


When Aparna put up a message on facebook calling bread baking enthusiasts together for a bread baking group,I was excited.As you may know,Aparna is someone whom I adore for her baking skills.Simple,no-frill recipes and delicious,gorgeous looking breads are her forte.I knew I was in safe hands.

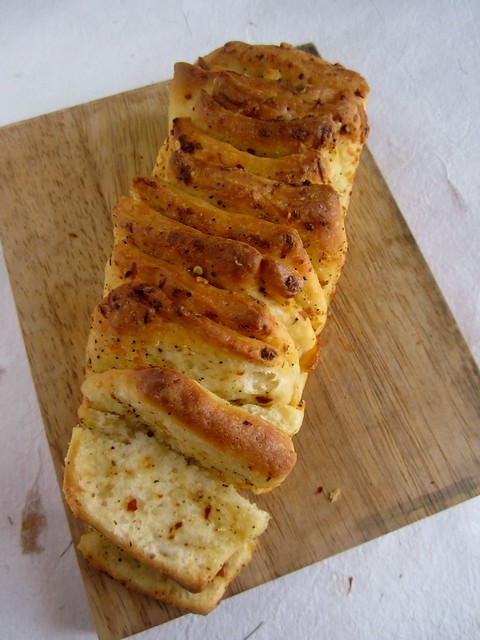
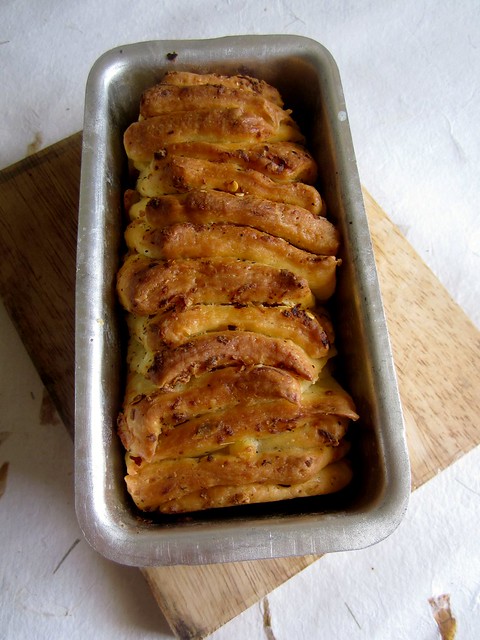
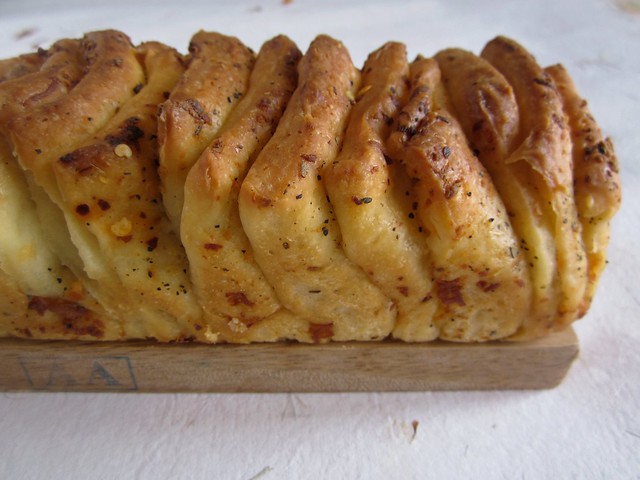 Herb & Cheese(Paneer) Pull-apart Loaf Bread
Ingredients
For the dough
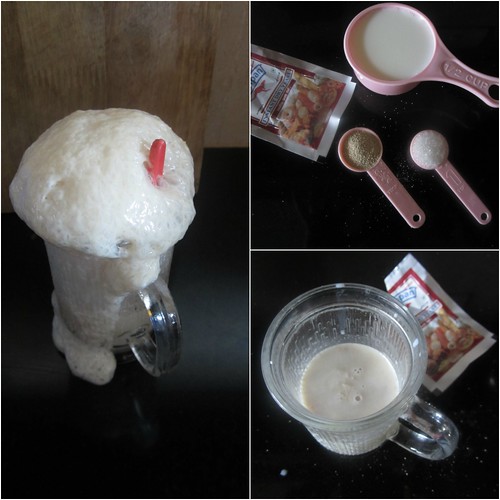
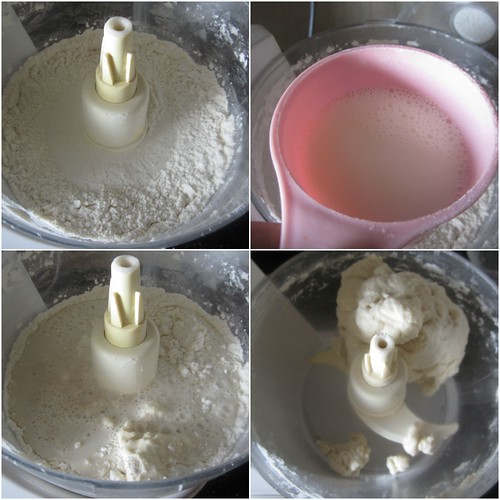
Warm milk - 1/2 cup
Sugar - 1 tsp
Active dry yeast - 2 tsp(I used Mauripan Yeast)
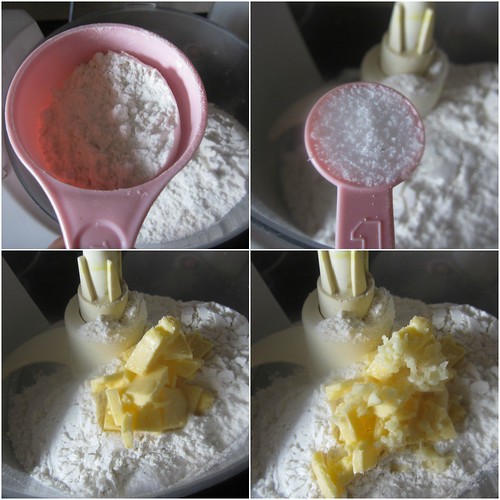
All purpose flour - 2 3/4 cups to 3 cups
Salt - 1 tsp
Butter - 25 gms,soft at room temperature
Garlic - 2 cloves,minced(or 1 tsp garlic paste)
Milk - 3/4 cup + a couple of tbsp to brush over the bread
For the filling
Melted butter - 15-20 gms
Mixed Italian herbs - 2 tsp
Chilli flakes - 1 tsp
Paneer - 1/2 cup,grated(or any cheese of your choice)
Method

Dust your work surface lightly with flour. Deflate the dough, shape it into a square and roll the dough out into a larger square that is about 12’ by 12”. Brush the surface of the square with the melted butter. Evenly sprinkle the herbs, pepper/ chilli flakes and then the grated cheese.
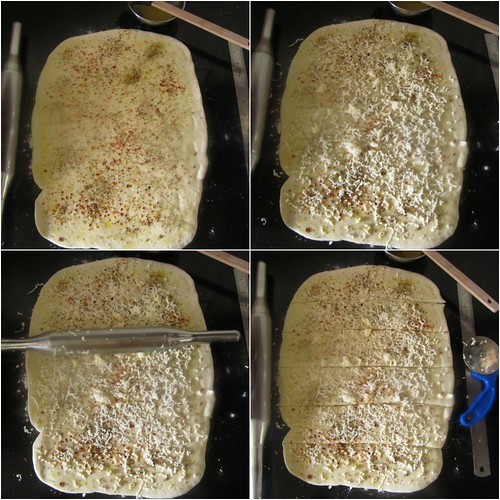
Use a rolling pin to very lightly press the topping into the dough to ensure the topping doesn’t fall off when you are stacking the strips.
Using a pizza cutter, slice the dough from top to bottom into 6 long and even strips – they do not have to be perfect. Lay each strip on top of the next, with the topping facing upwards, until you have a stack of the strips.
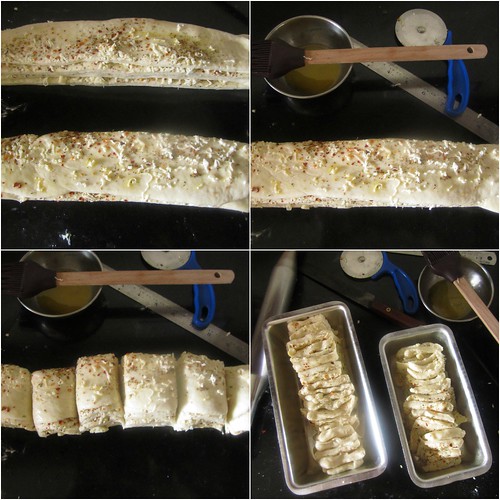
Grease and lightly flour a 9” by 4” (or 5”) loaf tin.Layer the square slices, cut sides down into the loaf tin.
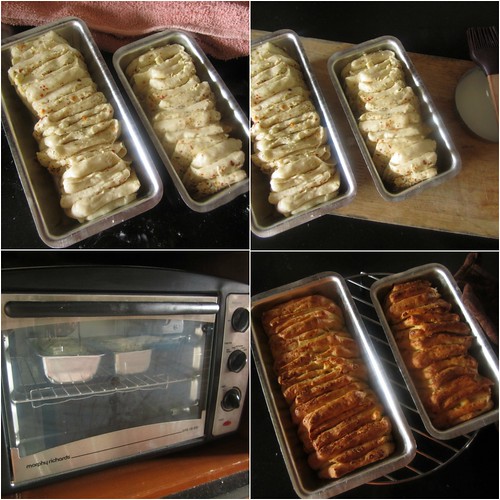
Bake the dough at 180C (350F) for about 30 to 40 minutes until it is done and the top is golden brown. This recipe bakes one 9” by 5” loaf.I used two smaller sized loaf tins.
- The filling can be of your choice-pesto,mint or butter-garlic or even sun-dried tomato,olives,caramelized onions-choices are aplenty.
- This versatile bread can be made into a sweet loaf too-just add 1/4 cup of sugar to the dough and proceed with the filling.Think Cinnamon-sugar,Orange marmalade-raisins,Chocolate chips and many more!


Beautiful bread, love the filling. Great baking together;you put a lot of faith in bread baking skills! :)
ReplyDeleteBread looks delicious. Nice step by step pictures and explanation.
ReplyDeleteSpill the Spices
Looks so beautiful divya...
ReplyDeleteGorgeous looking
ReplyDeleteWowie Divya... This bread loaf looks so gorgeous! I am definitely trying this.. and also am going to be following the We Knead to Bake series post out here :) Loved it!
ReplyDeletei particularly loved your second picture....I did not have the patience to roll the dough out in such a perfect rectangle and I had some peaks and ebbs. Now I shall have to learn from all of you!
ReplyDeleteWow..perfect beautiful looking loaf and loved the filling..
ReplyDeleteOh my god Divya how delicious does your bread look. So moist. Have to try your way of doing it and prefect it. Love your blog :)
ReplyDeleteDivya! Your bread looks absolutely delicious! It sure is a lot of fun baking with friends!
ReplyDeleteBeautifully done bread... I am just drooling here.. Perfect bake
ReplyDeletei am terribly hungry now!!!
ReplyDeleteLoved your step by step pictures. The bread is looking very delicious..!!
ReplyDeletethats awesome Divya, I am making Garlic pull apart :)
ReplyDeleteLooks delicious n awesome. Lovely clicks.
ReplyDeleteyour bread looks too tempting...yummy filling, loved baking together with u all :)
ReplyDeleteWow! And kudos to the step by step pics!
ReplyDeleteAnd the color of that bread, LOVELY! :)
They look so good, i especially like that yeast froth pic :-)
ReplyDeleteVery beautiful pull apart bread, terribly irresistible.
ReplyDeletelooks delicious! I love the yeast bubbling up pic! :)
ReplyDeleteLove the way your bread has turned out and which yeast do you use, it has proofed so much so checking.
ReplyDeleteI use Mauripan Yeast sachets.
Deletethe recipe is so easy divya....can we avoid putting garlic in the filling???? as i don't have a food processor can i do kneading of the dough with hands or won't it come out well???pls clear my doubts....
ReplyDeleteGo ahead and try it Sujata.Yes you can skip the garlic and add any filling/flavoring of your choice.It is easier to knead the dough by hand would be what my amma will say-no cleaning up the food processor when you all you need is just one big bowl to knead the dough!Do try and let me know!
Deletegreat idea to bake together! i love it :)
ReplyDeleteI will join the jing bang soon!! lovely stepwise divya..sooper patience! sooper bread!!
ReplyDeleteUr yeast has bubbled up beautifully. Loved ur pull apart bread. Beautiful!
ReplyDeleteBeautifully baked and i am eyeing on the yeast which has bubbled up so well. Great work
ReplyDeleteThis is beautiful...Love your step by step instructions. I am a newbie to this group and I am looking forward to baking this :)
ReplyDeleteI ve always feared food processors. But i think i just found some inspiration. Beautiful loaf!
ReplyDeleteLove the texture of your bread....guess I can use it as pillow...its so soft. Nicely done!
ReplyDeleteI love pull-apart bread! There's just something to it...and yours looks delectable!
ReplyDeleteAlso great step-by-step= instructions, makes it so easy to follow!
This was lovely, Divya.. just made it last night.. yea avoided using the food processor due to sheer laziness and the bread was still awesome.. thanks for your patience in putting up the step by step demo.
ReplyDeleteAwesome looking bread...
ReplyDeleteHello,
ReplyDeleteThis is a delicious recipe. I love your all recipes and successfully tried few of them.
I just want to know if this bread can be made with half all purpose flour and half whole wheat atta.
Also is there any supplement for yeast with same results?
Thanks
Priya
I have tried baking with half all purpose flour and half whole wheat flour with great results.However,when you do that it is recommended to add vital wheat gluten to the flour for better texture.When it comes to bread baking,there is no alternative for yeast:)
Deletedivya hi
Deletetried this ...with 50% whole wheat flour it turned out quite dense!!:( The following aspects I wld like to convey - do let me know where I cld have gone wrong:
1. Yeast - very freash - used 2 tsp
2. After the dough rose (added garlic, butter, salt and yeast) - I kneaded it and then rolled it out
3. The rolled out dough was abt 2-3 mm thick
4. Temperature setting was 180 deg - lowest shelf of oven (did preheating for abt 30 mts)
5. Rested the dough(cut and stacked) for an hour before baking
Used my hands to make the dough.I loved yours and wld be happy to try again - baking is new to me!! Thanx - girija
I am not sure why your loaf became dense because the process you mentioned seems perfect.I have tried baking with half all purpose flour and half maida and it has come out well.Keep trying and I am sure you can bake better bread than me:)
DeleteThanks alot dear for making my work so easy and i have followed the same steps and the bread was divine.. And i have given your link in my post:)
ReplyDeleteBeautiful bread!!Loved the step by step presentation. Have never dared to use the processor. Do you knead completely in the processsor or transfer it to a wooden board to knead?
ReplyDeleteThanks Veena.I was wary of kneading the bread dough in the processor toobut have taken to doing it totally in it now with great results.Quick and easy-only if the recipe calls for a long knead(knead for 5 minutes or so)I do it manually.
DeleteThanks a lot dear for your lovely post. Even I baked this bread by following your same steps but different ingredient's... I have given your link in my blog...
ReplyDeletehttp://www.spiceursenses.com/2013/01/pull-apart-bread-with-spicy-herbs-and.html?m=0
Lovely and such a perfect pull apart..love the detailed pics
ReplyDeleteDivya! Loo inning time! Good to be baking with you again!
ReplyDeletehello divya....tried out this bread yesterday....it came out more or less like the one u have made....i used cheese and coriander leaves as the filling and also did not add garlic and hand kneaded the dough..... ....my son simply loved it and it was finished yesterday itself....will surely make it again....thanks divya...:) :)
ReplyDeleteCheese and Coriander sounds yum.Glad you liked the bread!
DeleteMm, I love a good pull-apart bread! That looks AWESOME!
ReplyDeleteDelicious looking bread.. You've baked the bread in an OTG or a microwave convention oven? If OTG, then you've baked in the bake mode or in the toast mode where both the top and bottom elements are on??
ReplyDeleteThank you.As seen in the pictures,I baked this bread in my OTg-Morphy richards.I baked it in the bake mode with just the bottom coil on.
DeleteLovely recipe, I am new to baking and I am gonna try your recipes one by one!
ReplyDeleteQuick question about this recipe, do I have to preheat the oven? Then for how long?
you should preheat. if convection oven, 5 mins is enough, otherwise i guess 15 mins. so u preheat with the same temp u need for baking .
DeleteWould want to try this asp.Cant wait.
ReplyDeleteHi Divya,
ReplyDeleteI tried this recipe last weekend , the taste was great but the texture was like a chewy biscuit. I followed your recipe verbatim but feel there are some places where I would have prolly gone wrong. Could you kindly help me figure out?
1)I used the yeast brand solar but it didnt bubble up at all though i waited for more than 5 mins?
2) the milk used to pour over yeast wasnt warm enough. Does it matter?
3)I dont have food processor so hand kneaded the dough, should I knead it like how it is done for rotis?
Which yeast brand do u suggest as I feel yeast is the main culprit. I badly wanna get this right so that I can try all the bread recipes that I have bookmarked from ure blog. Thank you so much
If the yeast does not bubble up,it may either be inactive or the temperature of the water was too hot/too cold.
DeleteThe milk has to be warm enough,yes,to activate the yeast.Follow this method to make sure the liquid is just warm enough for the yeast.Dip you fingers and count until five.If you remove your fingers before that,the water is too hot and if you can keep it dipped longer,too cold.
You can knead the dough using your hands,just like for rotis.
I use and recommend the brand Mauripan.
Happy Baking!
HI Divya!!!! We share the same first name!!!
ReplyDeleteI have been reading ur recipies since few days and they all look so amazing........You show the steps alongwid photographs which is appreciable.
Shall be trying them soon.......
Divya
Hi divya.....
ReplyDeleteit looks wonderful.
i have a question...i don't have OTG, so can i use my microwave at convection mode for this n other bread recipes of urs?
Yes you can.I use both my MW and OTG for baking.
DeleteI love this bread and having just got a little comfortable with APF and yeast, was looking for a recipe for herb bread. I am happy that I found this and your step by step tutorial makes it so easy. Thankyou Divya. Will come back with the finished recipe.
ReplyDeleteI tried it out! !! Was divine! Made it with gouda cheese and methi and chilli curry flakes. Thanks for the recipe!
ReplyDeleteWas awesome! Made it for Christmas lunch! My first time baking bread and it came out perfectly! Thanks Divya 💜
ReplyDeleteWhat is the shelf life of baked bread divya?can i keep it for a day or two?
ReplyDelete