Monday, December 26, 2011

Baby Potato Biryani

Come Sunday morning and I am surrounded by a variety of smells in my kitchen.No not from my kitchen but the surrounding ones.While I am whipping up our late breakfast,I hear people pounding and mixing and getting ready to make their elaborate Sunday lunches.Most people I know make Biryani on Sundays mainly because it takes a long time to get done and people usually do not mind waiting to eat something as delicious as a Biryani.
IMG_6769 
Keeping this in mind,I decided I should try making something elaborate too.My Biryani and pulao is anything but elaborate,taking only about half an hour of my time and few minutes in the pressure cooker.So I chose this recipe from Prathibha's blog,which I had bookmarked ages ago.

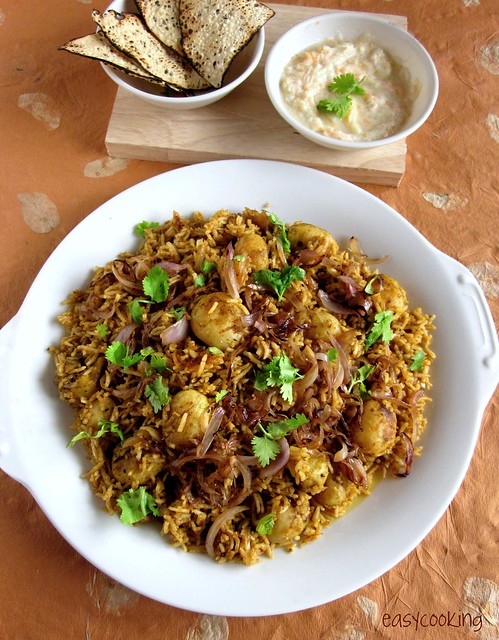
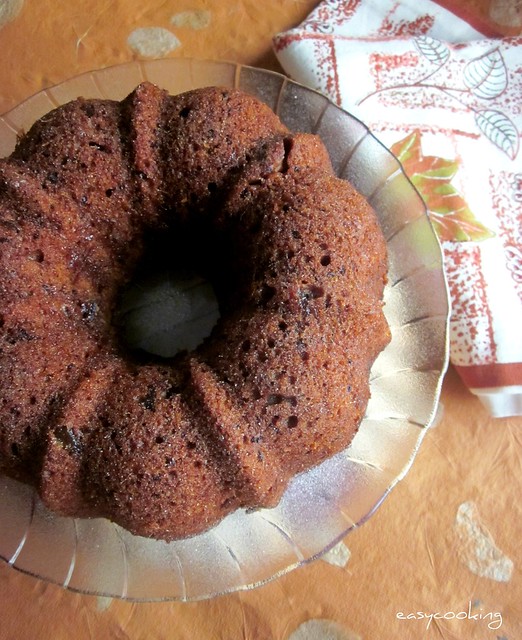
The Biryani by itself is delicious and paired with some simple salad and papad makes for a great meal.All I wanted after finishing my lunch was a long nap!

Baby Potato Biryani Recipe
Recipe source - Mallika Badrinath

Ingredients

Basmati Rice - 1 cup
Baby Potatoes - 200 gms(15-16 potatoes)
Onions - 2 big,thinly sliced
Fresh curds - 1/4 cup
Tomato juice - 3/4 cup,freshly extracted from 2-3 tomatoes
Water - 1 cup
Garam masala - 1/4 tsp
Fresh coriander leaves - 1/2 bunch(approximately 1 cup loosely packed)
1 tbsp chopped coriander leaves for garnish
Salt to taste
Oil - to deep fry/shallow fry
Ghee - 1 tsp

To roast and grind

Coriander seeds - 1 tsp
Red chillies - 4
Grated dry coconut -  2 tbsp
Green chillies - 2
Fresh Ginger - 1' piece
Oil - 1/2 tsp

IMG_6734 
Method


To prepare the rice

Wash basmati rice and soak in water for 10 mins.
Cook basmati rice with 1 cup water and 3/4 cup of freshly made tomato juice in cooker for 2 whistles or on stove top until the water is drained.
Fluff up the rice with fork and spread on a plate and cool the rice completely.Add a tsp of ghee and mix slightly.

To make the masala paste(1)

Grind washed coriander leaves to a fine paste.Beat the curds properly and add the ground paste to it and mix well.

Masala paste(2)

Heat 1/2 tsp oil and add coriander seeds,red chillies and fry until they change their color and add grated coconut and fry slightly.Cool these ingredients and grind along with green chillies and chopped ginger to a fine paste.

Prepare the baby potatoes and onions

Pressure cook baby potatoes for 1 whistle and simmer it for 4-5 mins or pressure cook for 2 whistles.
After the pressure goes down remove them and let them cool.Peel off the skins and pierce each potato with fork in 2-3 places.This helps in potato not to burst while frying.
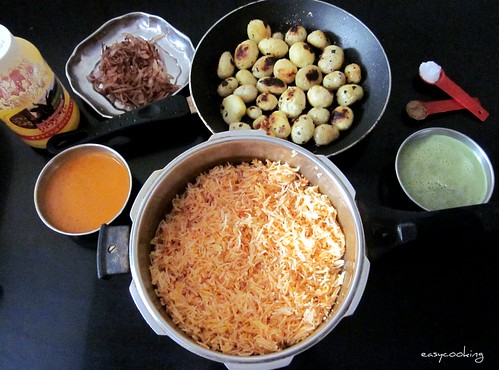
Heat oil in a deep heavy kadai and deep fry them over medium flame until they are golden brown in color.Drain them on a kitchen towel and keep them aside.You could also shallow fry the potatoes on a tawa.

Also deep fry thinly sliced onions until they are crisp and golden brown in color.Remove them and drain off excess oil in a kitchen towel and keep them aside.

Assemble the Biryani

Take 2 tbsp of oil from the pan and pour into another wide kadai and add ground masala paste and fry well until the raw smell goes away.
Add baby potatoes and half of the fried onions to it and mix well until the masala coats all the potatoes.
Reduce the flame and add curds(mixed with coriander leaves paste) and also add cooled cooked rice and salt and cover it and cook over low flame for 5-6 mins giving a dum to the rice which enhances its taste by absorbing all the flavors.
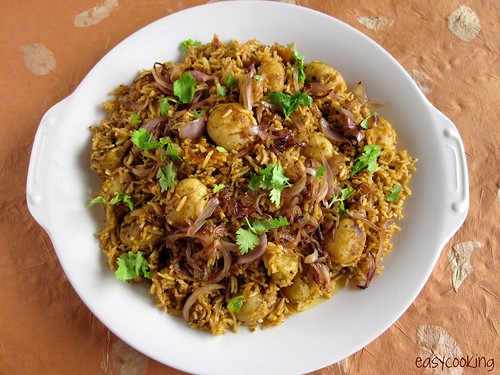
Remove the lid and mix everything properly.Add remaining fried onions and garam masala powder and mix well and switch off the flame.
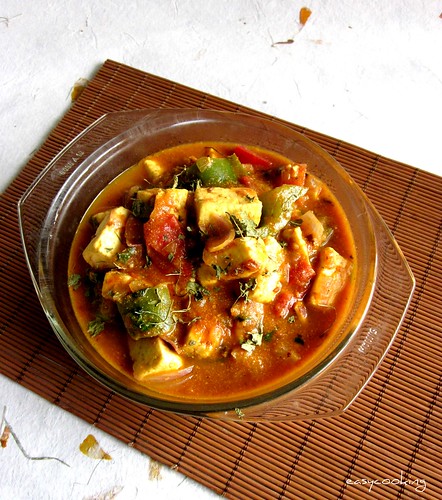
Garnish with chopped coriander and serve it hot with mixed vegetable raitha and papad.
IMG_6768
Notes

  • This Biryani is very mildly spiced,so make sure you use good quality garam masala,preferable homemade.You could also use whole garam masala and saute them before adding the masala pastes.
  • Ideally,the baby potatoes should be deep fried,but shallow frying on a tawa with some oil gives equally delicious results.
  • As with dishes of similar kinds,the biryani tastes better the next day.So make sure you keep some in a microproof box and reheat and eat it the next day for a tastier version:)


Wednesday, December 21, 2011

Crust N crumb Plum Cake Mix-Product Review

I seldom bake using cake mixes.Or rather if cake mixes were cheap(and good!)I'd have never learnt to bake.So it was with slight apprehension I got this packet of cake mix which was highly recommended by the shopkeeper at Staines,Ernakulam where I do my shopping for baking products,tins and other stuff.It has been almost 3 months since I got it and it would have definitely have gone unnoticed if not for the kitchen clean up during our shifting.
I have no clue if I'd be baking my yearly Fruit cake this year as I'd be neck deep in settling down in the new house and I have family visiting during Christmas.So I decided to try this anyway.It is quite easy to bake using a cake mix as you are basically required to mix everything together without all the weighing and sifting.


Have to say the cake batter smelt wonderful and I had high hopes about how the cake's gonna turn out.Not disappointing at all.Though honestly,it is no match to the meticulously made fruit cake but works out well as a substitute in a hurry.It is easier to bake this cake than to go out to bakery to buy one and it costs only 60rs!
I found the cake to be a little on the dry side but taste wise it was like those plum cakes you get off the shelves from bakeries.The taste improves as you keep it so make sure you bake the cake in advance if serving for guests.There are options to bake this cake in the microwave and also in the pressure cooker.
Check out their website for more info.


Disclaimer-This is not a paid review.I used this product and thought of sharing my experience with my readers.


Wishing all my readers who celebrate a very Merry Christmas.If you are looking to bake a fruit cake from scratch,do check out my archives and posts-


Christmas Fruit Cake - 2008
Christmas Fruit Cake - 2009
Christmas Fruit Cake - 2010

and here's an Eggless Version.Happy Holidays!!


Friday, December 16, 2011

Paneer Tikka Masala

I love my Paneer Tikka.Most of the times,it features on my order list when we dine out and by my own judgement,if the Paneer tikka is good,the main course would be awesome too.Recently,we had it at Dhabba Express,Cenotaph road and were licking our fingers,it was that good.
IMG_6927_picnik 
I wanted to recreate it at home one day for lunch but I had not marinated the ingredients ahead in time.So did a twist there and made this well recommended Paneer Tikka Masala from Vahrevah.The recipe is very simple to put together and works well even if you are in a hurry.I had prepared Jeera Rice and Raita and this made for a Jhakaas combo.
IMG_6929 
Paneer Tikka Masala


Ingredients
For the marinade-


Paneer - 200gms,cut into cubes
Capsicum - 1,chopped
Onion - 1,chopped 
Tomato - 1,chopped
Thick curd - 1/2 cup
Red chilly powder - 2 tsp
Kasoori methi - 1 tsp,crushed
Salt to taste
Lime juice - 1 tsp
Oil - 1/2 tsp


For the gravy


Oil - 1 tsp
Cumin seeds/Jeera - 1/2 tsp
Onion - 1 big,chopped
Ginger garlic paste - 1 tsp
All purpose flour/maida - 1 tsp
Tomato puree - 3/4 cup(puree 2 medium tomatoes to get this amount)
Coriander powder - 1 tsp
Cumin powder - 1/2 tsp
Red chilly powder - 1/2 tsp
Garam masala - 1 tsp
Water - 1 cup
Coriander leaves - 1/2 cup,chopped


Ingredients
Mix together the ingredients for the marinade,starting with curd,chilly powder,kasoori methi,salt,lime juice and oil.
Tip in the cut vegetables and mix well,keep this aside to marinate for 15 minutes or so till you prepare the gravy for the curry.


In a kadai add oil and crackle cumin seeds.Tip in the chopped onions and saute till they start turning golden.Add a pinch of turmeric and ginger garlic paste.
Add maida and keep stirring.Cook it for 3-5 minutes till the raw smell of maida and ginger garlic paste disappears.


Simultaneously,in a flat tawa add a tsp of oil and saute the marinated vegetables till they get cooked and browned evenly on both sides.
Add tomato puree to the sauteed onions and mix well.Mix in coriander powder,cumin powder,garam masala and saute till you see oil floating on top.Add water and let the whole thing come to a boil.Simmer for a while,about 5 minutes.


Add the roasted vegetables and paneer to the boiling gravy and mix well.Check seasoning.Cook for 5-7 minutes and garnish with freshly chopped coriander leaves.


Monday, December 12, 2011

The Pasta Bar Veneto,Chennai-Restaurant Review

We've been in love with pasta for a while now.After shoving it aside and refusing to taste it,we've come to a stage where we do not mind having it for dinner at least twice in a week.I think we are making up for the lost time:)
Picnik collage 
However,we were not too fond of Pasta served in restaurants(whenever we tried).Having taken a liking to it,we had specific tastes as to how a perfect pasta should be.With these thoughts in mind,we decided to check out the exclusive Pasta restaurant aptly named The Pasta Bar Veneto,which came in highly recommended by a dear friend.
We went to the Alsa Mall outlet where we sat facing the popular sandwich carts hoping that our pasta did taste better than those sandwiches and we were not disappointed.The restaurant has a quaint neighbourhood cafe feel.The menu is quite extensive with lots of choices to choose from for both vegetarians and non-vegetarians.It takes a while to pronounce those names though.
We ordered for a salad named Instalata Mista and loved it.Reminded us of those lovely platters of salads from Pizza Hut(Do they serve it now?).Crunchy lettuce with roasted bell peppers,olives and zucchini,it was a treat to the palate.The accompanying Garlic bread was just about ok though.Again,I love the ones they serve in Pizza hut.
                                       Malai Curry di Verdure
I chose to have Pasta Indian style.Farfalle pasta with fresh green peas,capsicum,broccoli and sweet corn in a cashewnut based malai gravy.Yeah,I know the choice is strange.Ajay frowned when I ordered but it turned out fine.I love my pasta and the accompanying sauce as well so was slightly disappointed with the almost-dry looking pasta but the flavors were awesome.The portion is quite huge and I couldn't finish it all my own.I had ulterior motives here as I wanted to dig into the dessert section!
For dessert,I had absolutely no doubts what to choose.The oh-so-popular Mud pie.Loved the way they recommended it to us.If you are a chocoholic like us,you'll flip on this one.Chocolate and chocolate all the way through.Perfect way to end the meal.
A meal for two with salad,two main dishes(including non-veg)and a dessert would cost approximately 700-900 INR.They do home delivery in specific locations too.

Food - 8/10
Ambience - 7/10
Service - 8/10

The Pasta Bar Veneto is at -

Egmore: 1st Floor, Alsa Mall, Egmore, Chennai. Ph 044 4214 5534. 

T.Nagar: 32 / 59, Burkit Road, T.Nagar, Chennai. Ph 044-4212 6680. 

Disclaimer-This is not a paid review.I liked the restaurant and thought of sharing my experience with my readers.

Thursday, December 8, 2011

Eggless Dates-Fruit and Nut Cake

Blink and it is December already!I've been planning so much for the 'first week of December' since last few months and now that it is here,I am caught unawares.Let me elaborate.We are finally shifting to our own abode by this weekend and I am excited as ever.But all the packing and disposing stuff is taking up most of my time.
IMG_7005 
Blogging,blog-hopping,even baking has taken a back seat.I had decided to bake this cake much early than this and schedule the post but see what happened.I saw Sweet Punch posts popping up all over the blogosphere and I was jolted out of my daydreams.Luckily,I had decided on this recipe so everything happened quite fast.Baked this cake yesterday night and posting it here now.
Picnik collage3 
This would probably be my last bake in my present kitchen and last bake of the year too.Can't wait to set up stuff in my new kitchen and start baking and blogging from there:).


Dates Cake is a constant bake in my home,here and in Ernakulam.The nutty taste with the delicate flavor of dates is a winner.So I was eager to see how this new recipe would turn out.I modified the recipe a bit by adding grated carrots and chopped nuts into the cake making it a fruit and nut cake.Check out the video here by Lakshmi Nair.
Eggless Dates Fruit and Nut Cake Recipe
Recipe source - Lakshmi Nair


Ingredients


Seedless dates - 200gms,chopped fine
Carrot - 1 medium,grated
Mixed nuts - 50 gms(I used Cashews,Almonds and Walnuts)
Sugar - 1 cup
Garam Masala* - 1 rounded teaspoon
Oil - 1/2 cup
Water - 2 cups
Flour - 2 cups
Baking soda - 2 tsp


Method


In a thick bottomed saucepan,mix in the dates,carrot,mixed nuts,sugar,garam masala,oil and water.Bring to a boil and then simmer for 5 minutes.
Switch off the flame and cool to room temperature.
Sift together flour and baking soda.
Mix the sifted flour with the cooked date mix and beat with a wooden spoon till you get a smooth batter.
Preheat oven to 180C.Grease a 6 cup Bundt tin**.
Pour the batter into the prepared cake tin and bake for 30-35 minutes or until a toothpick inserted into the center of the cake comes out clean.
Cool on a wire rack.


Notes
  • *Garam masala in a cake is a unique trick I learnt from Deeba of PAB.I assure it would not give out a curry taste.The flavor of the mixed spices elevate the cake to a fruit cake level.Of course,you'd have to use homeground garam masala.The readymade ones give out a funny taste.
  • You could make your own masala for this cake by powdering together 3 cloves,1/2' stick cinnamon and 1 cardamom.
  • **I have used a Bundt tin here,you could use an 8' round or a 9' square cake tin.

Saturday, December 3, 2011

Beansaa Talasani/Beans stir-fried with Garlic

One thing I wasn't prepared for after marriage into a South Canara(Mangalore)family was the extensive use of Garlic.Here I am,from a typical amchi household where we didn't even cook with onions even!Of course after I started cooking North Indian and Chinese dishes(without Garlic of course),onions did a slow entry into our house,but Garlic was a no-no.
IMG_6599 
I realized that garlic is something I'd never fall in love with.

To start with,the pungent flavour kind of puts me off and the fact that most of the times,it is added as whole cloves into a curry or stir-fry(as opposed to paste or minced garlic)was a further bummer.Ma-in-law completely understands my plight and removes a portion aside for me before adding the whole garlic tadka.


Ajay,on the other hand loves garlic.I mock him sometimes saying that even if I made a garlic stir-fry,he'd eat it with full gusto.So I guess you'd know by now that this stir-fry is a garlic loves delight.Simple beans stir-fry elevates to a different level when made this way.Don't go by my word,if you like garlic,you'd love this for sure.


Beans Talasani Recipe


Ingredients


Beans - 1/4 kg,ends cut and side strings removed
Red chillies - 2-3,roughly cut
Whole garlic cloves - 5-6(or more,if you like-keep the peels),crushed slightly
Oil - 2 tsp
Salt to taste


Method


Chop the beans side wise into even pieces.
In a kadai add oil and saute the garlic cloves in it till they start turning brown.Mix in the chillies and saute for a minute.
Tip in the beans,add salt to taste,sprinkle a few tbsps of water.
Cover with a lid and cook for 5-10 minutes or till the beans are cooked.
Serve with rice and dal.


Notes
  • Talasani is the generic name for stir-fries using garlic as tadka/seasoning.Beans can be replaced with yard long beans,gherkins or any vegetables of your choice.
  • Of course,if you are like me and do not like garlic,skip the garlic and make a tadka using mustard seeds and red chillies.The stir-fry would still taste great!

Wednesday, November 30, 2011

Maggi Bhuna Masala-Product review

Most of the times,when required to make a North Indian gravy one thing which puts me off is the whole onion-tomato slicing-sauteing and the grinding part.Of course,when I feel like eating something badly,nothing looks like an effort.But for those lazy times,Maggi Bhuna masala is the perfect answer.
There are two varieties available.One with ginger-garlic and one without.They say the onions and tomatoes are sauteed using just 1 spoon of oil,a relief for us who think a lot about the fat content in packaged foods.Maggi is a trusted brand in India,so this one was on my must-try list.I got around 5-6 packets and decided to explore the possibilities,fueled by the ads.
I made Dal Tadka using the Bhuna masala for Vegetables/Dal and was pleasantly surprised.I haven't tried making anything else with dal other than the usual yellow dal or dal tadka.This one had a typical dhaba kind of taste to it.I don't know if I'd try it again using homemade ground masala,but it tasted good with rotis and I guess that's what counts.
Speaking of rotis,how can a tomato fry with vegetables fall behind?I resort to good ol' tomato fry whenever there's a dearth of vegetables or I am too lazy to try something elaborate.Using the bhuna masala for vegetables,I added tomatoes,green peas and capsicum and gave a li'l twist to our regular tomato fry.It was a bit too tangy for Ajay but perfect for me to mop up those rotis.
Next recipe I tried was Rajma masala.We both love Rajma masala and I had high hopes from the same dish made with bhuna masala for gravies.I loved the final dish but felt the masala was not enough for the Rajma dish if it was to be served for a family of four.It was just sufficient for us.Ok,I could just go ahead and add two packets and more Rajma,but just saying.
Mention north Indian and how can we forget Paneer.I wanted to try out Paneer butter masala but the Paneer matar they showed in ads was too tempting and I decided to try just that.I am amazed by the ease in which we can make this delicious dish in just 15 minutes or less if you have Paneer and frozen green peas ready in the fridge.(sorry for the straight out of the pan pic!)


Check out their site for more recipe ideas and more info about the product.


This is not a paid review.I used and liked this product and just thought of sharing it with my readers.


--------


For my readers who love their cup of coffee,Times deal have an amazing offer of Buy any beverage and Get another one absolutely Free @ Barista Lavazza. This deal is available Pan India.


Friday, November 25, 2011

Eggless Tiramisu Cake

Tiramisu,the name itself evokes a sense of wanting doesn't it?After a long long wait,I finally tasted my first Tiramisu a couple of days back.I have come across the name on many different menus across restaurants in Chennai but was apprehensive to try.I didn't want the first impression to be a damp squib.After hearing quite a number of good reviews,I had mine at The Pasta Bar Veneto and fell in love with it.
IMG_6886_picnik
Remember the Tiramisu Cake we baked a while back?I wanted to try it again coz I am yet to muster up courage to make the real deal.Making Mascarpone cheese at home is such an easy task that you tend to forgive the gourmet stores who do not stock up on it:).I decided to go eggless this time.So an Eggless Tiramisu cake it is,even though it sounds like an Oxymoron for sure:)

The first part is making the sponge cakes.I made the never-fail eggless sponge cake recipe which I've tried here.Of course,making Mascarpone cheese on your own is only for us deprived souls who do not get to buy it off the shelves.But let me tell you,it is so worth it!
IMG_6872
 Eggless Tiramisu Cake Recipe
(Original recipe from Baking From My Home To Yours)

Ingredients

For the Cake(Double the recipe or bake two cakes.I made one plain cake and one with Coffee flavor)

All purpose flour – 1¼ cups
Cornflour - ¼ cup
Thick curd – 1 cup
Sugar – ¾ cup
Refined oil – ½ cup
Baking powder – 1 tsp
Baking soda – ½ tsp
Vanilla essence – 1 tsp


Preheat oven to 180C.


Grease an 9’ round cake tin.
Beat together sugar and curds well.
Add baking powder and baking soda,mix well and keep aside for 2-3 minutes.
Bubbles will start appearing on top-add oil and vanilla essence and beat well.
Mix in the flour 1 tbsp at a time and make a smooth batter.
I added a tsp of cocoa powder to 1/3 of the batter and then swirled it together with the yellow batter for a marbled effect.
Bake for 30-35 minutes or until a toothpick inserted comes out clean.

For the espresso extract:


2 tablespoons instant espresso powder
2 tablespoons boiling water
Stir the espresso powder and boiling water together in a small cup until blended. Set aside

For the espresso syrup:

½ cup water
1/3 cup sugar
1 tablespoon amaretto, Kahlua, or brandy[I skipped this,added a tsp of Vanilla essence instead]

Stir the water and sugar together in a small saucepan and bring just to a boil. Pour the syrup into a small heatproof bowl and stir in 1 tablespoon of the espresso extract and the liqueur or brandy; set aside.

For the filling and frosting:

1 8-ounce container mascarpone (store-bought or homemade)
½ cup confectioners’ sugar, sifted
1
½ teaspoons pure vanilla extract
1 tablespoon amaretto, Kahlua, or brandy[I skipped this]
1 cup cold heavy cream
½ ounces bittersweet or semisweet chocolate, finely chopped, or about ½ cup store-bought mini chocolate chips[I used chopped chocolate]

Put the mascarpone, sugar, vanilla, and liqueur in a large bowl and whisk just until blended and smooth.
Working with the stand mixer with the whisk attachment or with a hand mixer, whip the heavy cream until it holds firm peaks. Switch to a rubber spatula and stir about one quarter of the whipped cream into the mascarpone. Fold in the rest of the whipped cream with a light touch.

To assemble the cake:

If the tops of the cake layers have crowned, use a long serrated knife and a gentle sawing motion to even them. Place one layer right-side up on a cardboard round or a cake plate protected with strips of wax or parchment paper. Using a pastry brush or a small spoon, soak the layer with about one third of the espresso syrup. Smooth some of the mascarpone cream over the layer – user about 1 1/4 cups – and gently press the chopped chocolate into the filling. Put the second cake layer on the counter and soak the top of it with half the remaining espresso syrup, then turn the layer over and position it, soaked side down, over the filling. Soak the top of the cake with the remaining syrup.

For the frosting, whisk 1 to 1 1/2 tablespoons of the remaining espresso extract into the remaining mascarpone filling. Taste the frosting as you go to decide how much extract you want to add. If the frosting looks as if it might be a little too soft to spread over the cake, press a piece of plastic wrap against its surface and refrigerate it for 15 minutes or so. Refrigerate the cake too.

With a long metal icing spatula, smooth the frosting around the sides of the cake and over the top.Stick chopped chocolate pieces on the sides and do a doodle design on top if desired.I piped some swirls with some chocolate ganache.
Picnik collage 

Refrigerate the cake for at least 3 hours (or for up to 1 day) before serving – the elements need time to meld.

I know the recipe can fill up pages,but if you attempt each element on its own,it is not so difficult.Only a matter of making a sponge and the filling,that's it,easy isn't it?Hope you try this piece of heaven,it truly is!

Saturday, November 19, 2011

Eggless Chocolate Chip Cookies

IMG_6851_picnik
Disclaimer - This is not the authentic recipe for chocolate chip cookie.I have put forth my version here which is just a basic butter cookie adorned with chocolate chips.

I have not tasted the so-called 'authentic' chocolate chip cookie.From what I've heard,it is a chewy cookie full of chocolate chips and is out of the world.The closest I've come to taste these are in the form of Hide and seek biscuits or Good Day chocolate chip biscuits.
IMG_6861 
I used to bake and try a new cookie recipe at least once in a week during my initial baking days.But as they say,once you hit bulls eye then whenever you are required to bake it,you tend to go back to the trusted recipe.Absolutely no harm in that but I feel it makes you biased towards new recipes.What I am saying is that,though I've always wanted to try out an authentic version of the same,the ease of this recipe and the taste stops me from trying it.


Eggless Chocolate Chip Cookies Recipe

Ingredients(makes 24-26 cookies)

Butter(softened) - 1/2 cup/100gms
Powdered sugar - 1/2 cup(Cinnamon sugar or Vanilla sugar can also be used for great results)
Flour - 1 cup
Cornflour - 1/2 cup
Chocolate chips - 1/2 cup

Method

Cream together butter and sugar with a fork or wooden spoon till it becomes creamy.

Mix in flour,cornflour and chocolate chips.Knead softly to form a smooth dough.
Keep aside for 5-10 minutes then form smooth balls(lime sized) and place on an ungreased cookie tray.
Bake for 20-24 minutes or till done.
Cool on a wire rack and store in air tight containers.

IMG_6859 
Notes
  • Basic recipe of this cookie can be tweaked to make different types of cookies.You could add orange zest or coffee extract to make it taste different.
  • The amount of butter to flour ratio is a bit less,so you might have to add a tsp or so milk if the dough doesn't come together.Take care not to add too much liquid since this tends to make the cookie hard.
  • The amount of baking time given is for chewy-in-the-middle and crunchy-on-the-sides type of cookie.If you want crunchier cookies,flatten them a little before baking a bake for an extra two minutes.
  • You could also replace 2 tbsp of cornflour with cocoa powder and add white chocolate chips in place of milk chocolate chips for an opposite version of the same recipe.
-----
On another note,thanks to all of your support and encouragement,the Plagiarism issue is sorted out now.The blog is shut down by Google since it contained copied recipes from many blogs.A special thanks to Nags of Edible Garden for the timely help.


Tuesday, November 15, 2011

Coffee Chocolate Chip Bundt Cake

I like the ease at which I bake cakes these days.Must be practice,no kidding!!Earlier,though I loved to bake the initial procedure of measuring,sifting,baking and cleaning up after that was something I did not look forward to.But now it happens in a flow.I zero in on a recipe,take out my bowls and beater and in less than 10 minutes I've got everything ready and the cake inside the oven.
IMG_6783 
I had decided to bake for the (Inter)National Bundt day two days back.Home alone on Sunday,I thought I had all the time in the world till when at roughly around 2,I realized I hadn't baked the cake yet.Since the recipe was already chosen,I just had to whip it up and the cake got done in less than an hour and I was pleased with myself:)

The recipe is a small variation from the super-reliable recipes of Deeba,Lime Buttermilk Pound cake.The Chocolate version as well as the Mango version were super hits and I knew this one would be one too.I had made this sometime back for a coffee-loving friends birthday.Love the combination of coffee and chocolate,just like this one.
IMG_6797 
Coffee Chocolate Chip Bundt Cake
Recipe source - Deeba


Ingredients


Plain flour - 1 1/2 cups
Baking powder - 1/2 tsp
Baking soda - 1/4 tsp
Salt - 1/2 tsp
Unsalted butter, room temperature - 1/2 cup
Vanilla or plain sugar - 1 cup
Eggs - 2
Buttermilk {or substitute recipe below}- 100 ml
Pure vanilla extract - 1 tsp

Instant Coffee powder - 1 tsp(I used Bru)
Warm water - 1 tsp
Chocolate chips - 1/4 cup
Cinnamon powder - 1 tsp(optional)


To make buttermilk substitute at home:
Take 100ml milk at room temp; add 1 tsp white vinegar. Let it stand 5-10 minutes. When it curdles, it's ready.


Method


Preheat oven to 170C.
Grease and flour a 6 cup Bundt pan well.(make sure you grease the crevices well for easier release of the cake from the pan)
Sift the flour with the baking powder, baking soda and salt. Reserve.
Mix together instant coffee and warm water.Keep aside.
Cream the butter and sugar. Beat in eggs one at a time, followed by the vanilla extract and coffee mixture.
With beater on low add the flour and buttermilk alternately in three lots.
Mix chocolate chips with a tsp flour and fold it into the batter.Mix in the cinnamon.
Bake for 50-60 minutes till golden brown on top, and the tester comes out clean.
You could top it with powdered sugar or a glaze.I had some leftover ganache in the fridge and swirled it on top with some silver dragees.Wait for the cake to cool down completely before cutting to get neat slices.IMG_6787
Have you baked a Bundt for (Inter)National bundt day yet?If you do,send it to Mary-The Food Librarian who will be sending a cute I Like Big Bundts button to everyone who participates.

Related Posts Plugin for WordPress, Blogger...
 
Pin It button on image hover