


When it comes to baking,my style is a bit erratic.There will be days when I bake every single day,even more than once.More often than not,I'll be baking batches of Vanilla Cupcakes and Nankhatais(among those few recipes which I know by heart)and distributing them to friends.And then there are those days my ovens get a cobweb on them(not literally!)
Today,all of a sudden,I had the urge to bake.I almost got everything ready to make a Butter cake when Ajay suggested something savory.When it comes to savory bakes,these Garlic rolls win hands down.I've always had success with the recipe and to an extent,it helped me tame the yeast.As I was prepping,I decided to go with a different filling this time.
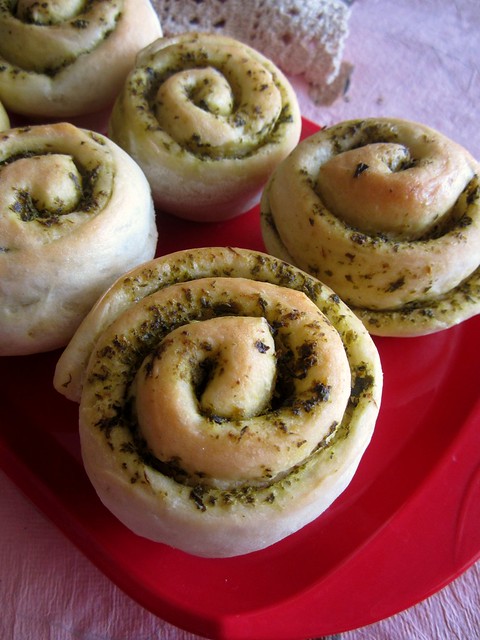
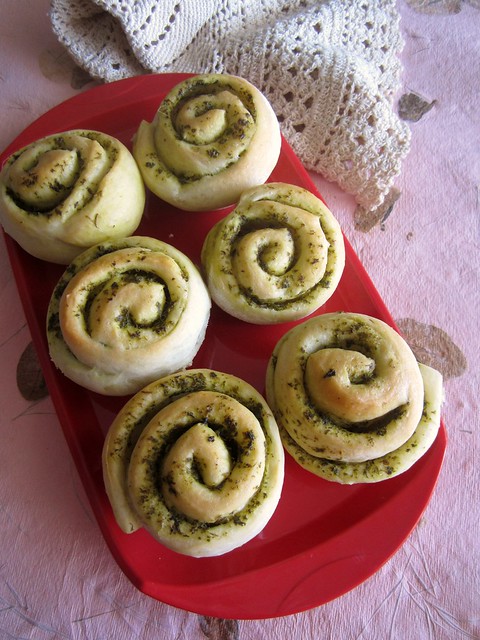
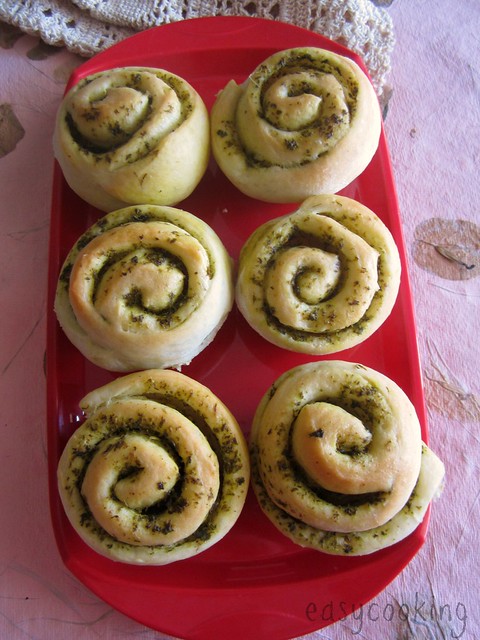
Mint was never a favorite herb of mine,somehow it always reminded me of toothpaste,yikes I know that sounds gross!But ever since I set up a miniature herb garden and saw those mint leaves sprouting beautifully,I've developed a new-found love for mint.So mint it was!Made a simple mint filling and crossed fingers for the end product.The rolls,as usual,were soft and fluffy and the mint filling worked wonderfully.
Spiral Mint Rolls
Recipe for the roll adapted from here;filling recipe,my own
Ingredients
Flour/maida - 1 1/2 cups
Warm water - 1/2 cup
Yeast - 1/2 tbsp
Salt - 1/2 tsp
Sugar - 1 tbsp
Olive oil - 2 tbsp
For the mint filling
Mint leaves - 1/4 cup,chopped
Coriander leaves - 1/4 cup,chopped
Green chilly - 1
Lime juice - 1 tsp
Salt to taste
Salted butter - 1 tbsp + more to grease the pan
Method
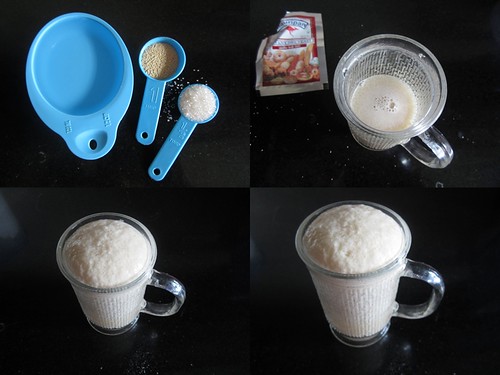
Mix together warm water,sugar and yeast in a bowl and let it proof for about 5-7 minutes.It should bubble and froth up within minutes,if not start afresh.

Mix together flour,salt and yeast mix till you get a slightly sticky dough.
Add oil and knead for 5-7 minutes till you get a smooth dough.

Cover the dough with a cling film or a kitchen towel and allow to proof for 40-45 minutes.
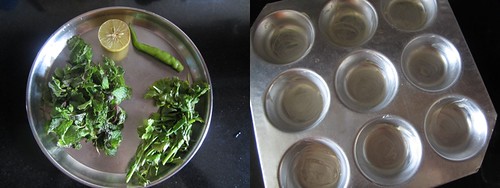
Make the filling-grind together the ingredients for the filling in a mixer jar until you get a smooth paste.
Grease a 9 hole muffin tray-you could use a round tin too.
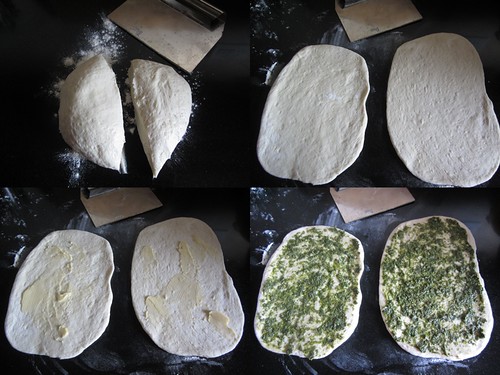
Knock down the air in the dough and divide the dough into two equal portions.(I divided the dough into one big and one small portion since I wanted nine rolls)
Roll from one end as you would for a swiss roll.

Today,all of a sudden,I had the urge to bake.I almost got everything ready to make a Butter cake when Ajay suggested something savory.When it comes to savory bakes,these Garlic rolls win hands down.I've always had success with the recipe and to an extent,it helped me tame the yeast.As I was prepping,I decided to go with a different filling this time.
Mint was never a favorite herb of mine,somehow it always reminded me of toothpaste,yikes I know that sounds gross!But ever since I set up a miniature herb garden and saw those mint leaves sprouting beautifully,I've developed a new-found love for mint.So mint it was!Made a simple mint filling and crossed fingers for the end product.The rolls,as usual,were soft and fluffy and the mint filling worked wonderfully.
Spiral Mint Rolls
Recipe for the roll adapted from here;filling recipe,my own
Ingredients
Flour/maida - 1 1/2 cups
Warm water - 1/2 cup
Yeast - 1/2 tbsp
Salt - 1/2 tsp
Sugar - 1 tbsp
Olive oil - 2 tbsp
For the mint filling
Mint leaves - 1/4 cup,chopped
Coriander leaves - 1/4 cup,chopped
Green chilly - 1
Lime juice - 1 tsp
Salt to taste
Salted butter - 1 tbsp + more to grease the pan
Method
Mix together warm water,sugar and yeast in a bowl and let it proof for about 5-7 minutes.It should bubble and froth up within minutes,if not start afresh.
Mix together flour,salt and yeast mix till you get a slightly sticky dough.
Add oil and knead for 5-7 minutes till you get a smooth dough.
Cover the dough with a cling film or a kitchen towel and allow to proof for 40-45 minutes.
Make the filling-grind together the ingredients for the filling in a mixer jar until you get a smooth paste.
Grease a 9 hole muffin tray-you could use a round tin too.
Knock down the air in the dough and divide the dough into two equal portions.(I divided the dough into one big and one small portion since I wanted nine rolls)
Roll one half of the dough on a floured surface using a rolling pin to a rough rectangle.
Spread about one third of the mint filling on one side.
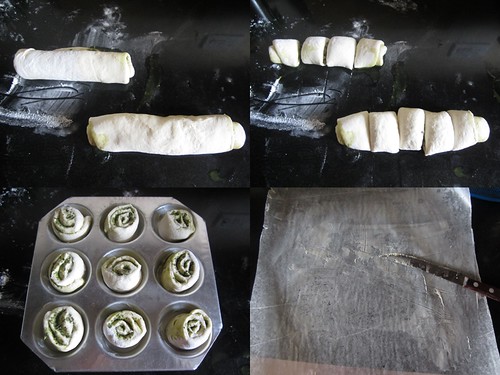
Roll from one end as you would for a swiss roll.
Cut the roll into half and further into two making it four rolls.Repeat with the other half.
Now place the rolls with the cut side up in the greased pan.
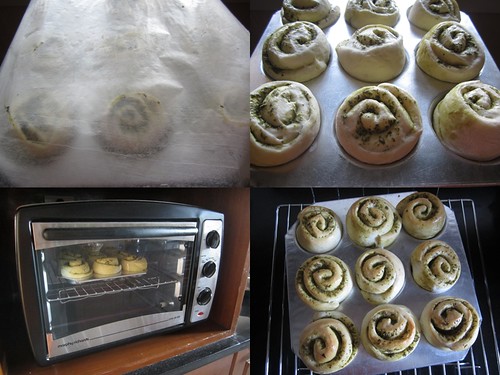
Cover with a greased wax paper/aluminium foil.Allow to rise for another 20 minutes.
In the mean time preheat the oven to 180C / 375F.
Cover with a greased wax paper/aluminium foil.Allow to rise for another 20 minutes.
In the mean time preheat the oven to 180C / 375F.
Bake for 20-25 minutes or till the top has become golden brown.
- I have used salted butter to slather on the bread before rolling,if you use unsalted butter,increase the quantity of salt added.
- My rolls didn't brown very well - I usually switch on the broiler mode(in my OTG) after the regular baking cycle but couldn't do so this time as there was the regular hourly power cut.The rolls were perfectly cooked though.


wow cute luking rolls,loved this savory minty version...sure will give a try...btn yeast testing pic is amazing...
ReplyDeleteRolls are my new family's favorite too. Just made a batch yesterday with just garlic butter. Your mint version is tempting me and I love the idea of arranging them in a muffin pan instead of making them as pull apart rolls which some times struggle to pull apart neatly :P Will follow your idea next time I bake them :)
ReplyDeleteDivya I tried them wid pesto as well and they taste delicious,but I hv not tried wid mint..I love mint flavor in cooking except those mint candys what we get in shops.
ReplyDeletePesto is next:)
DeleteRolls look so tempting :-)
ReplyDeleteshrutirasoi
Today's Recipe
Mirchi Bajji (mirchi ka pakora)
Baking them in muffin pans is a novice idea :-) Really easy way to get individual rolls
ReplyDeleteLove the idea of baking in muffin tins....rolls are looking damm yum....love the minty touch...
ReplyDeleteThe rolls look so beautiful..perfect with my evening cuppa!
ReplyDeleteVery flavorful minty roll.
ReplyDeleteCuisine Delights
My Monthly Event - Spotlight : "Healthy Snacks"
Looks soft, delicious and flavourful. Divya, kudos to your step by step pictures :) way to go!
ReplyDeleteLooks delicious. makes medrooll/
ReplyDeletelooks so delicious and nice clicks dear... bookmarked it...
ReplyDeleteVIRUNTHU UNNA VAANGA
awesome breakfast rolls for me bookmarked :)
ReplyDeleteVery new rolls.
ReplyDeleteSuper tempting rolls divya. They turned out well,i always mess up whenever i make rolls. Thanks for the stepwise pics, will try soon
ReplyDeleteLove these rolls. My all time favorite.
ReplyDeleteMint rolls,they came out prefectly..I dont mind having some.
ReplyDeleteHi Divya,
ReplyDeleteIt's a great recipe!
Don't you know that you can store and share your recipe with more than 13,000 foodies around the world?
We have an online cookbook and community, and surely we're always looking for more creative recipes to add to our database.
www.mycookbook.com
These rolls look delicious. I have yeast phobia, but I'm bookmarking this to try!
ReplyDelete