Wednesday, March 28, 2012

Pazham Pori / Ethakkappam - Banana Fritters

IMG_0822
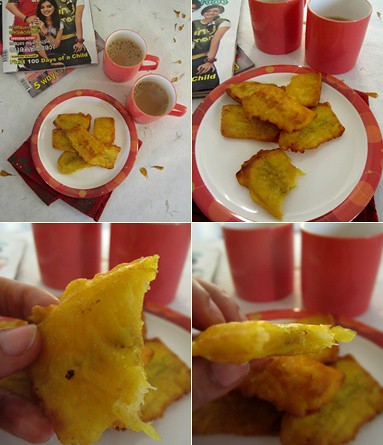
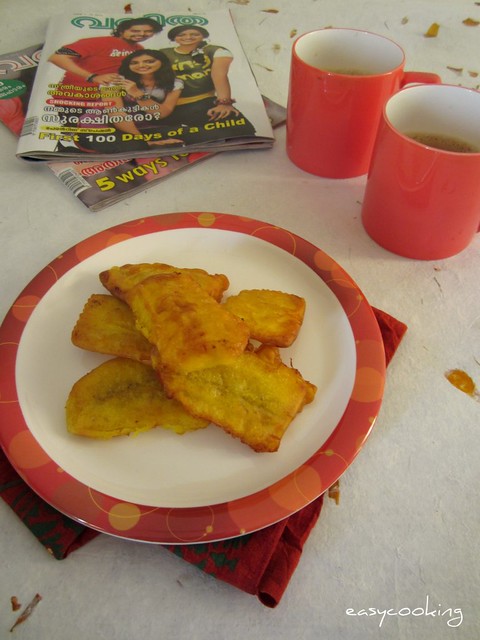
I was confused what to name this favorite of mine.Ever since I remember we used to say Pazham pori and nothing else.These days I am hearing the name Ethakkappam more often and hence thought will add it in the title too.Whenever I make this(and I make it once in a fortnight at least)I think I should blog about this.But since 99% of the time,I'll be making it to pair with tea and we just cannot wait to start eating it piping hot,right from the kadai to the plate,it keeps getting postponed.


One more reason I wanted to blog about this was the ingredients.Most of the recipes I've come across use Maida or all purpose flour as the coating for deep frying.My friend mixes atta along with maida for a healthier version(although it is deep fried!).
IMG_0811_picnik-tile 
Amma uses rice flour,yes that's right.No prizes for guessing I follow her recipe too.I asked her how she came to using rice flour when the so-called authentic version uses maida.She said we liked it crisp on the outside and soft on the inside texture and rice flour soaks up less oil while frying and hence maybe she started using it.

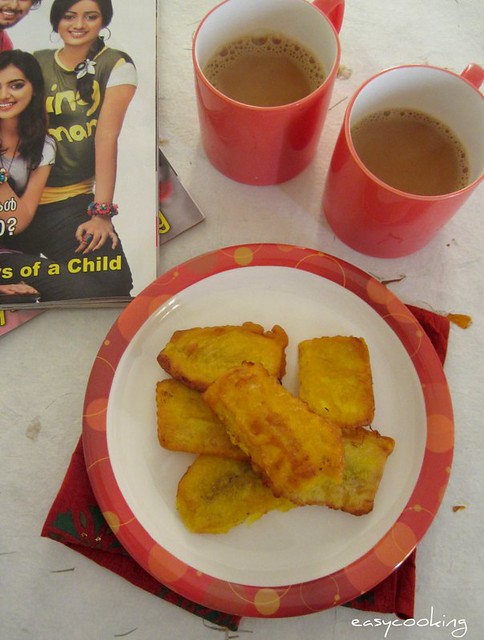
Pazham pori pairs up well with Tea or Coffee and makes for perfect travel food.Amma always packed few of these in a dabba when we traveled and we waited for the chaiwala to come so that we could open up the dabba and dig right in!

IMG_0816 
Pazham Pori /Ethakkappam - Banana Fritters


Ingredients


Rice flour - 1 cup ( I used Nirapara brand)
Sugar - 1 tsp
Salt to taste
Haldi - a pinch
Water as required to make the batter
Nendrapazham / Ripe Banana -1,sliced thinly
Coconut oil - to deep fry


Method


Slice the banana -cut the banana into three vertically,then slice each piece into 3-4 thinly.
Make a batter using rice flour,sugar,salt,haldi and enough water to make a smooth batter.
Heat a kadai with enough oil to deep fry.
Dip the sliced bananas into the batter one by one and drop into the hot oil.Fry 4-5 pieces at a time,not more.
When it starts turning golden brown flip and cook on the other side too.
Drain on a tissue paper and serve hot.

Monday, March 26, 2012

Pineapple Cream Cake

It was a different demand from birthday boy this year.No cake at all,can you imagine!!Well,he had a reason after all.We had a party at home few days back thrown for Ajay's colleagues in our new abode.We ate so much brownies and ice-cream that we just couldn't imagine making/eating anything sweet for the next few days.
But what's a birthday if there's no cake?As most of you know,I am wary of baking sponge cakes.Have tried it a few times before,some resulting in flat cakes and sometimes hard discs.This time,I was short of time and the oven was not behaving well too.I am yet to get used to the new oven and the icing on the cake was the power outage right during half time.
IMG_0908-2 
I didn't give up and went ahead with the flat cake.Whipped up the cream in my food processor which took less than 5 minutes to whip and hold shape.Finished off with some pineapple slices and kept my fingers crossed till we cut it.It wasn't bad after all.The texture was of course wrong(it was a bit grainy/coarse) but it tasted delicious,now I know how it feels to bite into moist cakes made at home.


Update - I am surprised that few anonymous commentators feel that if the texture is wrong,the whole dish goes kaput!Really?I did a quick Google search just to confirm the texture of sponge cakes.Many recipes state that even if the cake doesn't rise much it is fine since you'd be filling it up with cream or any other filling of your choice.The cake took to the moistening syrup well and  remained moist.If you look through the step by step pics,you'll know the texture to an extent.I could still cut the cake horizontally into two in a decent size.Probably if I had used an 8' pan,it wouldn't have come out as flat.


After the first slice was cut,I immediately made some custard and transformed the cake into a trifle pudding.Now I wasn't going to waste the precious cake,was I:)
IMG_0918-1 
Pineapple Cream Cake


Ingredients 


For the sponge - Recipe source PAB


Eggs - 3
Sugar - 1/2 cup
Vanilla extract - 1 tsp
Flour - 1/2 cup


Method


Preheat oven to 190C.Line a 9' round cake tin with parchment paper.
Beat together the eggs and sugar for 10-12 minutes on medium speed till it becomes pale and triples in volume.
Drizzle in the vanilla extract.
Spoon in the flour 1 tbsp at a time and fold in gently using figure eight moves to ensure you don't release the air.
Pour into the prepared tin and bake for 30-35 minutes or till the top becomes golden brown and the cake springs back when touched.
Peel off the parchment,let the cake cool completely and trim off the crust and cut the cake into half horizontally.


For the filling and frosting


Cream - 400ml - I used Amul
Sugar - 4 tbsp
Vanilla extract - 1 tsp
Pineapple slices - 3-4(canned)
Pineapple syrup - 1/2 cup(the sugar syrup from the tin)


Method


Whip the cream in a food processor for 2-3 minutes till the cream forms peaks and holds shape.Mix in the sugar and vanilla extract and keep chilled.


Keep 2-3 slices for decorating on top,chop the rest of the pineapple into small pieces.
IMG_0921_picnik-tile 
Assembly


In a serving plate,keep one layer of cake and drizzle the pineapple syrup on top.Brush some one the sides too.
Top with 1/3 of the cream and chopped pineapple.
Cover with the top layer and 1/2 of the cream.
Decorate with whole pineapple slices and whipped cream swirls on top.
Chill for 3-4 hours.

Tuesday, March 20, 2012

Chocolate Loaf Cake

Nothing can pep me up more than a decadent piece of chocolate cake.I've said this before,I'll say it now,I am a big time Chocoholic but there is a catch,it is only limited to baked goodies-cakes,brownies etc.I can give a chocolate bar a pass if I am in no mood.I might eat a piece or two of cadbury's,but that's it.I don't eat Nutella straight from the jar but I eat spoonfuls of ganache from the fridge.Strange,isn't it?
On our last visit to Homecenter,I decided to get myself some new silicone baking pans and the first one was the loaf pan.Since we carry around our measuring tape everywhere,I quietly measured the size and to my surprise,it was the perfect sized loaf pan 9" x 5" .I've been thinking what to bake in it for sometime and a loaf cake was the best bet.


Thanks to my addiction with yeast,I am constantly scouring through bread baking sites.Came across this recipe on King Arthur Flour site and I immediately gave it a try.The cake takes a bit longer to bake but the end result was so worth it.Perfect crumb,chocolaty and moist and drizzled with ganache it makes for a perfect dessert.
Chocolate Loaf Cake
Recipe source - King Arthur Flour

Ingredients


Butter - 100gms
Sugar - 1 1/2 cups
Salt - 3/4 tsp
Vanilla extract - 2 tsp
Baking powder - 1/2 tsp
Instant coffee powder - 1 tsp
Cocoa powder - 2/3 cup
Eggs - 3 large
All purpose flour - 1 1/4 cups
Milk - 3/4 cup


Method


Preheat oven to 160C.Grease and line a 9" x 5"  loaf pan.
In a medium-sized mixing bowl, beat together the butter, sugar, salt, vanilla, baking powder, espresso powder, and cocoa to make a sandy, somewhat clumpy mixture. 
Don't worry; the eggs will smooth things out. 
Add the eggs one at a time, beating well after each addition. Scrape down the sides and bottom of the bowl midway through this process. 
Add half the flour to the bowl, beating at low speed to combine. 
Add all of the milk, beating at low speed to combine. 
Add the remaining flour, beating gently just until the batter is smooth. 
Pour the batter into the prepared pan. 
Bake the cake for 75 to 80 minutes, or until a toothpick inserted into the center comes out clean. The top may look a tiny bit damp; that's OK. 
Remove the cake from the oven, loosen the edges, wait 10 minutes, and turn it out of the pan onto a rack to cool. 
Store completely cooled cake well wrapped, at room temperature. 
Yield: 12 to 18 servings. 
To make enough ganache for pouring on top of the cake - Heat up 100ml of cream(I use Amul)in a microwave safe bowl for 1 minute or until bubbles start appearing on the sides.Add 100gms chopped dark chocolate and mix.You could add a tbsp of rum or coffee to pep it up.If the chocolate doesn't melt completely keep the bowl in the MW for a further 30 seconds.Refrigerate until it thickens enough to pour.


Notes 
  • Though the recipe says the batter yields enough for a 9x5 loaf pan,I had some batter extra-enough to make six small cupcakes.
  • The cake tastes great on its own,but a little drizzle of ganache can always pep it up.The original recipe suggests peanut butter frosting-YUM
  • Cake remains moist even after refrigerating.Perfect for a trifle pudding or even cake pops!

Sunday, March 18, 2012

Haji Ali,Chennai-Restaurant Review

We've been hearing so much about Hajji Ali and their out of this world Fruit Creams and Falooda that we just had to try it.We chose the wrong day though,full to the nose from a delectable sizzler dinner at Tangerine,we have no idea why we went to Hajji Ali,but we had to!
We chose the G.N.Chetty outlet,and plonked ourselves at ground floor which was empty,all the crowd(we were told) was on the first floor enjoying the view.We decided to go for falooda,but oh boy we were confused.There were more than 6-7 varieties of falooda!!Between 6 of us,we chose to have Fruit Falooda(a must try)which was truly awesome with fruits like Lychee,Kiwi fruit,Strawberry along with regular fruits like apple and banana with ice cream,khus khus and semiya.
Strawberry Falooda was a twist to the regular falooda with sliced Strawberry and strawberry ice-cream.The rose flavored milk was delicious.
Kesar Royal Milk shake was one of their signature drinks and it was truly royal.It was too sweet for our palates,but maybe we would have enjoyed it if we weren't that full from our dinner.It had thick saffron milk with kesar ice-cream and pista and almonds.
The first thing which strikes you is the portion.Move away thin falooda glasses,here is the real deal.It is quite filling on its own,so maybe someday we'll skip our meals and head straight to Hajji Ali!They also serve short eats like Pizza,Sandwich etc.Prices hover around the 100rs mark but totally worth every penny.

Food - 9/10
Service - 9/10
Ambience - 8/10

Haji Ali is located at G.N.Chetty Road,opposite Maverick Gym
and at
Greams Road,Murugesa Naicker Complex, Near IDBI & SBI Bank, Anna Salai, Thousand Lights. 

Disclaimer-This is not a paid review.I liked the restaurant and thought of sharing my experience with my readers.

Friday, March 16, 2012

No-Knead Yeasted Banana Rolls

Whenever I read posts on bread baking or baking with yeast,I've always thought-how can bread baking be therapeutic?I mean,you are dealing with yeast and if not dealt with correctly,everything falls flat on you,literally.The very rare times I've tried yeast baking,I've crossed my fingers(toes too!)hoping the yeast rises to the occasion and blooms into a soft,spongy bread.
Yes,it has failed me at times but when it rose,it gave me delicious bread and oodles of confidence.I've also read that continuous baking with yeast spreads wild yeast in the environment you bake in which in turns paves the way for many more successful yeast bakes-voila!

Over ripe bananas always find their way into Buns or Muffins,but since the recipe for the yeasted banana rolls was very similar to the way I make Buns,I thought of giving it a try.It was a no knead bread too,which was a plus point.With the right hint of sweetness and banana flavor,I am sure this bread will be baked many a times in my kitchen:)
No-Knead Yeasted Banana Rolls
Recipe source - Aparna; Original recipe from ABin5

Ingredients

All purpose flour/Maida - 3 1/4 cups
Water,lukewarm - 1/2 cup (maybe a bit more)
Buttermilk - 1/2 cup*
Dry active yeast - 1 1/2 tsp
Salt - 3/4 tsp
Sugar - 3/4 tsp**
Butter - 2 tbsp,at room temperature
Ripe banana - 1 cup,pureed/mashed***
Cardamom - 1/2 tsp,seeds crushed
Flour - extra for dusting
Melted butter - for brushing on the rolls

Method

Mix together warm water,butter,salt,sugar and yeast in a mixing bowl and keep aside for 5-7 minutes or till the mixture becomes frothy.
In a large bowl(enough to hold 2 1/2 ltr of water)mix together the pureed/mashed banana,butter milk,crushed cardamom and one cup of flour.
Mix in the frothy yeast mix and the rest of the flour in without kneading-use a strong handled spoon to make the job easier.
Add a few spoons of warm water of the mixture looks dry.The dough should look shaggy and be a bit wet and sticky.
Cover the bowl (not airtight), and allow the dough to rise and collapse (or flatten on top). This should take about 2 hours.
You may use the dough at this point, but it is easier to handle when cold so refrigerate the dough for about half an hour. 
Grease a round 9” cake tin with oil or butter.
Take the dough out of the fridge and lightly dust with flour. Divide the dough into eight equal portions. Dust each piece with more flour, if needed but resist temptation to use too much flour or the rolls will turn out tough.

Shape into a ball by stretching the surface of the dough around to the bottom on all four sides while rotating the ball a quarter-turn as you go. Similarly shape all the other pieces into balls.
You can bake this bread as a loaf if you prefer.

Arrange the balls of dough in the greased cake tin and lightly cover the tin with a damp towel. Allow the dough to rise, for about 45 minutes to an hour.

Bake the rolls at 180C (350F) for about 35 to 40 minutes till done and golden brown. If you want the crust of the rolls to be soft, brush them on top with melted butter as soon as they come out of the oven.

Cool the rolls in the pan for about 5 minutes and then cool completely on a rack. Serve warm as you desire.
This recipe makes 8 medium sized banana rolls. 

Notes - The rolls were soft and spongy and remained so for a day.Next day I toasted it with some melted butter and it tasted delicious.Perfect as a tea time bread and as breakfast too.

*I did not have buttermilk or vinegar to make enough buttermilk,so I substituted it with thinned down yogurt and it worked fine.
**I found the rolls a little less sweet,so if you like your rolls sweet,increase the sugar to 1 or 1/2 tsp.
***While I was making the dough,there was no power and I mashed the banana with a fork,you can see specks of banana here and there,it did not make any difference with regard to taste.


Tuesday, March 13, 2012

Pavakkya Fry - Spicy Fried Bittergourd

I've eaten more Kerala food in Chennai than in Kerala.I still remember getting excited when I first had Puttu-Kadala at Kumarakom in Nungambakkam while I was new in Chennai.I've only had it at home and couldn't actually believe it was served in restaurants.Whenever Ajay asked me where to go out to eat,I'd say Kumarakom,I loved their fluffy appams,flaky parottas and of course Puttu.
Now of course,the excitement has died down and we seldom go there to eat.We absolutely loved the Kerala meals too and one of the star item in the 'thali' used to be pavakkya fry.I was always angry that they served only 2 or 3 chips in each plate and even when we asked for seconds,they served only as much.I've been so much fond of Karathe Fry that I make but this one was delicious on its own.


After a few trials and errors,I think I've made it very close to what they served in the restaurant.The recipe is very simple and it makes for a delicious side with meals.No more asking seconds to amused waiters in Kumarakom:)
Pavakkya fry - Spicy fried Bittergourd


Ingredients


Bittergourd - 1,sliced thin(either as a full circle,or a semi circle)
Onion - 1,sliced thin
Ginger - 1/2' piece,sliced thin
Garlic - 3-4 cloves,sliced thin
Red chilly powder - 1 tsp
Haldi - 1/2 tsp
Salt to taste
Oil to deep fry
Curry leaves - 1-2 sprigs


Method


Mix together all of the ingredients except oil and curry leaves and keep aside for 15-20 minutes.
In a kadai add enough oil to deep fry.
Squeeze the bittergourd mix and sprinkle over the hot oil.Fry on a high flame for a minute and then lower the flame till the bittergourd turns golden brown.
Drain on to a paper towel.Finish all the bittergourd and then fry curry leaves till crisp.
Serve with Red rice and Moru curry for a delicious meal.

Sunday, March 11, 2012

Sreedevi's Rice Kondattam

There are many foodie groups on facebook of which I am a part of.So my facebooking also involves checking out what people(sometimes friends,sometimes family too)are cooking in their kitchen and what experiment turned into disaster and which one tasted out of this world.
Sreedevi,a dear friend's wife is someone who clicks and posts everything she cooks in her kitchen on her facebook profile.She is a very pleasant and enthusiastic girl who replies within seconds when I ask her for a recipe and I love her for that.I've been telling her to start a blog of her own since she has such an array of dishes,but (it seems)she is content with her facebook album.


So I invited her to share her recipe for Easycooking readers and she readily obliged.She has prepared Rice Kondattam from scratch,something which even I have not attempted till date.Kudos to you Sreedevi!


Rice Kondattam
Ingredients


Raw rice/Pachari - 1 cup
Boiled rice/Puzhungalari - 1 1/4 cup
Salt - approximately 3 spoons
Green chilly - 3-4
Black sesame seeds - a handful


Method


Soak the raw rice and boiled rice together for 4-5 hours.
Blend together everything except the sesame seeds to a smooth paste adding enough water.
Add 2 - 2 1/2 cups of water to the batter and mix well.
Cook this batter on medium flame stirring continuously till the batter starts turning thick.
Keep stirring till the batter attains a wobbly consistency-thicker than dosa-idli batter.Take care not to overcook after this stage which would make the odi/vadi dry.
Switch off and add the sesame seeds.Mix well.
To prepare the odi/vadis
Drop spoonfuls of batter on a plastic sheet or baking paper and dry in sunlight till the vadis get dried completely.Anywhere between 2-3 days depending on the weather.
Tip-Spread baking paper on a thick cardboard sheet so that it becomes easier to take the sheets in and out while drying.


Heat oil in a kadai and fry the odi/vadis till crisp.It takes less than a minute to fry up one batch.


Happy Cooking!

Thursday, March 8, 2012

Paneer Masala Bread

Some recipes should be attacked instantly,if you think too much about how and when to make/bake it,it might get postponed.When I saw Hetal and Anuja's video on SMTC,I thought to myself 'ah,this is one bread I could try',off I went to check my kitchen stuff and saw something else and completely forgot about it.My excuse was,I didn't have paneer!! IMG_0578
Even after I got myself a block for making this bread,strangely I was looking for different recipes with Paneer.Yeah,I have a problem with yeast,I admit.I haven't baked much with yeast but the fear of failure with bread always pulled me back.Few days back,I tried baking a savory roll,which to my amusement came out really well despite quartering the recipe,but hard luck,I messed up the salt measurement.The rolls were so salty that it went straight to the bin.They baked up beautifully though.
IMG_0553 
I couldn't resist myself baking bread again when Ajay asked me why I was 'stuck' with cakes.Yes stuck!!Now I had to prove him wrong,double trouble.


Home alone and armed with all the ingredients I just went with the flow.Everything was falling into place.The yeast bloomed well,the dough rose well and it baked perfectly too with a lovely golden crust.The icing on the cake was when I cut it-beautiful patterned bread and it tasted delicious.If you find bread baking adventurous,you should bake this bread too!
edited 
Paneer Masala Bread
Recipe source - Showmethecurry.com


Ingredients


Warm Water – 1 cup
Instant Yeast - 1 1/2 tsp
Sugar – 1 tsp
Salt – 1 1/2 tsp
Olive Oil – 1/3 cup (I used Saffola)
All-Purpose Flour (Maida) – 3 cups (plus little extra for dusting)
Paneer – 200 g or 1 1/2 cups, crumbled
Turmeric Powder – 1/4 tsp
Dry Mango Powder/Amchoor – 1 tsp
Red Chili Powder – 1/2 tsp
Garam Masala – 1 tsp
Salt – to taste
Juice of 1 lime
Pickled Jalapenos – 1/2 cup, chopped finely (I did not add this)
Method
In a mixing bowl,combine warm water,yeast,sugar,salt and oil. Mix well.
In a separate mixing bowl, combine above mixture (a little at a time) with All-Purpose Flour and knead into a soft dough. Once dough comes together, knead for 4 to 5 minutes, until dough is smooth and elastic. Additional flour can be used for dusting to prevent dough from sticking to hands.(I did not have to use extra flour at all).
Grease the mixing bowl with oil and place the dough in it.Cover with a damp kitchen towel and allow to proof for 45 minutes to an hour.
Combine crumbled paneer,turmeric powder,dry mango powder,red Chili powder,garam masala,salt and lime juice.Mix gently so that paneer doesn’t get mashed.
On a rolling surface, roll out dough into a rectangular shape (approx 9 inch by 13 inch).
Spread Paneer mixture evenly over the dough all the way to the edges and gently press in.From the side closest to you, start rolling the dough tightly into a log.
Lightly grease the bottom and sides of a 9″x13″ baking pan(I used a round cookie tray) and place dough log in the center.
Loosely cover with a damp kitchen towel and place pan in a warm place for 1 hour to allow dough to rise.
Take a serrated knife and make shallow diagonal slits into the top of the dough.
Preheat oven to 450 degrees F (232C) and then reduce temperature to 425 degrees F (218C).
Place pan in the oven and bake for 30 to 35 minutes. Every oven is different so please keep an eye on it towards the end of the cooking period.
(it took exactly 35 minutes in my oven @ 215C)
Remove bread from oven and allow it to cool for 5 minutes in the pan. Remove bread from pan and place on a cooling rack for 30 minutes before cutting or serving.
Cool completely before storing.IMG_0586
  • The original recipe calls for rapid rise yeast,it can be substituted with the same quantity of active dry yeast,with slight changes in the procedure.I was not sure if my yeast was instant or dry so I played it safe by blooming the yeast for 5 minutes and then proofing the dough for an hour before stuffing.
  • The temperature of the water plays a crucial role in blooming the yeast.I warm the water for about 30 seconds in the microwave and then carry on with the procedure.
  • The stuffing for the bread could also be according to your taste.I am thinking Mushroom pepper masala next.
Related Posts Plugin for WordPress, Blogger...
 
Pin It button on image hover