Thursday, June 30, 2011

Chukku Kaapi and revisiting Aye Auto!

If you are from Kerala or if you follow Malayalam or if you love watching Malayalam movies you wouldn't have missed one of Mohanlal's best movies Aye Auto.I consider it one among my most favorite movies with stellar performances by almost all of the actors,my favorites being Mohanlal[of course!],Maniyanpilla Raju,Kunjan,Srinivasan,Pappu,Rekha and Thikkurishi among others.


But waitaminute,what is Aye auto doing on my blog?Let me come to that in a while.

IMG_5379

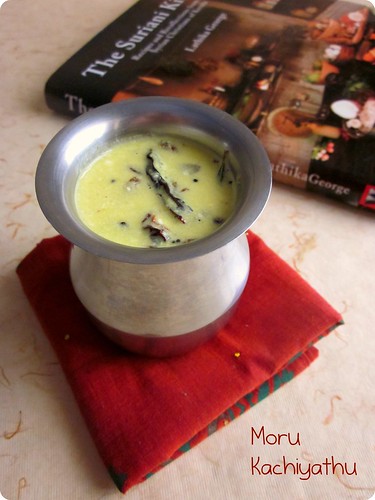
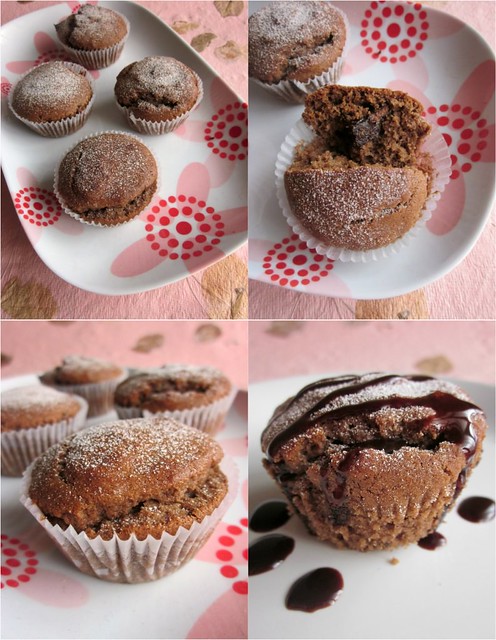
Thanks to the unpredictable climate in Chennai these days and thanks to one of our very rare bike outings followed by a drenching-in-the-rain part,both of us were down with the usual symptoms of cold and flu.Coughing,throat pain,headache and all the works.First thing amma suggested was to have Chukku kaapi,a healthy 
concoction made with coffee powder,jaggery and dry ginger with pepper,jeera and tulasi leaves.


IMG_5362


The moment amma said chukku kaapi,I googled and found out this movie clip from Aye auto where the poor autorickshaw-wala makes this kaapi for his super-rich girlfriend.[watch from 6.00 minute if you want to watch the exact scene]I am having this kaapi as I am watching the movie.I hope by the time the movie or the kaapi finishes,my throat pain and cold disappears too,wishful thinking!.


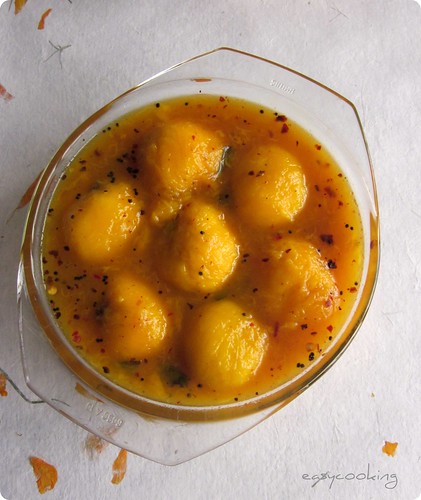
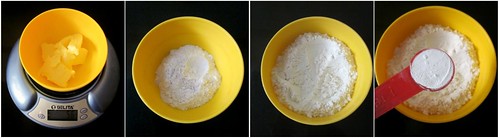
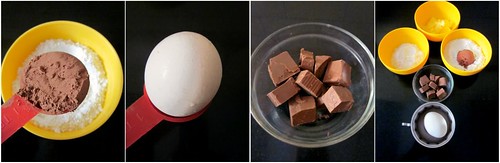
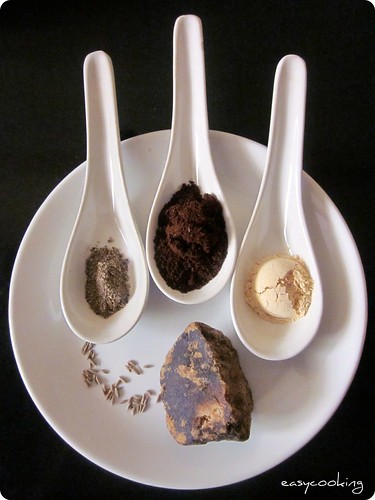
There is no precise recipe for this.Just boil about 1 1/2 cups of water,add 2-3 cubes[around 30-35gms]of karipetti[dark jaggery],a few tulasi leaves and let it boil.Add 1 tsp of chukku[dry ginger],1 tsp of coffee powder,1 tsp of crushed pepper and 1/2 tsp of jeera.


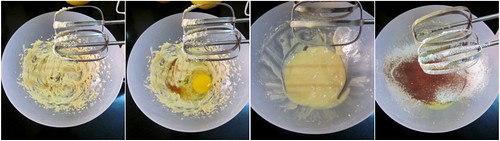
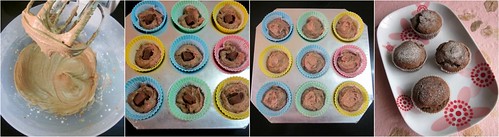
Let the whole mix come to a rolling boil,simmer for about 5 minutes.Drain and drink while it is piping hot.


Sending this to Kerala Kitchen.

Monday, June 27, 2011

Roasted Banana Rum Cake

Baking with banana is always exciting.Mainly because the ripe,blackened bananas finally find their abode and the wonderful flavor that banana provides to a baked goodie is just too good.How about roasting the banana before adding to the cake batter and how about spicing it up with a few drops of Rum,now it sounds all the more exciting,doesn't it?


IMG_5155

I had bookmarked this recipe from Baking Bites ages ago and planned to bake it during Christmas.Of course,Xmas came and went but the cake never got baked.Why Xmas time,because that's when I get my annual stash of Rum in my teetotaler home!I got the biggest surprise while I was searching for Rum,guess what--a bottle full of dry fruits and nuts soaked in rum,I really cannot contain my excitement!!


Only goof up with this cake happened when I poured the icing on top.I felt the rum icing was too thick and added a drop of milk.As soon as I poured the icing on top,it started curdling.My bad.It tastes awesome though,big consolation for the lack of pics of the whole cake!


IMG_5161


Roasted Banana Rum Cake


Ingredients


Butter - ¼ cup
Sugar - ¾ cup [I used Brown sugar]
Egg - 1 large
Vanilla - 1 tsp
Oil - 1/8 cup
Ripe Bananas - 3
Dark Rum - 2 tbsp
Flour - 1 ¼ cups + 2 tbsp
Baking powder - 1 tsp
Baking soda - ¼ tsp 
Salt - ¼ tsp 
Buttermilk - ¼ cup 

Method

Preheat oven to 180C.Grease a 6 cup Bundt pan with butter and flour it.
Cut the banana into one inch thick slices and roast in a non-stick frying pan till it starts browning.Mash well with the back of a spoon and keep aside.
In a large bowl, cream together butter and sugar until light. Beat in the egg followed with vanilla extract, vegetable oil, mashed bananas and rum.

In a medium bowl, whisk together the flour, baking powder, baking soda and salt. Add half of the flour mixture to the butter mix and stir to combine. Add in the buttermilk, followed by the remaining flour mixture.
Pour batter into prepared pan
Bake for 35-40 minutes, or until a toothpick inserted into the center of the cake comes out clean and the top springs back when lightly pressed.
Allow cake to cool for 10 minutes in the pan, then turn cake out onto a wire rack to cool completely.

Rum Drizzle

Butter - 1 tbsp
Dark rum - 1 tbsp
Milk - 1 tbsp
Vanilla - ½ tsp 
Icing sugar - 1 cup

Beat together butter, rum, milk, vanilla and about ½ cup icing sugar in a bowl until smooth. Gradually blend in additional sugar until you have a glaze that is smooth and thick enough to drizzle over the cake. Additional  sugar will make a glaze suitable for a thicker drizzle (i.e. from a piping bag).

IMG_5149
Notes

  • I halved the original recipe but used the same amount of bananas hence used 1 egg in place of 2.
  • I substituted buttermilk with yogurt and the texture of the cake was very light and fluffy,unlike the dense texture which is normally associated with cakes of this kind.
  • Follow the recipe as is for the rum drizzle and it might not curdle.I added milk at the last stage and believe that's the reason for the curdling.
---

Sending this to Sonia of Dinner Recipes from Sonia's Kitchen who is hosting Celebrate Sweets-Cakes this month,an event originally started by Nivedita.


Friday, June 24, 2011

Kanchipuram Masala Dosa

How many of you have dosa as breakfast[or dinner!]more than two times a week?What,most of you??I knew I was not alone here:)
IMG_5345
Having dosa batter in the fridge is like having ready drafts of posts in your folder which you could post as and when you are busy.Easy and stress free.I was fascinated by ready-made dosa batter available in Chennai when I first came here.It used to be such an easy thing to stock up and make dosa/idli whenever we fancied having it.


But once I started making dosa batter on my own,I have not purchased those.One thing is hygiene.I happened to pass through a 'mavu mill'[wet and dry flour mill]on a roadside and the sight I saw there was pathetic and I vowed never to buy ready-made batter again.
IMG_5333
Only problem with making homemade batter is the amount it yields.Between two of us,the batter lasts us for almost a week.So to prevent the batter from getting sour I have to make dosas every alternate day[if not daily].I do have some ulterior motives here as I am a big dosa lover.


Kanchipuram dosa* is a small variation from the plain dosa which definitely brings some variety for dosa on the breakfast table.Dosa batter,potato-onion masala and kanchipuram masala is all you need to make a dosa which looks quite gourmet and tastes equally so!
IMG_5346
Kanchipuram Masala Dosa


Ingredients


Dosa batter - about a cup or as required[depends on how big your dosa pan is and the size of your dosa]
Potato-Onion masala - about 1 tbsp for each dosa


For the Kanchipuram Masala
Onion - 2 tbsp,finely chopped
Tomato - 2 tbsp,finely chopped
Green chilly - 1,finely chopped
Beetroot - 2 tbsp,grated
Carrot - 2 tbsp,grated
Ghee - 2 tsp
Coriander leaves for garnish


Method
Picnik collage
In a pan add ghee and saute all the ingredients for the Kanchipuram masala for 5-7 minutes.Add a pinch of salt and coriander leaves and switch off the flame.


For making the dosa
Picnik collage
Heat a dosa pan and lightly smear with oil.
Pour a ladleful of dosa batter and spread in a concentric circle.Pour few drops of oil and let it cook for a minute or so or until it starts browning.
Spread the vegetable masala on the dosa with a spoon and place the potato masala on top.
Fold the dosa and serve with chutney of your choice.
IMG_5351
 Notes

  • You could add grated coconut or chopped cashewnuts with the masala for an extra punch.
  • The dosa is tasty on its own and can be had without chutney or sambhar on the side which makes it a meal[in this case,breakfast] by itself.Both the masalas can be made ahead and refrigerated.
  • *I do not claim this one to be an authentic dosa as I got the recipe from Vanitha which featured dosa recipes from the famous Pai's Thattu kada in Ernakulam.
---


Anything colourful catches the attention of kids and I have heard many of my friends claiming that the lunch boxes come back licked clean if there is variety.What better way than to pep up the lunch box with this colourful dosa?Sending this to Radhika of Tickling Palates for the Let's cook series which features Break-time snacks.

Also to Divya,who blogs at Dil-se for the Show me your... series which features the humble dosa this month.

Tuesday, June 21, 2011

I love your Blog - Joy The Baker

Joy loves baking..so do I!


Joy turned 30 a while back..I will be 30 too,in a couple of months!


Sadly,the similarities end there.If you are new to Joy[I'd guess not!],I'd highly recommend you to visit her space.You'd be hooked right then,just like I was,bookmarking one post after the other!I wish I could whip up baked delicacies like Joy,one after the other.One look at her Cinnamon Sugar Pull apart Bread and I just fainted.Baking bread is still an unknown territory to me and here she has rolled two classics into one-Cinnamon rolls and Bread--one word-Mindblowing!


Brownies make my knees go weak.I can resist anything but not brownies.Dense,moist and Fudgy brownies??Spot on!


Coconut Macaroons have been on my baking to-do list like forever.I always buy dessicated coconut in hopes of making it but somehow forget it every time.Crunchy macaroons with a nutty flavor,what happens if you combine it with Chocolate--you get Chocolate dipped Coconut Macaroons--doubly irresistible!


Chocolate and Orange is one of the best combinations you can whip up in a cake.Having tried so many variations of it myself,I really can vouch for it.What's better is making it for breakfast like Joy.Now come on,though it is cake,it has Orange in it doesn't it?Sounds good enough!!


Not only does Joy bakes all these goodies,she stocks up on Plates to present them too.Now how many of you can vouch for single plates and mugs and cups strewn around your crockery shelf?I sometimes look at my random collection and smile,but looks like I am not alone here!


The biggest dream for any one who bakes[at least for me],is to bake for someone else.When it is a joyous occasion like a wedding,it gets double fun but double tension too.Read all about Joy's efforts on Wedding Cake Project.


I am not done yet,but at the risk of making this post a mile-long,I guess I have to stop now.These are only a few of my favorites in her site[there are many many more!].Check out her Recipe Index and be sure to get lost among an array of wonderful recipes.Or check out her Top five,orTop 10 Cookie recipes,or even better How to Frost a Cake,I told you I am hooked to her blog!


**All pictures published with the blogger's permission.

Saturday, June 18, 2011

Bread Upma & A Birthday Cake

I am always prepared when it comes to making breakfasts coz Ajay is a very typical 'amchi' and prefers the usual idli-dosa-idiyappam rather than oats or cornflakes[we do have it once in a while though].Weekends are almost predictable with Puttu or Poori so throughout the week,I have many options for a healthy and nutritious breakfast.

IMG_5271


But sometimes I forget.There is no idli-dosa batter in the fridge or there is no atta or idiyappam flour or even eggs.Like today.


I did have some stale bread in the fridge and what better way than to pep up stale bread than this upma!With some shriveled Capsicum and added tomatoes,it almost resembles a 'nutritious' breakfast!


IMG_5274


Bread Upma


Ingredients


Bread,cubed - 3 cups,loosely packed[preferably a day old]
Onion - 1 small,thinly sliced
Tomato - 1small,finely chopped
Capsicum - 1/2 of 1 medium,chopped
Red chilly powder - 1/2 tsp
Coriander powder - 1/2 tsp
Haldi - 1/4 tsp
Salt to taste
Ghee+Oil - 2 tbsp,divided
Mustard seeds - 1/2 tsp
Urad dal - 1/2 tsp
Green chilly - 1,chopped
Ginger - 1/2' piece,finely chopped
Curry leaves - 1 sprig
Coriander leaves - 1 tbsp,chopped


Method


In a thick bottom kadai add 1 tbsp oil+ghee and splutter mustard seeds and urad dal.When the urad dal starts to brown,mix in the minced green chilly and ginger.Add onion and curry leaves and saute for 5-7 minutes or till the onions start to brown.


Add the powders-red chilly powder,coriander powder and haldi powder and give a good mix.Add the tomatoes and capsicum now and sprinkle a few drops of water[if necessary] to avoid burning the powders.Add enough salt to taste.


Now mix in the chopped bread and give a good stir.Mix well so that the masala coats the bread pieces evenly.Add the remaining 1 tbsp oil+ghee and keep the kadai on simmer till the bread gets roasted evenly.Stir once in a while to avoid burning.When the bread becomes golden brown and crisp add coriander leaves and switch off the flame.


Notes

  • It is preferable to use a day old bread for this upma since fresh bread will crumble with all the mixing and will stay soft[and not crisp]after the cooking.I used whole wheat bread,white bread will work fine too.
  • Though the ingredient list looks big,it is the usual ingredients found in your kitchen.I believe adding or subtracting a few ingredients here and there will not affect the taste in anyway.Go ahead and add anything to this if you like!
--------


On a different note,I baked a birthday cake for a 3 year old boy[our friends' kid]this week and though I was not very happy with the final outcome[lookswise],the cake was much relished by the kid guests as well as adults[there were 30 people in all].Thank you Ramya for trusting me with your kids' cake and for being more confident in my baking skills than I am!


IMG_5214


I baked a Classic American Layer cake,basically a Yellow Butter cake from A Passion for Baking and made a Classic Vanilla Buttercream from Savory Sweet Life.The cake by itself was a very tasty one,moist and with a tender crumb-perfect as a Birthday cake.Hope to better my decorating skills soon!


Wednesday, June 15, 2011

Iyengar Bakery Khare Biscuits ~ Spicy Shortbread Cookies

At the risk of being thrown out from the group for not taking part in the challenges for a long time,I am saying it--this month's Indian Cooking challenge was too good to miss.Firstly,it is a baking challenge and second,it is one of my favorite Iyengar bakery treats of all time - Khare biscuit.The moment Srivalli announced the challenge,I knew I was game!

IMG_5260


I first got introduced to Iyengar bakery treats when we were in Bangalore.The first item I tried itself got me hooked-Masala Bread loaf.Every time we are in Bangalore,I make sure I bring back at least 2 loaves back to Chennai and guard it like there's no tomorrow.Second one is Potato buns,do no even get me started on that one--potato bhaji stuffed in soft fluffy buns--too good to be true.


IMG_5253_picnik

Salt biscuits or Khare biscuits as they are commonly known,comes a close third in my list.I tried a very similar version some time back and absolutely loved it.Perfect companion with a cup of tea.So when a new recipe for the same had been decided for the challenge from Champa's blog,I jumped for it.


Khare Biscuit


Ingredients


Maida/All purpose flour - 2 cups / 250 gms
Butter - 1/3 cup,softened
Sugar - 4 tsp[I pulsed the sugar in the mixer]
Salt - 1 tsp
Green chillies - 3,chopped fine[or more,as per your taste]
Fresh Coriander leaves - 3 tbsp
Curd - 3 tbsp


Method


Preheat oven to 160C.Grease a cookie tray and keep aside.

Sift together flour and salt.
Cream together butter and sugar till the sugar dissolves,mix in 2 tbsp curd and continue beating.
Picnik collage
Whisk in the sifted flour slowly and mix.At this stage,it would be better if you start kneading by your hand.
Mix in the chopped coriander leaves,green chillies and the remaining 1 tbsp curd.The dough would be crumbly.

Picnik collage1

For easier handling-tip the dough into a polythene bag[or a cling wrap]
Leave the bag open, place on your work surface and slowly press out the dough with a rolling pin so it becomes a rectangle.Chill for 10-15 minutes so that it is easy to handle the dough.

Picnik collage2

R
oll the dough into 1/4 inch thickness and rip the bag open and cut using a cookie cutter.

Picnik collage3


Place the cookies on the baking tray and bake for 18-20 minutes.The cookies might still be soft but would harden once it cools down.

Cool on a wire rack and store in airtight containers.

Sunday, June 12, 2011

The Suriani Kitchen

The Suriani Kitchen is a book I've been hooked to since last few days.I read a review on Hindu some time back and have been meaning to buy the book since then.Somehow,I forgot about it and got reminded only when a friend asked me about a recipe from the book.


The author,Lathika George is a Bombay-born Syrian Christian who moved to Kerala in her teens.All the illustrations in the book are by the authors sister Latha George.


The first thing you'd notice in the book are the pretty illustrations.Especially the one of a typical Suriani household kitchen and those pretty ones of bharanis,urulis,velakku,coconut tree,in short each one is worth writing about.


A brief history about the Syrian Christians of Kerala follows and makes for an interesting read.Despite being a Keralite,I never knew most of the stuff that is written,which clearly explains the great amount of research gone into the book.


Suriani is a generic term used for Syrian Christians in Kerala.Though primarily Kerala based,the Suriani Christians have a cuisine unique to them.It is predominantly non-vegetarian with much importance given to sea-food.Vegetarian side-dishes are a part of the menu too,most of them simple and quite easy to put together.


IMG_4455


The book is classified into Rice preparations,Vegetables and lentils,Seafood,Beef,Mutton and Pork dishes,Poultry and Eggs,Accompaniments,Sweet and Savory snacks,Pickles & Puddings and Payasams.As expected,it has all the Syrian favorites Beef Ularthiyathu,Duck Roast,Mutton Biriyani,Yesterdays Fish curry to name a few.


No worries for the vegetarians since there are some great vegetarian dishes too-Cherupayar Olathiyathu,Chena Erissery,Koon Olathiyathu,Cashewnut Saute and many more.


IMG_4463


I think more than the recipes,the book makes for a good read.Contrary to cookbooks with recipes,most of the posts here include a li'l anecdote from the author.Like this Achinga Payar Ularthu,which comes with a full page folklore about two dove sisters.


"Kuttathi prave,kurr,kurr,
Nazhi payare,kurr,kurr,
Little sister dove,kurr,kurr,
A measure of beans,kurr,kurr"


Or the Spicy Bharani Soup which so wonderfully explains the ritual baths for the new born baby and the mother by the 'kulapir chedathi'.


"Special baths start as soon as the child is born,or in modern times,when the mother and child are brought home from the hospital.The process begins around ten in the morning when the sun has risen high.The dhanwanthari thailam,a medicated oil prepared especially for this purpose,is warmed and lavishly applied all over the new mother's body,followed by a vigorous massage which lasts for an hour"


The pictures[though less] are very beautiful too.But it would have been nice if many of the pictures were in colour,than in black and white.


If you like Kerala non-veg cooking,you'll like this book.If you like reading cookbooks[like me!],you'll like it too!Keep watching this space for more dishes from The Suriani Kitchen!


Thursday, June 9, 2011

Kadai Paneer

It is not hard to sell any Paneer recipe to me as I am a self confessed Paneer lover.Though I usually do not deviate from the usual PBM route,ever since I tried Matar Paneer,I am open to trying out new Paneer dishes.So it was no wonder when Srivalli posted a step by step recipe of Kadai paneer,I was tempted to make it right away.
IMG_5132
Fresh Paneer,crisp Capsicum and a melange of masalas in a tomato gravy was bound to be a hit.


Unlike side dishes featuring paneer,this one is not very rich or laden with butter/oil/cream to make it tasty.Sometimes,the most simplest of recipes are the most tastiest,don't you agree?
IMG_5115
Kadai Paneer


Ingredients


Paneer - 200 gms,cubed
Capsicum - 1 medium,cubed


Red chilly - 1[I used the long variety-Byadge]
Coriander seeds - 1 tbsp


Oil - 2 tsp
Cloves - 2
Cinnamon - 1' piece
Onion - 2,chopped finely
Green chilly - 2,whole
Ginger garlic paste - 1 tsp
Red chilly powder - 1 tsp
Tomato -2,pureed
Salt to taste


Method


Coarsely powder red chilly and coriander seeds and keep aside.
Chop the paneer into bite-size cubes and saute in 1 tsp oil till golden brown on both sides.Drain from the pan and immerse in about 2 cups of boiling water and keep aside.
Sauté the capsicum in the same pan till it starts browning.Drain and keep aside.
In the same pan add the remaining 1 tsp oil and add the red chilly-coriander powder,cloves and cinnamon and sauté for a minute.
Add the onions,whole green chillies and stir till it starts becoming golden brown,then add the ginger garlic paste,red chilly powder and mix well.
Continue to sauté for two minutes, add tomato puree, salt. Cover with lid and let the puree cook.
When the tomato puree is well cooked, add the roasted paneer,roasted capsicum and mix well. 

Garnish with coriander leaves and serve.


IMG_5123
Notes
  • If you are using fresh homemade Paneer,you can add it straight to the curry.No need to roast or soak it in hot water.

Monday, June 6, 2011

Ambya Gojju ~ Ripe Mango Curry

Come Mango season and there's no dearth of recipes featuring Mangoes.A while back,I used to believe that mangoes should be eaten as is,but not any more.There are so many varieties of mango in the market these days and I am tempted to do so much with it!


IMG_4837

I love Banganpally mangoes and I can identify it even if I eat it blindfolded.I shouldn't be very proud of this because Ajay and his parents can identify each and every mangoes in the market with just a whiff,or even a glance.I always enjoy the talk going on between them regarding mangoes of the season.Sometimes it goes 'this season Kalapadi is not so good,and so is Malgoa',and then Ma-in-law says 'goinT* ambos have gone so expensive,but without them how can we indulge in ambe upkaris and gojjus?'


There are certain mangoes meant for certain dishes.For example,this gojju requires small and juicy mangoes[with fibers] so that it can be dipped into the sauce and eaten to the hearts content.This is very similar to Ambya Upkari,the only difference being,this one is served cool and requires no cooking![except for the seasoning].

IMG_5119

                                                        [Kalapadi Mangoes]


Ambya Gojju


Ingredients


Ripe mangoes - 8-10[small variety]
Jaggery - 1 cup,melted[or you could use an equal amount of grated jaggery]
Roasted red chillies - 2[I used the long variety called Byadge]
Tamarind - one small piece[a channa size]


For the tadka/seasoning


Oil - 1 tsp
Mustard seeds - 1/4 tsp
Hing/asafoetida - 1/2 tsp


Method


Wash the mangoes well under running water.Wipe clean with a kitchen towel and peel,do not discard the peels.
In a big pan put all the mango peels and add about 1 to 1 1/2 cups of boiling water and keep aside.
After 5 minutes,mash the skins with hands till it oozes out mango pulp,collect as much as you can and throw away the skins.
Take one mango and make pulp with it,add it to the above mix.

Grind together red chillies and tamarind to a coarse powder.
In a pan,add the mangoes and mix in the skin pulp and the mango pulp.

Add a pinch of salt and the red chilly-tamarind powder and mix well.
In a pan add oil for seasoning and splutter mustard seeds.Add hing.
Mix the seasoning to the prepared mangoes and keep refrigerated till serving.


IMG_4833
Notes

  • Pick small,juicy varieties of Mango for this dish.[*goinT is a generic name for mangoes which are particularly used for curries like this]
  • Gojju tastes best when chilled so keep it refrigerated for at least 3-4 hours before serving.

Friday, June 3, 2011

Molten Center Chocolate Cupcakes

IMG_5016_picnik
One of the first recipes I bookmarked when I got hold of The Big Book of Baking,this one is a very simple recipe.What I liked most about the recipe is the quantity of the ingredients,almost half of regular cupcakes and it yields 8 big Cupcakes[since I have a 9 hole Cupcake tray,I adjusted a bit here and there to get 9].


Many of my readers expressed concern over uncooked batter when I posted the Molten Lava Cake,though personally I have no problems in baking/eating it,I was amused because many people felt that way.This recipe uses chocolate pieces as the molten centers and it creates a gooey center and there's no question of uncooked batter too.
IMG_5007
Having baked a 'cooked' MLC sometime back,I was wary of over baking the cupcake and kept a close tab on it while it baked.While the recipe says 190C,I went with 180C which is the temperature I bake my cupcakes in.The centers were not 'cooked',but the chocolate was not gooey either.I had to Microwave the cupcake[after it baked] for 15 seconds and then the chocolate slowly started melting.But I didn't have to do it after all coz the cupcakes disappeared as soon as they came out of the oven!

Molten Center Chocolate Cupcakes
Recipe adapted from The Big Book of Baking


Ingredients


Picnik collage
Butter - 55 gms
Castor Sugar - 55 gms
Flour - 85 gms
Baking powder - 1 tsp
Cocoa powder - 1 tbsp
Egg - 1
Vanilla - 1 tsp
Milk - 1-2  tbsp
Chocolate - 100 gms,chopped into small cubes
Picnik collage

Method

Preheat oven to 190C.Line a cupcake tray with paper cups or use a silicon muffin pan.
Sift together flour,baking powder and cocoa powder.Keep aside.


Picnik collage
Cream butter and sugar till light and fluffy.
Mix in egg and vanilla,beat for one more minute.
Sift in the dry ingredients and beat until the last trace of flour disappears.If the batter seems too stiff,add milk to 'loosen' the batter.The final batter should be of dropping consistency.


Picnik collage


Pour half of the batter into the cupcake molds.Make an indentation with the back of a spoon and place the chopped chocolate on top.Pour the other half of the remaining batter and cover the chocolate.
Bake for 20-22 minutes or till the cupcakes have risen and firm on top.
Let it cool for 2-3 minutes,then remove the cupcakes from the tray and cool on a wire rack.
Dust with icing sugar on top and serve.

Picnik collage


Notes
  • As I mentioned earlier,the centers were not so molten,so you can try baking it at a higher temperature for a gooey center.190C or 200C would be ideal.
  • I found the cupcakes to be a lot less sweet for my liking,nothing that a drizzle of Hershey's couldn't save,but if you are serving the cupcakes on their own,increase the sugar.I think 70 gms would be fine.
  • The original recipe calls for self rising flour,so if you have it--use it and skip the baking powder.


Related Posts Plugin for WordPress, Blogger...
 
Pin It button on image hover