Thursday, April 26, 2012

One-bowl Vanilla Yellow Cake

IMG_1356

I've been postponing my sweet bakes for some time now.No prizes for guessing it is related to the dreaded weighing scale:).My new love for Yeast baking is also a culprit.The inspiration came from a magazine,I was reading an article on a birthday cake and tada!the bulb shines and I HAD to bake a cake.There are a few recipes which are in my head and doesn't need a double check,but I was in the mood for something new.

Of course,there was the usual tussle between vanilla and chocolate and for a change,vanilla won:).One more reason to zero in on this recipe was that it didn't require much ingredients and was a dump and mix kind of a cake.But me being me,had to go the regular route of creaming and mixing the wet and dry ingredients.I felt like baking a cake,remember?So I had to do it this way:)
IMG_1365

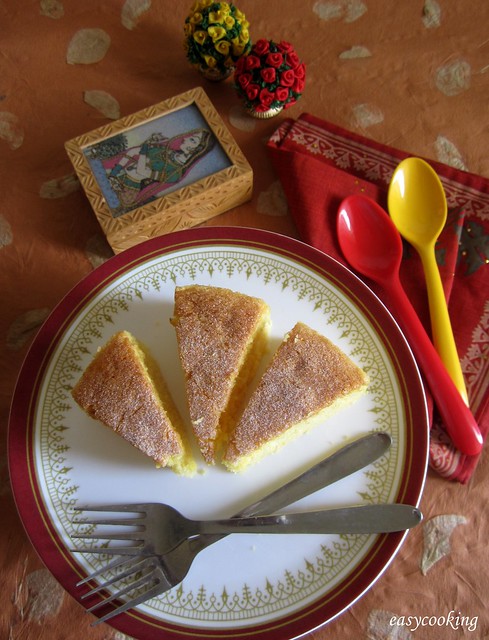
When I bit into the slice,I wondered whether I was a chocoholic or not because this cake is so full of vanilla flavor that no matter what,you'll end up falling in love with it.The secret ingredient to achieving the lovely yellow colour is Custard powder.I have used the same in few recipes before,here and here.I yearn to achieve bakery-like results in my baking since I have no other benchmark and I must say this one fits the bill perfectly.
IMG_1327

One-bowl Vanilla Yellow Cake
Recipe source - My Diverse Kitchen

Ingredients

Butter - 100gms,softened
Sugar - 1 1/4 cups
Egg - 1
Vanilla extract - 1 tsp
All purpose flour/Maida - 1 3/4 cups
Vanilla flavored Custard powder - 1/2 cup(I used Brown and Polson)
Baking powder - 3 1/2 tsp
Salt - 1 tsp
Milk - 1 1/4 cups

Method

Preheat oven to 180C.Grease and line a 9' round cake tin.
cats 
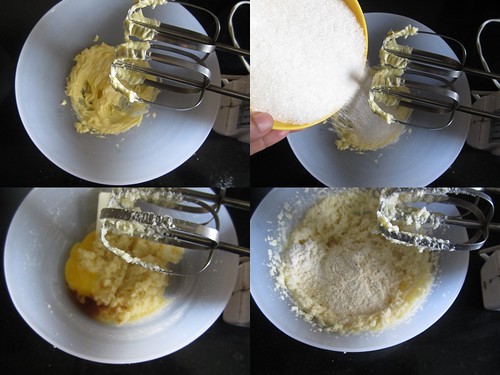
In a big mixing bowl cream together butter and sugar till light and fluffy.Mix in the eggs and vanilla and beat again.
IMG_1335-tile 
Slowly add the dry ingredients followed by milk and beat till you get a smooth batter.
*I had used a small mixing bowl and didn't want flour to fly everywhere on my counter top,so followed the usual way of adding dry ingredients with wet ingredients alternately into the batter.
Pour the batter into the prepared tin and bake for 40-45 minutes or till a toothpick inserted into the center of the cake comes out clean.
Cool in the tin for 5-7 minutes,then invert into a wire rack to cool completely.
Slice and serve.
IMG_1366

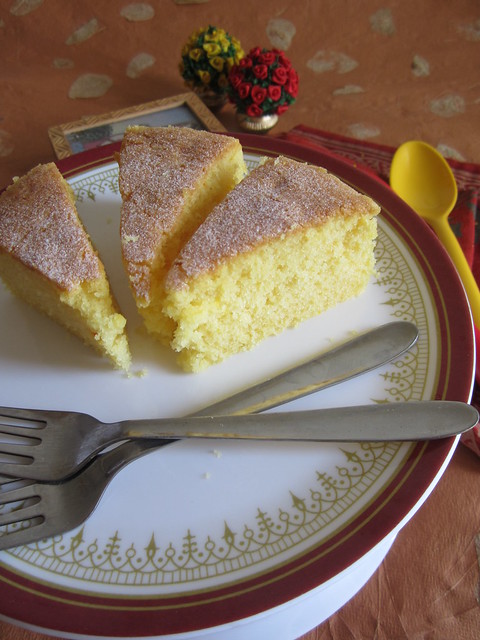
The cake tastes best served warm,plain or dusted with some powdered sugar.Of course,it would be delicious if you fill and frost it using vanilla flavored buttercream or even sweetened whipped cream with fresh fruits.Endless possibilities.

Monday, April 23, 2012

Homemade Garam Masala

I have heard varied opinions from people about garam masala.My ma-in-law for instance hates garam masala in any curries.She says it is primarily because of the strong taste of it which spoils the dish.But I love the distinct taste of garam masala and cannot imagine not adding it to my north indian gravies or pulaos.


I don't remember using a store bought garam masala at all but once when I was out of my home made one and had to rely on a very popular brand,I understood why ma-in-law hated it after all.It doesn't have a balanced taste and one flavor was very dominating.It does spoil the taste of the final dish after all.
Amma always makes a small batch every now and then.She believes freshly ground homemade garam masala wins above anything else.I completely agree.This time when I was home,we made a slightly big batch as I had to bring it back with me to last a while.It stays fresh when kept in an airtight box or tupperware.I remove a small portion and keep it for my regular use,this way you wouldn't have to keep using it from the big batch which might kill the flavors in the long run.
Homemade Garam Masala


Ingredients


Cardamom - 50gms
Clove - 50gms
Cinnamon - 50gms
Pepper - 50gms
Javitri/Mace - 50gms
Star anise - 50gms


Method


Mix together all the spices and dry in hot sun for 2-3 hours or till the spices are warm and dry.
Alternately,place the ingredients in a microproof bowl and microwave for 1 minute OR roast the spices in a thick bottom kadai for 5-10 minutes on very low flame,keep stirring now and then to avoid burning.
In small batches grind the spices in a mixer till it becomes a coarse powder.If required,sieve the mix and grind it again.
Let it cool down to room temperature and store in airtight containers.
This measure yielded 250gms of Garam Masala.


Notes
  • We have used spices in equal measures so that there is a combined flavor and no flavor dominates the other.
  • If you do not use garam masala in your recipes frequently,make a small batch to keep the flavors intact.
  • I have seen recipes which use Coriander seeds,Saunf and Jeera among other spices.Add spices according to your taste preference.
Use the freshly ground Garam Masala to make Biryani,Pulao or any North Indian gravy.Homemade Garam masala is the best choice for adding to Fruit Cakes too!

Thursday, April 19, 2012

Vellarikkya Ulli Sambhar ~ Lemon Cucumber and Small Onion Sambhar

I contemplated a while before posting this recipe.I mean,Sambhar is something people make on a daily basis isn't it,what is new about it?So many blogs have recipes in detail about sambhar made from scratch and being in South India,I am sure every one of us grew up eating sambhar and we just need to put some known ingredients together and a delicious sambhar will be ready in minutes.
But like most of the bloggers I know,every new recipe is looked upon as a prospective blog post:)
At home,amma makes many different varieties of sambhar.It all depends on which vegetable is in stock at a given time.Sambhar made with ash gourd and pumpkin was/is my all time favorite.I love the tangy and sweet taste of it and when paired with dosa,it makes for a great combination making you forget how many dosas you eat.


It wasn't different this time when we were home.When I saw dosa for breakfast,I tried smelling the sambhar to make out the ingredients used.She kept me guessing till I got a taste of it.I loved the ulli sambhar+vellarikkya combo so much that it has become my new favorite.It tastes awesome with dosa and makes for a great side-dish with rice too!
Vellarikkya Ulli Sambhar


Ingredients


Vellarikkya/Lemon Cucumber/Dosakkaya - 1 medium sized,chopped into cubes
Ulli/Pearl onions - 1/2 cup,peeled
Toor dal - 1/2 cup
Tomato - 1 medium,chopped
Coriander leaves - 2-3 tbsp,chopped
Eastern Sambhar Powder - 2 1/2 tsp
Salt to taste


For the seasoning


Oil - 1 tbsp
Mustard seeds - 1/2 tsp
Hing/asafoetida - 1/4 tsp


Method
Cook together vellarikkya,ulli and toor dal in a pressure cooker for 3-4 whistles(after the first whistle,simmer and cook for 3 more whistles).
Soak the sambhar powder in 1/4 cup warm water,reserve.
Open the cooker and add tomatoes,coriander leaves,sambhar powder and salt to taste and let it boil.
Simmer for 5-7 minutes.
Prepare tadka in a pan using oil,splutter mustard seeds and add hing.Add the seasoning to the sambhar.
Garnish with some more coriander leaves while serving.
Notes
  • The amount of vegetables to add in the sambhar depends on ones taste and preference.While amma added more of vellarikkya,I added more onions.
  • I have used Eastern sambhar powder here,you can use your favorite brand.


Monday, April 16, 2012

Whole-Wheat Garlic Pull-apart Rolls

There's no stopping me now.Really.I am addicted to bread baking these days and not a day goes by without thinking of which recipes to try out and what new ways I can shape up the bread.Only one thing is unusual,I haven't purchased any bread baking books.At least not yet.
IMG_1011 
I always buy one exclusive book dedicated to the cuisine which I am interested in a particular time.It was Cake baking initially,which went on to Kerala cooking,then Continental and so on.Though I love browsing through my cookbooks way too often,whenever I feel like cooking something new,I turn to Google.Do you do the same thing too??

So even though I am itching to buy Artisan Bread in 5 minutes a day and Peter Reinhart's Artisans Bread Everyday, I am restraining from doing so.

I tried this Garlic-rolls a while back from Prathibha's and just cannot rave enough about it.The original recipe from Suhaina spread like wildfire in blogosphere sometime back and this one is no different.Some of the flour is replaced by whole wheat flour and the resulting rolls are way too good.
Whole-Wheat Garlic Pull-apart Rolls
Recipe adapted from Prathibha

Ingredients

Whole wheat Flour/Atta - 1 cup
All purpose flour/Maida - 1 cup
Lukewarm Water - 1 cup
Active dry yeast - 1 tsp
Sugar - 2 tsp
Salt to taste
Olive Oil - 2 tsp

For the Garlic spread

Softened butter - 2 tbsp
Garlic cloves - 4-5,finely chopped
Green chilly - 1,finely chopped
Fresh Coriander leaves - 1 tbsp,finely chopped

Method
Mix together warm water,sugar,salt and yeast and keep aside for 5-10 minutes to bloom.If the yeast is fresh,it will start bubbling within minutes.If it does not bloom,start afresh.
In a big mixing bowl,add whole wheat flour and maida.Pour in the yeast mixture along with olive oil,little at a time and start kneading the dough.You might/might not require the entire quantity so add as required to form a smooth dough.
Knead the dough for 5-7 minutes or till the dough becomes smooth and elastic.Add flour a tsp or two if you feel the dough is too sticky,but refrain from adding more.
Coat the mixing bowl with some oilve oil and place the dough in it and smear oil around the dough.Cover the bowl with a damp towel and let the dough rise to double its size in a warm place for 45 minutes to an hour.
Meanwhile,make the garlic filling.Mix together all the ingredients mentioned for the filling to a spreadable consistency and keep aside.
Grease a loaf pan with some oil and keep aside.
Punch down the dough and knead for 2-3 minutes.Divide the dough into two equal portions.
Smear your workspace with some flour and roll the dough into a rough rectangle,about half an inch thick.Smear half of the garlic spread.Roll the rectangle and cut into two and further into two more,so that you end up with four spirals.Place the rolls carefully into the greased pan.
Repeat with the other half of the dough.
Apply any remaining garlic spread on top of the dough and brush with some milk.You could also sprinkle some sesame seeds on top.
Allow the rolls to proof for 30-45 minutes.
Preheat the oven to 180C.
Bake the rolls for 20-25 minutes or till the top portion of the dough becomes golden and the bread sounds hollow when tapped.If not,bake for a further 10 minutes.
Brush the top of the rolls with softened butter immediately after you remove from the oven.
Run a knife around the edges and immediately remove the rolls from the pan and cool on a wire rack.
Serve the rolls warm with a hot cup of tea.
Notes

  • The quality of the bread depends entirely on the yeast,so make sure you use a fresh batch.I use instant dry yeast which doesn't require proofing but I follow the tried and tested method.
  • The rolls taste awesome when served warm from the oven but if you are storing it,cover it in a ziplock and microwave for 10-15 seconds before serving and it will taste as fresh.

 Yeastspotted

Sunday, April 8, 2012

I love your blog - The Purple Foodie

I am sure most of you are familiar with Shaheen aka The Purple Foodie.Her blog is a mixed bag of her travails with food,travel and books.Her recipe for Pound cake is the one which attracted me to her blog and from there it took me to her posts on Candied ginger,Nutella Cake and many more.She is living her dream of studying at Le Cordon Bleu,Paris these days.
Her blog is full of cute looking illustrations and it is hard not to fall in love with those.She also posted a DIY notepad which has become such a useful thing to have around you when you want to suddenly jot down a recipe or make a list of ingredients to shop for.
She was a guest editor for BBC Good Food India's first edition.She put forth recipes for Meditterranean food and desserts.Tiramisu was one of them.
Ever since I am bitten by the yeast bug,I've been planning to make these Pesto rolls and Cinnamon rolls.Fingers crossed,soon-very soon!
You think it is tough to source baking ingredients in India?Read up this exhaustive list of places where you can buy stuff in Bombay.Very informative post.
As I mentioned in the beginning,her Vanilla Choco-chip Pound Cake is the recipe which got me hooked to her blog and that is the first recipe I tried from her blog too.
Another winner would be the Double Chocolate Truffle Brownies which I am yet to post on the blog.
Not to forget the Apple Crumb Cake which has become an absolute favorite!

 
*All pictures published with the bloggers permission.


Thursday, April 5, 2012

Batate bhajun Upkari ~ Roasted Potato Stir-fry

Whenever amma asks me details about the blog and what my latest post is,it so happens that it'd be a cake or a baked goodie or something else.She always says,why don't you post something which we make on a regular basis,you know, different upkaris/ghashis etc.Which actually makes me sit and ponder.
I started the blog way back in 2008 without a clue what blogging was all about.Initial entries of mine were all dishes made for breakfast,lunch and dinner.Slowly I graduated to posting stuff from different cuisines etc and after the baking bug hit,it was baked goodies all through.

Sometime back when I made our favorite roast potato stir-fry,I thought about what amma said and decided to post this on the blog.So here is a very basic and simple potato stir fry which goes well with rice and dal and is a great combination with chapathi/rotis too.

Batate bhajun Upkari - Roasted Potato Stir-fry

Ingredients

Potatoes - 2,medium
Oil - 2 tbsp*
Mustard seeds - 1/4 tsp
Red chilly powder - 1/2 tsp
Salt to taste

Method
Peel and slice potatoes into thin triangular pieces and soak in enough water till required.
In a kadai add oil and splutter mustard seeds.
Drain the potatoes and mix in.Add red chilly powder and enough salt to taste.
Stir well and cover with a tight lid and cook for 10 minutes stirring often.
When the potatoes are cooked,remove the lid and cook for further 10 minutes on simmer or till the potatoes are roasted evenly.
*Oil can be added as per ones choice-more oil would make the roasting speed up and the potatoes more crisp.

Monday, April 2, 2012

Double Chocolate Mocha Brownies

I don't know what's with me and chocolate.I keep thinking I shouldn't bake/post anything chocolaty here for a while but the chocoholic in me somehow peeps up and here I am again with not something 'just' chocolate but a double chocolate brownie with coffee.Now we're talking.So after these Eggless Molten Lava Cake and Chocolate Loaf cake it is only fitting to post these Double Chocolate Mocha Brownies,isn't it?
I rarely try any other recipe than this whenever I bake brownies because,well why mess with perfection,right?But it is fun to try something new,the excitement while trying a new recipe and the anticipation while cutting into the crust is simply mind blowing.
IMG_1051 
Some time back,I had tried a similar recipe from Purple Foodie.Though I took pictures through the starting stage to the final,somehow the brownie hasn't made it to the blog.Yes,it was made for my niece and was a total last minute bake when we had less than 2 hours to catch our train.Taking pictures while the taxi is waiting outside didn't make sense to Ajay,well I would have tried if he wasn't around;)).
Brownies made with dark chocolate and cocoa make my heart beat faster.The decadent rich chocolate flavor is elevated to a completely different level with a slight hint of coffee.Though I do love brownies with walnuts,this one does not have any and is a complete chocolate lovers treat on its own.

Double Chocolate Mocha Brownies
Recipe source - Martha Stewart

Ingredients

Butter - 8tbsp / 100 gms,cut into pieces plus more for the pan
Chocolate - 8 oz /225gms - I used a mix of milk and dark chocolate
Instant Coffee powder - 2 tsp - I used Nescafe
Sugar - 1 1/4 cups - I powdered the sugar until it was fine,(not superfine)so that it mixes evenly into the batter without excessive mixing
Eggs - 3,whisked slightly
Flour - 1 cup
Cocoa powder - 1/4 cup
Baking powder - 1/2 tsp
Salt - 1/2 tsp

Method

Preheat oven to 170C.Grease and line a 9' square baking pan with butter.Line bottom and two sides with aluminium foil,leaving a 2' overhang on the two sides.
In a small bowl whisk together flour,cocoa powder,baking powder and salt,set aside.
Place butter and chocolate in a micro proof bowl and microwave on full power for 1 minute.Whisk together till smooth.If chocolate chunks remain microwave  again for 15 seconds and whisk again.
Add instant coffee and sugar and mix to combine.
Mix in the whisked eggs and stir.Add the flour mix and mix just until moistened(do not overmix).
Transfer batter into prepared pan,smooth top.
Bake for 50-60 minutes or until a toothpick inserted into the center comes out with moist crumbs.(it took 50 minutes in my oven).
Cool in the pan for 30 minutes.
Using paper overhang,lift the brownies out of the pan and transfer to a rack to cool completely.
On a cutting board,using a damp serrated knife cut the brownie into 16 squares.
Serve warm with ice-cream.
Notes

  • The baking time varies from one oven to another so check the brownies after 40-45 minutes.It is better to under bake the brownies(with gooey center)than to over bake which would make the brownie dry and hard.
  • Cool the brownie completely before cutting to get pretty,neat squares.I am impatient and couldn't wait:).
  • You could also refrigerate the brownie for 30-45 minutes and then cut it to get neat squares.Warm the brownie in the MW for 10-15 seconds before serving.
Related Posts Plugin for WordPress, Blogger...
 
Pin It button on image hover