Thursday, December 30, 2010

The year that went by --the inevitable 2010 round-up!


Here I am with the inevitable yearly round-up,I am sorry if its sounds boring,almost in sync with the Annual report which is dished out in every meeting and undoubtedly,the most boring part.I promise to keep this short,sweet and interesting[hopefully].

2010 has been a mixed bag of emotions for us.Though the year started on a very promising note,it didn't remain so for long.I fought with a terrible bloggers' block due to this and then came back with a bang for my 2nd Blog anniversary.I invited you to be a part of my happiness by sending in your Best Chocolate Cakes.It was a very successful event[my first] with a whooping 34 entries in all.I roped in a dear friend[now a super celebrity]to do the honours of choosing the winner for the event.

The Best Chocolate Cake event Round-up


Being a self-learned baker,I identify with beginner bakers and their apprehensions well.While starting off,I just had one or two fool-proof recipes with me,passed on by my co-sis and after a few trial and error sessions,I started getting good,consistent results.So when Ria suggested a baking group for beginners,along with Maria,I couldn't be more happier and we started a baking group--A Sweet Punch.If you want to be a part of this group,please send a mail to asweetpunch@gmail.com

A Sweet Punch


For a person who hasn't won a single lucky draw or even any assured gifts,winning a giveaway was an occasion worth celebrating.I won a giveaway hosted by Nags with which I could finally buy the Bundt Pan and Microplaner I've wanted for a long time.As the year was coming to an end,I won another giveaway hosted by Ann and I am still breaking my head as to what to buy--lucky me!!

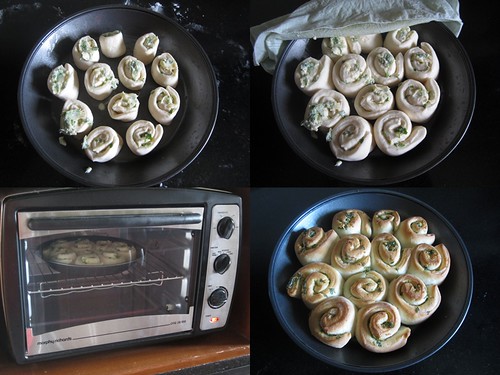
Ever since I started baking,I've been getting queries regarding my oven.Even now,people find it difficult to believe I've been successfully baking in my Microwave Convection oven.I don't see any reason not to bake in MW Convection,as it gives such consistent results each and every time.So when DK,asked me to do a guest post on the same,I was more than happy.Check out my guest posts at her blog for MW Convection FAQ's.


Baking in Microwave Mode


Another highlight of the year was meeting bloggers in person.It is a totally different feeling altogether to meet someone who shares the same interest as you and someone whom you've known only through their blogs.In June,I met Nithya,Priya,Shanthi and Srivalli in a mini-blogger meet.But the real icing on the cake was the Mega blogger meet we had this month where a whooping 17 of us turned up.It was great fun.Some of us met again two days later which again was a great experience for me.Looking forward to more such meets in the future!!

Best 5 recipes of 2010


Best 5 recipes you liked


Initially,this blog was started just to record my kitchen experiences,but now it has grown and has gone a long way from there.From the blog stats,I understand that you guys like my baking adventures and look forward to it.For Easycooking,2011 would be a year of more baking,more experiments in Konkani cuisine,as well as other cuisines and more important - more recipes which you like to read about and cook.Hope to see you around more and wishing every one a very Happy New Year 2011!!

Off this goes to Srivalli's event-Best of 2010!!

Lots of Love,

Friday, December 24, 2010

Christmas Fruit & Nut Cake


The festival of joy,happiness and cheer is here.One of my favorite seasons of the year where all over you can see lighted stars and decorated Christmas trees,with the delicate voices of carols playing in the background.As always,I am truly enticed with the cheer and like most people in Chennai,wished it snowed here too.Yes,the climate is so cold and chilly that the newspaper even carried an article asking people what if snowed in Chennai?

Now that would be quite an interesting proposition,wouldn't it?


I almost chose not to bake THE fruit cake this year,because I am so tempted by the Christmas goodies which are available in various hotels,bakeries and pâtisseries.Well,I am getting a goodie basket for myself,but the blog has to be fed the ceremonial fruit cake for Christmas,right?So here's my fruit cake for the year-I chose the recipe from Sankeerthanam,primarily because of the simplicity of the recipe.Kind of like a quick fruit cake,without compromising on the taste.

Do check out my Christmas Cake recipes of last year and year before last's too if you want a different recipe!!I'd especially recommend my last years cake,which I followed from Raaga's blog which,according to me came the closest in taste of the Fruit cake I've had during my childhood years--I am making it for the New Years!! 


Christmas Fruit & Nut Cake
Recipe minimally adapted from  Sankeerthanam

Ingredients

Flour/Maida - 1 1/4 cup + 1 tbsp for the soaked fruits
Baking powder - 1 tsp
Salt - a pinch
Garam masala (homemade) - 1 tsp* [ Inspired by Deeba ]
Butter - 1/3 cup / 75 gms
Sugar - 1 cup
Eggs - 2
Vanilla extract - 1 tsp
Caramel syrup - made from 1/2 cup sugar and 1/2 cup hot water[method below]
Dry fruits and nuts - 1 cup [ I used a mix of Cashews,Almonds,Walnuts and Tutty fruity,Glace cherries,Dates and Raisins]
Rum - 1/2 cup**


Method


Soak the fruits - Chop the fruits and nuts and soak in the rum in a clean and dry jar for a couple of days,or at least overnight.Shake the jar once in a while.

Preparing the Caramel - Spread the sugar evenly in a thick bottomed pan and switch on the flame.Do not stir,just keep swirling the pan as and when the sugar starts to caramelize.Keep a close eye on it and the moment it reaches a deep,dark brown colour,add the hot water 1 tbsp at a time till you finish all the measured water.Remove to a bowl and let it cool.

Making the cake

Preheat oven to 170C.
Grease and line an 8 ' round cake tin[I prefer to line the sides and bottom and then grease the baking paper with butter].
Sift together flour,baking soda,salt and garam masala.
Cream the butter and sugar till light and fluffy.
Add the eggs one at a time and beat well.
Mix in the vanilla and the cooled caramel syrup.
Beat in the flour at low speed till you get a smooth batter.
Drain the soaked fruits and add the 1 tbsp flour to it and mix well till the flour is evenly coated.
Switch to a rubber spatula and fold in the soaked fruits.
Pour the batter into the prepared tin and smooth the top with a spatula.
Bake for 45-50 minutes or till a toothpick inserted comes out clean.
Cool in the tin and when the cake is cool,prick holes on top with a toothpick.
Pour rum on top using a spoon and cover the cake with a foil.
Keep aside for 2-3 days till the cake gets 'matured' and all the flavors seep in.
Cut and serve. 


*Use only homemade freshly ground garam masala.I am not sure the cake would taste the same with store bought garam masala.If you don't have a ready stock,just grind together 1 cardamom,2-3 cloves & 1' stick cinnamon to a smooth powder.

**If you do not want to use Rum,just substitute with Orange juice,but keep it refrigerated.

Here are some of the best Fruit Cake recipes for the year which I found very,very interesting.


For eggless Fruit Cakes,I'd recommend Anushruti's Eggless Fruit and Nut Cake which I tried last year,also the one she made this year.


Wishing all of you who celebrate a Very Merry Christmas!!!

Christmas Fruit and Nut Cake is of to Suma's Blog anniversary event!!


Wednesday, December 22, 2010

Chocolate Mud Cake ~ For Suma & Blogger Meet[s] !!


They say excuses are a waste of time,your friends don't need them and your enemies won't believe them.I definitely consider Suma as a dear bloggie pal and I hope she doesn't mind this long over due post.

It was a while back[more than 2-3 months I guess] that Suma e-mailed me and requested me to do a guest post on her blog.She even kept the window open asking me to post anything which fancies me,though I couldn't ignore the *hint* on Cake.Now come on,for some one whose blog is named Cakes and More,what else can you bake??

Many things kept me from posting this on time.But I wouldn't get into all that,better late than never.I wanted the Cake to be Chocolatey and believe me,this one's full of it.Fudgy and gooey,this one could almost pose as a Brownie and you wouldn't know the difference!!Perfect with a scoop of Chocolate Ice-cream with some Chocolate sauce on top with some toasted nuts.And the colour..ah the colour.Oh,I could grab that plate and go into Chocolate Nirvana.Suma,here it is for you and I hope with this one I've made up for being such a Late Lateef!! I almost felt guilty eating this on my own when I actually made it for you!!


Hop on to Suma's blog for the recipe and more!

------


Photo courtesy - Srivalli

It is fun meeting people who share the same enthusiasm[some even more] as you when it comes to clicking pictures of food rather than people,who don't feel offended when you ask a recipe before asking pleasantries and those who don't mind by being known by their blog names rather than their own.Yes,I am talking about meeting fellow food-bloggers.I first met few of them personally back in June when we had an out of the moment mini-bloggers meet at a restaurant.But this time Oh boy,it was nothing close to mini and as named by us,it was a Mega blogger meet with a whooping 16 of us turning up.

Some of us were meeting each other for the first time but it didn't feel like so.We were giggling and clicking pictures and eating from each others plates at the same time,much to the chagrin of the floor manager who asked us to leave!!!Yeah,Veena,even threatened to sack him and hence was proclaimed the official security of Chennai Food Bloggers.And then the person whom we thrust our cameras and asked to take group photos.He looked a bit iffy in the beginning but a few snaps later,he joined in the fun!!

All in all,an afternoon well spent.I am definitely looking forward to such meets in the future,we do have a few things planned in our heads regarding this,hope it materializes!!

Few of us met again on Monday since Bharathy was in town and wanted to meet us all.It was organized in a jiffy and we met for a casual lunch at Mathsya,a restaurant in T-Nagar.It really does feel nice when you spend time with someone whom you've known only through their blogs or facebook profiles.I am looking forward to more such meets in the future!!

Monday, December 20, 2010

Dates and Walnut Cookies


How often do you feel you have created something so original and unique and feeling so proud of yourselves and within a few seconds of Google search,you fall back to the ground with a thud?Let me tell you,it is not a great feeling at all.But for a change,I felt good that even though the combination of Dates and Walnuts in Cakes and cookies is not new,I followed a basic cookie dough recipe and tweaked it to make this cookie and guess what,it came out great too.

It has been a while since I posted any Cookie recipe here even though I end up making it at least once every two weeks.Reason being,I follow a very basic recipe and change flavorings every time which gives me a different tasting cookie but the recipe remains the same.I started by making a basic shortbread cookie recipe but now swear by this recipe from The Yum Blog for the Cinnamon Cookies.

I made this in bulk,about 3 batches for a Blogger meet we had in Chennai[more on that on my next post].It was fun baking batches of cookies back to back and packing them individually.I hope whoever got it liked it :-)


Dates and Walnut Cookies

Ingredients

Dates - 1/3 cup,packed-chopped fine
Walnuts - 1/3 cup,chopped
Flour - 1 1/2 cups
Sugar - 1/2 cup
Butter - 1/2 cup
Spices - 2 Cloves,1' stick Cinnamon[optional]

Method

Powder the sugar along with the spices[if using].
Cream the butter and powdered sugar till fluffy.
Keep about half a cup of flour aside and knead in the rest.
Add the remaining flour along with the chopped dates and walnuts till you get a smooth dough[adding the dates and nuts before makes it difficult to mix].
If the dough is dry and crumbly,mix in one or two tbsp butter and if it is too sticky,mix in 1 tbsp flour.
Put the dough inside a ziplock bag.
Leave the bag open and slowly press out the dough with a rolling pin so it becomes a rough rectangle about 1/4 inch thick.
Turn the bag to the other side as well, while rolling, and occasionally lift the bag from the dough to smooth out the creases. Take care to see no air pockets remain and gently press out any. Seal the Ziploc bag and refrigerate for at least two hours or upto 2 days.
When the dough has chilled enough, take it out. 
Place on a cutting surface and slit the Ziploc bag open. Take the chilled rectangle of dough out, and cut into 1 1/2" squares with a sharp knife after marking them out using a ruler.
Place the squares on a baking sheet lined with parchment and prick them well with a fork.
Bake at 150*C for 20 minutes(That is the normal baking time for cookies of our taste-crispy yet melt in the mouth,you can bake it according to the temperature settings of your oven).

Date and Walnut Cookies are off to Suma's Blog Anniversary event!!

Wednesday, December 15, 2010

Old-fashioned Cherry Loaf Cake


I love cherries.Nope,not the fresh cherries,or cherries in syrup on cherries in a can,but the cherries in Sugar syrup or more commonly known as Glace cherries.I can munch on them any time of the day.Back home,we used to get these in small quantities from the Bakery opposite our house where they sat prettily in huge glass jars every now and then.Whenever Custard was made,we got cherries.Whenever we bought Ice-cream,we got some cherries.In fact,we used to have these cherries on their own sometimes after meals and call them our dessert of the day!

No wonder then I used to like cherries in my cakes too.I like the glace-cherry filled Blackforest cake any day over the ones with Maraschino cherries.A friend once called me old-fashioned when I mentioned I make my Blackforest Cake using glace cherries.I have tried a similar cake before which called for glace cherries and loved it.I was actually looking for some colored cherries since it is this time of the season.Imagine the color burst if this cake had green and yellow cherries too along with red ones!!


I would call this a bakery style cake.It is more like a tea-cake than a sweet treat.Buttery and melt in the mouth,almost like a pound cake,with cherries in every bite,I can see myself baking this again and again.


Old-fashioned Cherry Loaf Cake
Recipe minimally adapted from - Thangam Philip Book of Baking

Ingredients

All purpose flour/Maida - 115gms
Baking powder - 1/2 tsp
Salt - a pinch
Butter - 85 gms
Sugar - 85 gms
Glace cherries - 55 gms
Eggs - 2,lightly beaten
Milk - 2-3 tbsp
Vanilla extract/essence - 1 tsp

Method

Preheat oven to 170C.
Grease and line a loaf tin or a small cake tin[6' or 7' round/square].
Sift together flour,baking powder and salt.
Prepare the cherries-wash them well and pat them dry using a kitchen towel.
Cream together butter and sugar till light and fluffy-about 5 minutes on an electric beater.
Mix in the beaten eggs little at a time with Vanilla essence and beat for another 5 minutes till the mix becomes creamy.
Mix in the flour mix [keep 1 tbsp aside for the cherries] and beat on low speed,alternating with the milk till you get a smooth batter,the batter is fairly thick and not of pourable consistency,it is rather of a dropping consistency.
Add the 1 tbsp flour to the cherries and give a good shake-fold it into the batter.
Pour the batter into the prepared loaf tin and bake for 35-40 minutes or till the cake is golden brown and firm and a toothpick inserted comes out clean.
Cool and cut into thick slices.


---

On a different note-I keep getting mails from readers asking what kind of measuring tool[s] I use for baking.I started with an old coffee mug for measuring dry ingredients and a liquid measuring cup I got as a freebie with something for liquids.I got good results but I should say my baking has definitely improved after I got a measuring cups and spoons set.For conversions,I used this website,which I found very useful.I now have a digital weighing scale which makes baking more easier.

What measuring tools do you use?

---

Old-Fashioned Cherry Loaf cake is off to Suma's Blog Anniversary event!!


Monday, December 13, 2010

Garlic Pull-apart Rolls

I am petrified of yeast..aah,I said it.It feels so good to share this with you people,no one else would quite understand it if I said this to them.I mean,how can anyone be scared of something which looks so..so..hmm,can't really say what.I have baked with yeast before,many a times but every time I am about to cook something with this star ingredient,I start getting nightmares[okay day-mares,since I cook in daylight],whether it will rise or not,whether it will lend a good texture to the baked product or whether it will fall flat on me.
Garlic Pull-apart Rolls

But sometimes,you let go of all inhibitions when something appeals to you strongly,very strongly in my case.Few days back,on a Sunday I was lurking around in Facebook when I saw Nags' status message saying she just tried these Garlic rolls from Suhaina's.That got me interesting and I hopped over to Suhaina's blog for the recipe and I should say I had the urge to try it right then.I checked my fridge for the Yeast sachets I got from Ekm last time and hoped the yeast wouldn't disappoint my enthusiasm.

The recipe is easy peasy.Just mix everything together and bake.Yep,that's it.As the rolls were baking,the house was smelling so good and when I saw them puffing and browning so nicely my joy knew no bounds.Half of the rolls were finished as soon as they came out of the oven and half for dinner along with Broccoli soup.Only then did I realize i didn't take pictures,but wait-it just gave me the opportunity to bake it once more..yay!!Do give it a try!!
Garlic Pull-apart Rolls

Garlic Pull-apart Rolls
Recipe courtesy  - Suhaina 

Ingredients


Flour/maida - 1 1/2 cups
Warm water - 1/2 cup
Yeast - 1/2 tbsp
Salt - 1/2 tsp
Sugar - 1 tbsp
Olive oil - 2 tbsp


For the garlic spread


Salted butter, at room temperature - 25 gms
Garlic - 2-3 cloves,grated
Chopped coriander leaves - 2 tbsp

Method
Garlic Pull-apart Rolls-step1 
Mix together warm water,sugar and yeast in a bowl and let it proof for about 5-7 minutes.It should bubble and froth up within minutes,if not start afresh.
Garlic Pull-apart Rolls-step2 
Mix together flour,salt and yeast mix till you get a slightly sticky dough.
Add oil and knead for 5-7 minutes till you get a smooth dough.
Garlic Pull-apart Rolls-step3 
Cover the dough with a cling film or a kitchen towel and allow to proof for 40-45 minutes.
Garlic Pull-apart Rolls-step4 
Meanwhile,mix together all the ingredients for the garlic spread and keep aside.
Grease a baking pan or a loaf tin with butter[I used my loaf pan for the first trial and a round tin for this one-both work fine]
Garlic Pull-apart Rolls-step5 
Knock down the air in the dough and divide the dough into two equal portions.
Roll one half of the dough on a floured surface using a rolling pin to a rough rectangle.
Spread about one third of the garlic bread on one side.
Roll from one end as you would for a swiss roll.
Cut the roll into half and further into two making it four rolls.(I rolled the dough from the long end and got 6 rolls out of one).
Garlic Pull-apart Rolls-step6 
Now place the rolls with the cut side up in the greased pan.
Repeat the same procedure for the remaining dough. 
Spread a little milk on the rolls and add the remaining garlic spread on top.
Allow to rise for another 20 minutes. In the mean time preheat the oven to 180C / 375F.
Bake for 20-25 minutes or till the top has become golden brown.
Garlic Pull-apart Rolls


Notes
  • The recipe is a very simple one,perfect for beginner yeast bakers.Of course,it all depends on the quality of the yeast you use.Make sure you use a fresh batch of yeast.I use Mauripan Yeast sachets.
  • The yeast granules can be directly added with the flour,but I always take the tried and tested route of proofing the yeast first and then kneading the dough.
  • Knead the dough for at least 5 minutes to develop gluten.This creates soft and fluffy rolls.
  • Every oven is different so baking times may vary.
Off this goes to Suma's Blog Anniversary event!!

Pictures updated on 11/08/12

Tuesday, December 7, 2010

Pear,Chocolate and Almond Crumble


It is time to Punch!!Yes,our December Punch is here again and I am happy to be hosting it this time.Our challenge was a Crumble/Cobbler this month and I chose a Pear,Chocolate and Almond Crumble.

A crumble is a dish of  British origin that can be made in a sweet or savoury version, depending on ingredients used. A sweet variety usually contains stewed fruit topped with a crumbly mixture of fat(usually butter),flour and sugar.It is often served with custard,cream or ice-cream as a hearty, warm dessert after a meal.Popular fruits used in crumble include Apple,Blackberry,Peach,Rhubarb and Plum.[Source]


Few months back,I didn't know what a crumble was and now I am a convert.I love the flavor of caramelized fruits topped with the delicious crumble topping.I have tried an Apple Crumble version here.This recipe is almost similar but with a slight twist.Chocolate makes anything better,so I believe and it is true in this Crumble too.Little bites of chocolate in between crunchy crumble and soft pears,absolute YUM!!


Pear,Chocolate and Almond Crumble
Recipe minimally adapted from here

Ingredients

Pears - 2-3,peeled and chopped
Sugar - 3 tbsp
Grated zest and juice of 1 lemon
Chocolate - 50 gms,roughly chopped

For the Crumble

Flour - 1/2 cup
Butter - 50 gms[I used only half and a bit more of it,so about 35 gms]
Sugar - 3 tbsp
Almonds - 1/4 cup,roughly chopped[measured after chopping]
Chocolate - 50 gms,roughly chopped 

Method

Preheat the oven to 180°C.
Grease an oven proof glass dish or a pie dish or individual ramekins.
In a medium bowl, mix together the pears,sugar, lemon zest and juice, and half the chocolate.
Divide the mixture between the glass dish or ramekins, spooning over any juice.


To make the crumble, place the flour and butter in a medium bowl and, with your fingertips, rub together until the mixture resembles fine breadcrumbs. Stir in the sugar, almonds and remaining chocolate.
Spoon the crumble over the pears and press down lightly. 
Place the crumbles on a baking tray and bake for 30-35 minutes until golden and bubbling.


Monday, December 6, 2010

Broccoli,Mushroom and Corn Bake


It has been a very uneventful weekend.Chennai didn't look like Chennai at all,continuous rains,the definitive chill in the air and...the darkness.Perfect climate for a hot cup of tea and a plate full of snack items like deep fried Bajji and Bonda.We just sat with the windows open,on the bean bags reading all day and solving sudoku and crosswords.I just did not have the mood to cook since the thought of even getting up from the couch was unappealing!!

For lunch,Ajay wanted to have something simple and I managed with whatever leftovers I had plus a bowl of salad and then again back to the lazy routine.By evening,we were famished and wanted to have something which didn't take much trouble to make but delicious nevertheless.One-bowl dinners are perfect for that and I chose this cheesy vegetable bake which perfectly satisfied our craving.


I've not been very successful with making white sauce but after following this method,I've been consistently getting good results.I chose the recipe from one of my favorite blogs and as with all her recipes,this one too is a no-fail recipe!!I did add more vegetables than the ones named but thought this name was perfect!!


Broccoli,Mushroom and Corn Bake [Plus Cauliflower,Carrot and Baby corn]
Recipe minimally adapted from Raaga


Ingredients


Broccoli florets - 1/2 cup
Cauliflower florets - 1/2 cup
Sweet corn - 1/4 cup
Baby corn - 1/4 cup,chopped
Carrot - 1,chopped
Mushroom - 4-5,sliced


Butter - 1 tbsp
Flour - 1 tbsp
Milk - 2-3 cups
Cheese - 4-5 tbsp,grated[I used Mozarella]
Oregano - 1 tsp
Salt and pepper to taste
Bread crumbs - 2 tbsp
Butter to grease the pans

Method

Cook the vegetables[except mushroom] till soft-we like it a bit crunchy,so cook according to your preference.
In a saucepan,add the butter and oregano and stir well.
Mix in the sliced mushrooms and saute for a few seconds.
Add the flour and stir well,without browning the flour-simmer and add the milk stirring continuously till the mixture comes to a boil and the sauce starts to thicken.
This method ensures that no lumps are formed while adding the milk.
Add half of the grated cheese and salt and pepper to taste.
Mix in the cooked vegetables and stir well so that the sauce coats the vegetables evenly.
Grease a baking dish with butter and pour in the vegetables-white sauce mix.
Sprinkle the rest of the cheese and breadcrumbs over it.
Bake in a preheated oven at 200C for 10 minutes.
Serve hot with Garlic bread [ used store bought]

 Chennai at 2 pm - Adyar Thiru-vi-ka bridge

Saturday, December 4, 2010

Eggless Custard Powder Snack Cake


cpc2

Update --I have updated this post with pics when I made the cake very recently.My previous attempt was in a Ring mold which caused the cake to break when it was inverted to a wire rack for cooling.I tried it this time in a 7' round cake tin[baking time was same]and got 6 cupcakes with the leftover batter.
---
Sometimes the distance between a recipe and the kitchen is very far and sometimes it is as near as it can be.Many a times,I have baked cakes even before I read the full recipe on someone's blog,it would be that interesting.This is an example.So when I saw Aparna's recipe,I knew I had to try it asap.I mean,how simple can a recipe get,it was simpler than that.Barring the time required for the butter to come down to room temperature,it is as easy as saying c-a-k-e!!

cpc5


If you are looking for a beginner baking recipe,this is it.If you are looking for a simple eggless cake,this is it and if you are looking for just-a-snack cake to munch on,this is it.Have I convinced you enough to don your aprons and start baking this???


Only problem with mine was,it cracked into two[maybe three?] pieces once I inverted it on the rack.No worries,I just left it at that and when it cooled down,I cut into pieces and the cake was fine.Oh wait,did I say fine?wrong,it should be goooooood.Loved the flavor of custard powder and true to its name,I kept snacking on it one piece after the other.


cpc3


Eggless Custard Powder Snack Cake
Recipe courtesy - Aparna of My Diverse Kitchen


Ingredients


All Purpose flour - 1 1/2 cups
Vanilla flavoured Custard Powder - 3/4 cup [or Cornflour]
Baking powder - 2 1/4 tsp
Sugar - 3/4 cup
Vanilla extract - 1 1/2 tsp[if using cornflour]
Butter - 150 gms,room temperature
Milk - 1 cup


Method


Put all the dry ingredients in a large bowl. 
Use a wooden spoon and mix well. 
Add the milk and the butter and beat with the spoon until you get a smooth batter.
Pour the batter into a greased and floured cake tin* (or two smaller tins) and bake at 180C (350F) for about 45 minutes to an hour or till the cake is done and a skewer poked into the cake comes out clean. Sometimes, depending upon your cake tin and the oven, this cake might take upto an hour to cook especially in the middle.
* I baked my cake in a ring mould and my cake was done in 45 minutes.
Cool on a rack and serve.

cpc5


Related Posts Plugin for WordPress, Blogger...
 
Pin It button on image hover