Monday, May 31, 2010

Classic Chocolate Fudge Brownies


Brownies make me forget my diets,coming to think of it,I seriously can’t resist a Fudgy gooey brownie and I have enough will power[I believe] to overlook the dessert section otherwise!Precisely the reason why I have not ventured much into Brownie baking.I love my brownies with a dollop or more of Chocolate ice cream drizzled with chocolate sauce and topped with toasted nuts,serious calorie overload;).

But a Brownie as gooey,fudgy and chocolatey and as the name says Classic as this is not to be ignored.I wanted to bake it immediately,as in just.right.now when I saw DK’s post but I resisted and waited for an occasion.I was lucky that it came just a few days later.Baked it for a friend who is as crazy about Brownies as I am and I am good to go.For the first time ever,I baked it at 11pm as Ajay sat watching his Friday night Hbo movie.

DK..I can’t thank you enough for this masterpiece.I have my go-to Brownie recipe now and if it was not made as an edible gift,I am sure I would have gobbled down the whole batch.I skipped the icing but the taste is not one bit compromised.. I can see myself baking this again..and again.


Classic Chocolate Fudge Brownies
[Recipe source - DK of Chefinyou]

Ingredientsyields about 12-16 pieces

Flour - ½ cup
Baking powder – ¾ tsp
Salt – a pinch
Walnuts,chopped – 1 cup
Eggs, lightly beaten -2[or 4 egg whites]
Butter, melted – ¾ cup
Cocoa – 6 tbsp
Sugar – 1 cup
Vanilla extract – ½ tsp

Method

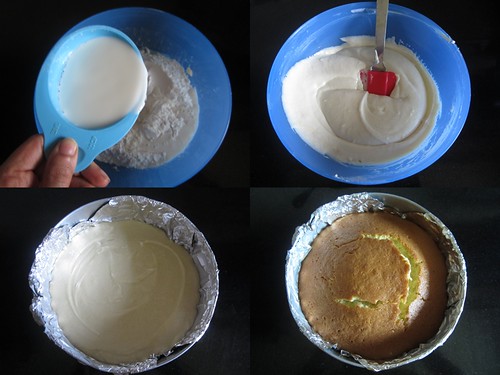
Preheat Oven 350F. Grease an 8 inch square shallow cake pan with wax paper. Mix the butter and cocoa in a pan and set aside.
Beat together the eggs, sugar and vanilla extract in a bowl.
Mix it along with cocoa mixture.
Stir in the nuts.
Sift over the flour and fold it along with the mixture.
Pour this mixture into the cake pan and bake for 20-35 minutes until risen. It will still look soft and wet but it will cook further while cooling. Let it sit to cool.

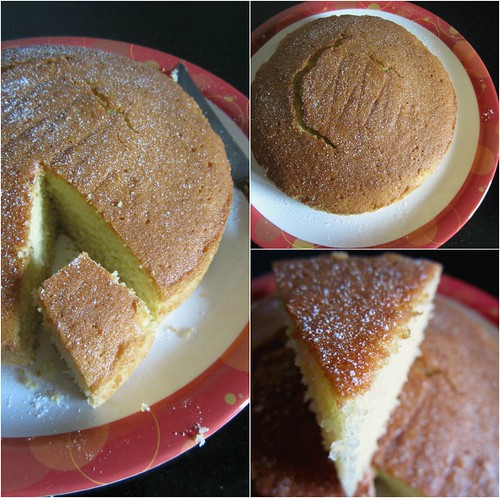
DK’s notes - It would make about 12 large pieces. You can cut it into smaller pieces since its pretty rich. Its gooey, smooth, chewy with a slight crunch from the nuts.


It had an oh-so-nice crust and according to me the crust makes the brownies,period.I just can't rave enough about this one..:).Thanks again DK!!

Friday, May 28, 2010

Dudhi chi Phodi ~ Shallow fried Pumpkins


I find it really difficult to get back to cooking after a break.Yes,even if the break is for as less as two days,the thought of getting back into the kitchen and cook really puts me off.Ajay jokes that the food automatically tastes too salty,too sour or too spicy for sometime before I am back on track..can’t blame him completely here;).

Other than the regular fare,I find cooking for lunch is the most time-consuming,not cooking-wise but the whole time spent on thinking about what-to-cook.After our regular veggie shopping I had a whole array of vegetables looking at me and I got my inspiration from these humble pumpkins.Ma-in-law had made these yummy phodis once she was here and I was too busy hogging to ask her the recipe.

I came across this recipe here and made some modifications.Made a Sambhar[not with beets though;)] and fried some papads,with phodis and curd on the side,I had a happy man content with the lunch!!


Dudhi chi Phodi
Recipe slightly adapted from
here

Ingredients

Pumpkin slices – 10-12,thinly sliced
Red chilly powder – 1 ½ tsp
Salt to taste
Hing/asafoetida – ½ tsp
Fine sooji/semolina – ¼ cup
Oil – 2 tsp

Method

Make a paste of red chilly powder,salt and hing with 1 or 2 tsps of water.
Mix the pumpkin slices with this well and make sure the masala is coated evenly on the slices. Keep aside for ½ an hour.
Dip each slices in semolina and place evenly on a hot tawa.
Add 1 or 2 tsps oil on top and close with a lid and fry on simmer.
After 5 minutes or so,turn the pieces and roast the other side too.
Makes a perfect accompaniment with rice and sambhar.


Saturday, May 22, 2010

Thingalavrya Song ~ White Navy Beans Cooked in a Tangy spicy Gravy

I admire people who cook according to a time-table they’ve set for themselves.A while back,I had read in Vanitha Pachakam about a couple who have been having a pattern of sorts when it came to their breakfast,lunch,tea and dinner.Of course there were some modifications here and there,or else it might get monotonous,but the basic menu remains the same.

When it comes to our tradition,there are people who strictly follow the rules for certain pulses on few days of the week.For example,Fridays would be Channa,Saturdays would be Kulith/Horse gram and Monday for Thingalavro/Navy beans.I try to follow the Friday-Channa routine to an extent.According to ma-in-law,these are some simple traditions made by the older generation so that people include pulses in their menu at least twice or thrice a week,good logic,eh?

I usually make a Saarupkari[Recipe below] or Kolmbo using Thingalavro.Inspired by the pictures in KAF,I made a spicy curry with it called Song[similar to Batata Song].Song is a tangy curry which goes well with Rice as well as Rotis.


Thingalavrya Song ~ Navy Beans cooked in a Tangy,spicy Gravy

Ingredients

Thingalavro/Navy beans – ½ cup,soaked overnight or for 6-8 hours
Red chillies – 2-3[roasted in ½ tsp oil]
Tamarind – a small pea size
Onion – 1,big,chopped
Tomato- 1 big,chopped
Oil – 1 tbsp
Salt to taste

Method
Cook the beans in a pressure cooker for 20-25 minutes or till soft[shouldn’t become mushy].
Grind to a smooth paste the roasted chillies and tamarind.
In a kadai,add oil and sauté the onions till they start turning golden brown.
Add the ground masala and the chopped tomatoes and sauté for 2-3 minutes.
Mix in the cooked beans and salt to taste.
Let the curry come to a rolling boil,then reduce flame and cook for another 5 minutes.
Serve hot!

Thingalavrya Saarupkari - Soak the beans overnight and cook till soft.In a kadai,prepare seasoning of crushed Garlic and red chillies.Mix in the cooked beans and add salt to taste.A simple yet hearty curry!!

Thursday, May 20, 2010

Moist Butter Cake

Moist Butter Cake

I don’t think I have cooked anything from a blog as fast as this one.Last Sunday morning,I was home alone and as usual,was blogopping when I saw this utterly butterly Butter Cake at Maria’s blog.I read through the ingredients and surprisingly,I had everything ready in my kitchen.The recipe is super easy and can be almost termed as a beginner baker recipe.There is almost no effort involved.Literally dump everything into a mixing bowl,beat well till everything is mixed and there you have your cake batter ready.

I immediately got up and set about baking it.Only change I did was adding 2 eggs,instead of 3 as mentioned in the recipe.But still the cake turned out great..soft,moist and delicious.I have no memories of home-made cakes as baking was not a part of our cooking regime.I sure can relate to it in terms of the butter cake we bought from Best bakery.It tasted almost similar,but better.In fact,when I gave a slice to Ajay,he said it is better than McRennet’s Butter Cake,one which we used to buy regularly before my baking adventures.[*silently gushing in glory:)*]

Thanks Maria,for this Ultra simple,but fabulous recipe.We loved it.
Moist Butter Cake
Moist Butter Cake
Recipe adapted verbatim from Marias Menu

Ingredients
Butter – 125 gm, softened
Vanilla essence – 1 tsp
Caster sugar – 1 ¼ cups, (275 gm)
Eggs – 3, at room temp
Plain flour – 1 
½ cups
Baking powder -½ tsp
Bicarbonate of soda – ¼ tsp
Milk – ½ cup (125 ml) at room temp

Method


Preheat oven to 180 C, 10 mins before baking.
Moist Butter Cake-step1 

Grease a deep 20 cm/8 inch round cake tin; line base with baking paper.
Moist Butter Cake-step2 

Beat ingredients in medium bowl on low speed with electric mixer until just combined.
Beat on medium speed until mixture is smooth and changed to a paler colour. Moist Butter Cake-step3 

Pour mixture into prepared pan.
Bake cake in the preheated oven for 40-50 mins or until the skewer inserted comes out clean.
Stand cake 5 minutes then turn onto wire rack; turn cake top-side up to cool.
Dust cake with a little sifted icing sugar, if desired.
Moist Butter Cake 

Notes
  • The batter might look curdled, but its ok, go ahead and bake it. If you want a caramel flavor, substitute 1 1/3 cups (275 gm) firmly packed brown sugar for the caster sugar.
Pictures updated on 23/08/12

Tuesday, May 18, 2010

Brinjal-Drumstick Masala

It was during my parents’ first visit here,I had planned the menu and bought all the vegetables myself and donned the apron with full gusto.They were supposed to be here for dinner and I had set the table and the works.I served the dinner to Ajay,my dad and my brothers first.Either they were too hungry or too tired to notice what I had made and what they were eating:)

When me and amma sat to have dinner,she casually asked me what I had cooked and I said,Mixed Vegetable Sambhar amma.Sambhar?then why is it reddish in colour?,she asked.Me-Maybe because of the beetroot.You added beetroot to Sambhar..?,she asked and laughed loudly and I saw all her tired-with-journey fatigue melting away and then we had a good laugh over it.I had no clue which vegetables were added to Sambhar:)

I was that bad [still am] when it comes to vegetables.I cook with a set of vegetables and whenever I try to cook a new vegetable,I am at a loss.While we were in Bangalore,ma-in-law prepared this delicious side-dish made with Gulla[also called Matti Gulla] and drumstick and I saw myself liking it immensely.We do not get Gulla here and she said it can be easily substituted with Brinjal.I loved it and can see myself shopping for Brinjal more often!!


Gulla –Mashingasaang Saglen – Brinjal and Drumstick in a Coconut based Masala

Ingredients

Gulla/Brinjal – 3,cut into 4 pieces
Drumstick – 3,cut into 1’ pieces
Onion – 1,chopped
Grated coconut – 3 tbsp
Roasted red chillies – 3-4
Tamarind – a small pea size
Coriander – 1 ½ tsp [roasted in ½ tsp oil]
Urad dal – ½ tsp
Methi – ¼ tsp
Oil – I tbsp
Salt to taste

Method

Grind grated coconut,roasted red chillies,tamarind and roasted coriander to a coarse paste.
In a kadai,add oil and splutter urad dal and methi seeds.
Add in chopped onion and sauté till it turns light brown.
Now add the cut brinjal and drumstick and mix well.
Mix in the ground masala,salt to taste and enough water to cook the vegetables.
Close with a lid and cook for 10-15 minutes or till the vegetables are cooked well and coated with the masala.
Serve hot with Rice and Dali thoy.

Monday, May 17, 2010

Baking in Microwave Convection Oven

I started baking in my Microwave without knowing the Abc's of baking.I've searched frantically for topics relating to these in many sites and blogs,but there were only a few which answered my questions to the point.So,when DK asked me to share my two cents on her blog,I was more than happy.

I am not an expert though.I have been baking in my Microwave for sometime now and I have tried to answer the queries in whatever way I can!!I have an IFB Microwave Oven with Convection and Grill and all baking I do is done in that.


Hop on to her blog to see my guest post,Part 1,on Baking in Microwave Convection Oven.Please leave your comments and suggestions and if you have any questions,shoot..:)

Saturday, May 15, 2010

Rasmalai for Indian Cooking Challenge!!

It has been a while since I participated in Indian Cooking Challenge.Though at first it was not intentional,after a point I became lazy[sorry Valli:)].But this month’s Challenge shook me out of my slumber existence.I love Bengali sweets,all of them.Rasgulla,Mishti Doi,Rasmalai,Cham cham,you name it,I love them all.

I have tried making Rasgulla once,a while back.The reason it has not featured here yet is self explanatory,it was a super flop.I followed the instructions very carefully and did exactly as the recipe said but still ended up with a hard mass of white balls which ‘would have been Rasgullas’.Thankfully,Ajay encourages me in all my ventures and equally provides me with necessary solace when things don’t work well.He always says,close your eyes and dump everything in the waste bin when I encounter unsuccessful cooking experiments[there have been many].

One hot,humid afternoon,I donned my apron and started work on ICC.Everything went on smoothly and I was surprised at how easy it actually was.My camera was missing mysteriously right when I needed it and all the pics are taken with my Phone Camera.

I followed the lesser quantity version which yielded me 6 rasmalais.You can find the original recipe here.


Verdict – History repeats??Here too,I followed the instructions carefully,but ended up with hard paneer balls.The ras/evaporated milk tasted awesome though.I really did not have the heart to throw this off,so I added some nuts to the Milk and served it in a bowl,chilled.Tasted almost like Kheer and I’m glad I did not have to waste the whole thing.

Can someone help me with this please??

Wednesday, May 12, 2010

Palak Baby Corn


I am not a big fan of Greens.It required a Palak Pathrodo for me to even start liking it.I tried very hard to incorporate greens at least twice in a week but ended up wasting one portion of it since Ajay loves it and has his share with gusto.I tried many variations of Thoran and curry but have to say that I very well can do without it.

Now,I am not going to say this curry made me a convert and I cannot live without Palak anymore,no,far from it.But I liked its taste.The delicate flavors of the masala kind of masked the strong taste of palak,just like the pathrodo and I can have anything if Baby corn is added into it,well almost anything!!Goes well with Rotis and I had some leftover with Ghee rice too and actually liked it.

Palak Baby Corn
Recipe courtesy – Lakshmi Nair

Ingredients

Palak/Spinach leaves – 1 bunch
Baby corn – 1 packet,about 10 corns
Onions – 2,chopped
Ginger garlic paste – 1 ½ tbsp
Green chilly – 2,finely chopped
Tomato – 2,ground to a paste
Cashewnuts – 10,soaked and ground to a paste
Red chilly powder – ½ tsp
Jeera powder – ¼ tsp
Garam masala – ½ tsp
Salt to taste
Oil – 1 ½ tbsp

Method

Clean the palak leaves well and cook in boiling water for 5 minutes.
Let it cool and then puree into a smooth paste.
In a kadai add oil and sauté the onions.
Add chopped green chilly and ginger garlic paste and sauté till the onions become light brown. Mix in the tomato puree and red chilly powder and stir well.
When the onion-tomato mix becomes a bit dry add the palak puree,jeera powder,garam masala and salt to taste.[Add ¼ - ½ cup of water if the curry is dry]
Let it boil and then add whole/halved baby corn and cook for 5 minutes or so.
Mix in the cashewnut paste and let the curry come to a final boil.
Serve hot with Roti or Rice.

Monday, May 10, 2010

Vegetable Cutlets ~ Udupi Diana Style!!


I recently joined a group on Facebook called Konkani Amchi Food.Someone sent me an invite and I joined casually.I am a member of quite a few groups on facebook but seldom do I peek into the group discussion or photos.Even otherwise Fb takes up lots of my time:).But this one is different.It is more a photo group where the members post pictures of Konkani dishes as well as new,innovative dishes.

Our dining table has seen a lot of variety after I joined the group,seriously.Thanks to KAF,I made Tori bendi and Palak pathrodo.While browsing through the recipe corner,I came across this recipe for Cutlets.Ajay is a big fan of cutlets and fondly remembers the way his mother made it for them during his school days.I tried his mom’s recipe here and we both loved it.But I try to cut back on deep fried snacks and hence this did not feature in our menu for a long time.

Ajay vividly remembers the Cutlets from Diana restaurant in Udupi and since the recipe sounded pretty easy,I decided to try it out after all.I was in a good mood and hence the step by step pics:).

Vegetable Cutlets ~ Udupi Diana Style
Recipe courtesy – Kudpi Raj of KAF

Ingredients

Potato – 3,medium,cooked and mashed
Carrots – 3,medium,peeled and grated
Beetroot – 1,big,peeled and grated
Onion – 1,chopped
Green chilly – 1,chopped
Garlic – 2-3 cloves,chopped[I substituted it with 1 tsp garlic paste]
Salt to taste
Garam masala – 1 tsp
Bread slices – 4,dipped in water and squeezed to a pulp

Bread crumbs – 100 gms
Maida – 2 tbsp
Oil – for frying

Method

Heat oil in a kadai and add green chillies and garlic paste.
Saute for a minute and then add the chopped onion.
When the onion starts turning light brown,mix in the grated carrot and beetroot.
Add garam masala and salt to taste and mix well.
Cook on a low flame till the water evaporates and the mix becomes dry.
Let it cool and then mix in the mashed potatoes and bread pulp.


Make small balls of the mix and flatten it using your palms.


[you could try this method too-using a bottle lid-place the balls inside the lid and flatten with your palms,upturn it into a plate and you’ll get flat,round discs]


Keep it in the fridge for a while to firm up.
Make a paste using ½ a cup of water and maida.
Dip the flattened discs first in the maida-water and then roll it in the bread crumbs.


Arrange on a plate and refrigerate for 2-3 hours.


Heat oil in a kadai for deep frying the cutlets.[Make sure the oil is really hot before putting in the cutlets].
Add the cutlets to the hot oil and fry till they become dark brown on both sides.Serve hot!!

Saturday, May 8, 2010

Eggless Vanilla Cake with Chocolate Frosting


I feel so good when people appreciate and like the food I cook.I am bad at responding to compliments and often fumble for words,when saying a simple ‘thank you’ would do.But when someone as young as a eight year old asks you for a recipe,I am more amused than happy.Yes,I have a very young fan who loves whatever I bake and eats it with gusto.

Vikram aka Vicky is our friends’ son and I’ve been his official baby sitter[though only occasionally] ever since he was as young as a six month old baby.It was while baking this cake that he expressed his love for me..er my cake.He is very fussy with his food and his taste changes every now and then making it difficult for me to cook for him.But if I say I will be baking a cake if he finishes his food,he will eat whatever I put on his plate.Little tricks I am learning..:)
‘The moment’ came when he had a slice of the Celebration Chocolate Cake.When I asked him how it was he said-It is Sooooper,can you please write the recipe in a paper??I will ask mom to bake it for me!!I felt elated and never before have I felt so good about a compliment!!So whenever he is here,I bake for him.Last time,while I was about to bake,I saw that there was only 1 egg in the fridge and I decided to go eggless.


Eggless Vanilla Cake with Chocolate Icing
Recipe source-Lakshmi Kudua,original recipe by Nita Mehta

Ingredients

Cake flour – 1 ½ cups
Thick curd – 1 cup
Sugar – ¾ cup
Refined oil – ½ cup
Baking powder – 1 tsp
Baking soda – ½ tsp
Vanilla essence – 1 tsp

Method


Preheat oven to 180C.
Grease an 8’ round cake tin.
Beat together sugar and curds well.
Add baking powder and baking soda,mix well and keep aside for 2-3 minutes.
Bubbles will start appearing on top-add oil and vanilla essence and beat well.
Mix in the flour 1 tbsp at a time and make a smooth batter.
I added a tsp of cocoa powder to 1/3 of the batter and then swirled it together with the yellow batter for a marbled effect.
Bake for 30-35 minutes or until a toothpick inserted comes out clean.

Chocolate frosting – I had some leftover frosting after making this cake,so I used that.Regular butter icing could be used for this cake.I topped it with some sprinkles for my young guest.

Thursday, May 6, 2010

Tori Bendi

Tori is Pigeon peas and Bendi is a coconut based curry with a garlic seasoning.

Bendi reminds me of a very funny story.A few years back,a family friend of ours had gone to Mangalore with his whole family as part of a pilgrimage.Though Konkani is spoken in Mangalore,it is quite different from the Konkani we speak[in Kerala].The dialects are different and sometimes some words have a totally different meaning than what we intend to say!!

Story goes like this,they had stopped for breakfast in an amchigele[Konkani] restaurant which was evident from the waiters’ lingo.They were quite happy and asked the waiter what was the special item for the day.He said Surnali-Bendi.Though they didn’t understand what the dish was,they assumed it would consist of Surnu[Elephant Yam] and Bhindi[Okra].They were in for a pleasant surprise when the waiter bought along plates of Yellow Fluffy dosas and a curry made with pulses!!

My ma-in-law tells me that Bendi is indeed paired with Mushti Polo[spongy dosa/set dosa] and after such a long time I had it today and loved it.It tastes great with Rice too.If you do not like the strong flavour of Garlic,you could season it with mustard seeds and curry leaves too.


Tori Bendi

Ingredients


Tori/Pigeon peas[dried] – ¾ cup,soaked overnight and cooked[I pressure cooked it for 20 minutes]
Grated coconut – ½ cup
Roasted red chillies – 4-5
Tamarind – 1 small pea size
Salt to taste
Oil – 1 tbsp
Garlic cloves – 5-6,crushed

Method

Grind to a smooth paste the grated coconut,red chillies and tamarind.
Mix with the cooked tori/peas,add salt to taste and boil for 5-10 minutes.
In a pan,add oil and crushed garlic.
Keep stirring till the garlic cooks and browns well.
Add to the boiling curry and switch off the flame.
Serve with dosa or rice.

Monday, May 3, 2010

Appam ~ A not-so-traditional recipe!!


Warning – This is not the traditional recipe for Appam.

Appam,known by many names-Palappam,Vellayapam,Aappam is a fluffy rice pancake made originally with kallu[toddy] which gives it the unique sweet and sour taste.It is a quite popular breakfast item in Kerala and a rockstar during Christian wedding feasts and festivals.Paired with Stew[mostly mutton] it has a very homely tag attached to it.

Most recipes use yeast for the fermentation of the Appam batter.Long back,my amma tried to recreate this recipe from Vanitha and had to serve it to our maid since none of us liked the smell of the yeast and we wouldn’t go anywhere near it.Then one day,she made some yummy Potato stew and such delicious looking lacy appams and they smelt wonderful too,with none of that funny smelling yeast and I was eager to know what the magic was.

Adding Eno fruit salt to a simple rice and coconut batter did the trick.We were instant appam converts!I have been following the same recipe too and it has never failed me.


Appam

Ingredients
[makes 8-10 appams]


Raw rice – 1 cup
Cooked rice – ½ cup
Grated coconut – ½ cup
Salt to taste
Baking powder – 1 tsp
Sugar – 1 tbsp
Eno Fruit salt – 1 sachet

Method

Soak the raw rice for 4-6 hours.
Grind to a smooth batter adding the cooked rice and grated coconut and enough water.
Add the baking powder and salt.
Mix well and keep it covered for 8-10 hours.[I keep it overnight]
Next morning add sugar and mix well,add more water if the batter is too thick-it has to be of pouring consistency.
Just before you start making the appam,add eno fruit salt to the batter.
The batter will froth up instantly,mix gently.
Heat a non stick appa chatti[appam pan] or any non stick kadai.
Pour a ladleful of batter into the pan when it is hot and swirl the pan in a clockwise motion spreading the batter to the sides of the pan.
Swirling the pan gives the appam the customary pretty lace edges and a spongy centre.
Close the lid and cook on medium heat for about 2-3 minutes.
Remove the appam to a plate and serve hot with Stew,Mutta roast,Kadala curry or just sweetened coconut milk.

Related Posts Plugin for WordPress, Blogger...
 
Pin It button on image hover