


I am petrified of yeast..aah,I said it.It feels so good to share this with you people,no one else would quite understand it if I said this to them.I mean,how can anyone be scared of something which looks so..so..hmm,can't really say what.I have baked with yeast before,many a times but every time I am about to cook something with this star ingredient,I start getting nightmares[okay day-mares,since I cook in daylight],whether it will rise or not,whether it will lend a good texture to the baked product or whether it will fall flat on me.
But sometimes,you let go of all inhibitions when something appeals to you strongly,very strongly in my case.Few days back,on a Sunday I was lurking around in Facebook when I saw Nags' status message saying she just tried these Garlic rolls from Suhaina's.That got me interesting and I hopped over to Suhaina's blog for the recipe and I should say I had the urge to try it right then.I checked my fridge for the Yeast sachets I got from Ekm last time and hoped the yeast wouldn't disappoint my enthusiasm.
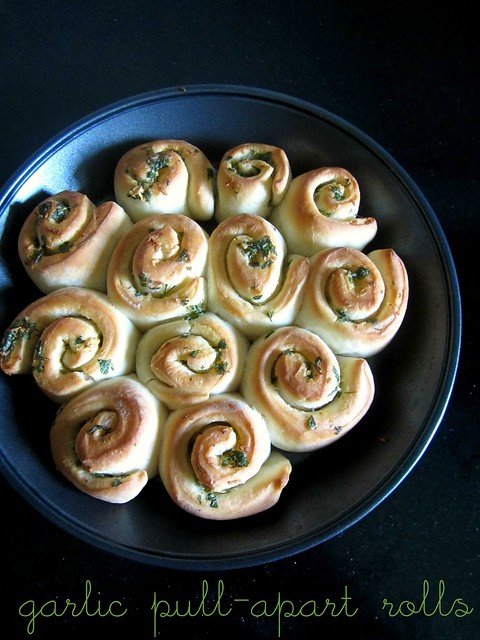
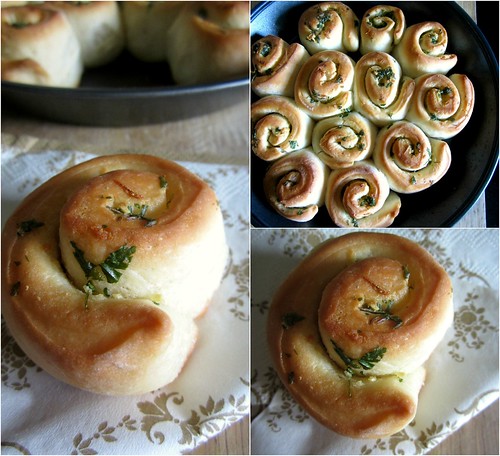
The recipe is easy peasy.Just mix everything together and bake.Yep,that's it.As the rolls were baking,the house was smelling so good and when I saw them puffing and browning so nicely my joy knew no bounds.Half of the rolls were finished as soon as they came out of the oven and half for dinner along with Broccoli soup.Only then did I realize i didn't take pictures,but wait-it just gave me the opportunity to bake it once more..yay!!Do give it a try!!
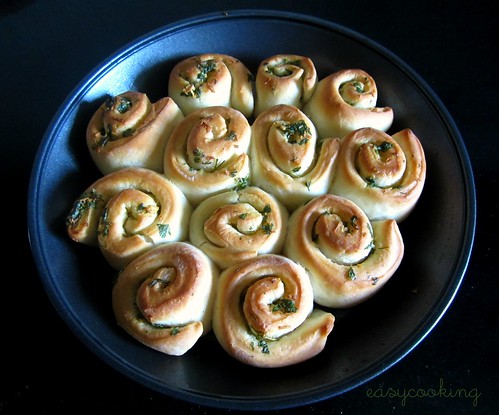
Garlic Pull-apart Rolls
Recipe courtesy - Suhaina
Ingredients
Flour/maida - 1 1/2 cups
Warm water - 1/2 cup
Yeast - 1/2 tbsp
Salt - 1/2 tsp
Sugar - 1 tbsp
Olive oil - 2 tbsp
For the garlic spread
Salted butter, at room temperature - 25 gms
Garlic - 2-3 cloves,grated
Chopped coriander leaves - 2 tbsp
Method
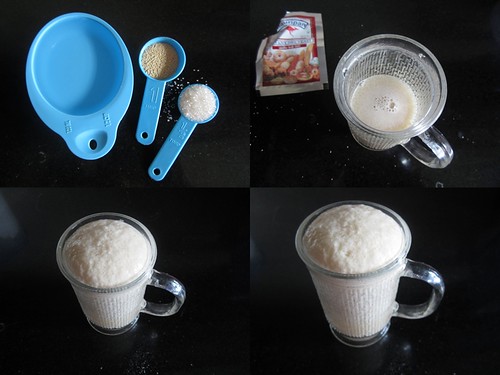
Mix together warm water,sugar and yeast in a bowl and let it proof for about 5-7 minutes.It should bubble and froth up within minutes,if not start afresh.

Mix together flour,salt and yeast mix till you get a slightly sticky dough.
Add oil and knead for 5-7 minutes till you get a smooth dough.

Cover the dough with a cling film or a kitchen towel and allow to proof for 40-45 minutes.
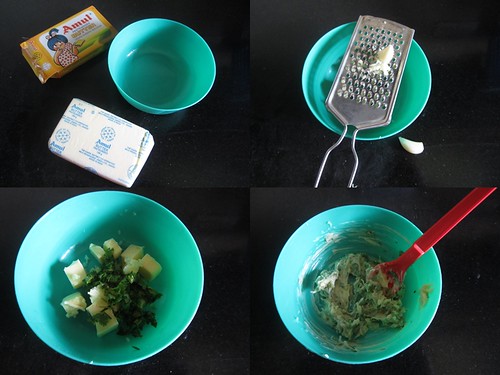
Meanwhile,mix together all the ingredients for the garlic spread and keep aside.
Grease a baking pan or a loaf tin with butter[I used my loaf pan for the first trial and a round tin for this one-both work fine]
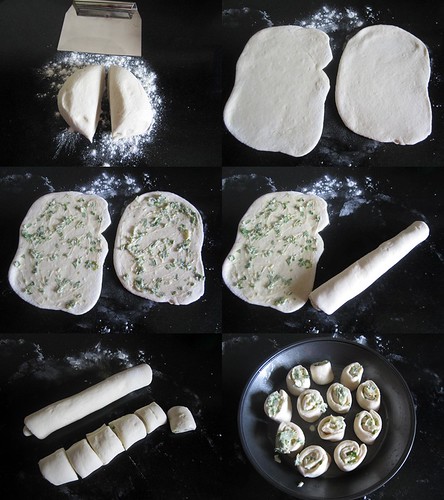
Knock down the air in the dough and divide the dough into two equal portions.
Roll one half of the dough on a floured surface using a rolling pin to a rough rectangle.
Now place the rolls with the cut side up in the greased pan.
Repeat the same procedure for the remaining dough.
Spread a little milk on the rolls and add the remaining garlic spread on top.
Notes
Pictures updated on 11/08/12
But sometimes,you let go of all inhibitions when something appeals to you strongly,very strongly in my case.Few days back,on a Sunday I was lurking around in Facebook when I saw Nags' status message saying she just tried these Garlic rolls from Suhaina's.That got me interesting and I hopped over to Suhaina's blog for the recipe and I should say I had the urge to try it right then.I checked my fridge for the Yeast sachets I got from Ekm last time and hoped the yeast wouldn't disappoint my enthusiasm.
The recipe is easy peasy.Just mix everything together and bake.Yep,that's it.As the rolls were baking,the house was smelling so good and when I saw them puffing and browning so nicely my joy knew no bounds.Half of the rolls were finished as soon as they came out of the oven and half for dinner along with Broccoli soup.Only then did I realize i didn't take pictures,but wait-it just gave me the opportunity to bake it once more..yay!!Do give it a try!!
Garlic Pull-apart Rolls
Recipe courtesy - Suhaina
Ingredients
Flour/maida - 1 1/2 cups
Warm water - 1/2 cup
Yeast - 1/2 tbsp
Salt - 1/2 tsp
Sugar - 1 tbsp
Olive oil - 2 tbsp
For the garlic spread
Salted butter, at room temperature - 25 gms
Garlic - 2-3 cloves,grated
Chopped coriander leaves - 2 tbsp
Method
Mix together warm water,sugar and yeast in a bowl and let it proof for about 5-7 minutes.It should bubble and froth up within minutes,if not start afresh.
Mix together flour,salt and yeast mix till you get a slightly sticky dough.
Add oil and knead for 5-7 minutes till you get a smooth dough.
Cover the dough with a cling film or a kitchen towel and allow to proof for 40-45 minutes.
Meanwhile,mix together all the ingredients for the garlic spread and keep aside.
Grease a baking pan or a loaf tin with butter[I used my loaf pan for the first trial and a round tin for this one-both work fine]
Knock down the air in the dough and divide the dough into two equal portions.
Roll one half of the dough on a floured surface using a rolling pin to a rough rectangle.
Spread about one third of the garlic bread on one side.
Roll from one end as you would for a swiss roll.
Cut the roll into half and further into two making it four rolls.(I rolled the dough from the long end and got 6 rolls out of one).
Now place the rolls with the cut side up in the greased pan.
Repeat the same procedure for the remaining dough.
Spread a little milk on the rolls and add the remaining garlic spread on top.
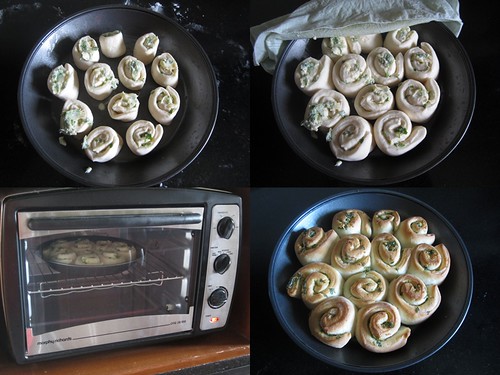
Allow to rise for another 20 minutes. In the mean time preheat the oven to 180C / 375F.
Bake for 20-25 minutes or till the top has become golden brown.Notes
- The recipe is a very simple one,perfect for beginner yeast bakers.Of course,it all depends on the quality of the yeast you use.Make sure you use a fresh batch of yeast.I use Mauripan Yeast sachets.
- The yeast granules can be directly added with the flour,but I always take the tried and tested route of proofing the yeast first and then kneading the dough.
- Knead the dough for at least 5 minutes to develop gluten.This creates soft and fluffy rolls.
- Every oven is different so baking times may vary.
Pictures updated on 11/08/12


I dont bother to grab some, very tempting garlic rolls..
ReplyDeleteDear Divya, these buns have become so popular in blogosphere and I am no exception to that, have tried various versions of these rolls and loved them all.Good to hear that u loved them too.
ReplyDeleteFOODELICIOUS
wow.looks soooo wonderful.. it looks like u have filled some savory filling inside.drool.. it HAS COME OUT REALLY WELL.Wonderful clicks too..
ReplyDeleteI am so happy that everyone is trying my recipe with confidence and is coming out very well. I too baked it yesterday and impressed some guests...
I am becoming famous.Thanks dear..
Suhaina,these rolls are so popular in my friends/family circle now and thanks to you,I am getting all the compliments!
Deleteperfect for todays evening,..
ReplyDeletebtw luv your header
droolworthy and yummilicious rolls.
ReplyDeleteI too have this in my to do list for long time now,yummy!
ReplyDeleteThe rolls look cute and crisp. In my short list too.
ReplyDeleteLooks so gud....I've tried this too but with wheat flour.
ReplyDeleteI remember seeing them in Nags place too. And this looks yummy too.
ReplyDeleteLooks perfect. feel like grabbing ;)
ReplyDeleteHi
ReplyDeleteVery tempting.... if i m using rapid rising yeast... how long should i keep it for proofing... please clarify...
Thanks...
Hi there....lovely rolls....I also posted Suhaina's rolls ...do visit my space...I am already ur follower...http://nisahomey.blogspot.com/2010/12/garlic-breadrollsthe-easy-way-no-egg.html
ReplyDeletecute n yummy
ReplyDeleteI am all too familiar with this feeling about yeast, only its beginning to get friendly with me now. I love garlic bread too, this sounds fab, and the smell of bread baking at home is just amazing...Hope to see more breads here:-)
ReplyDeletePerfect and tempting rolls!
ReplyDeletewow, they are mouth watering.
ReplyDeleteCan you send me a couple please?
ReplyDeletelovely rolls..
ReplyDeleteMouth watering picture perfect rolls.
ReplyDeletethey look so soft and perfect...oh why am I on a diet!!!!!!
ReplyDeleteLooks simply awesome Divya..
ReplyDeleteThese are practically talking to me. What a joyful think to bake. And to eat, of course!
ReplyDeleteI want to try them.. lets see.. If I am able to :P .. Love them.. they look so yummmmyyy...!!!!
ReplyDeleteHi Divya,
ReplyDeleteI have been a silent follower of your blog for a while now.
Have tried many of your eggless cakes :) and they trned out soooo well.
I baked these rolls just last week and though they tasted yummy, I did not get that browning on top :( .
So look wise it was not much.
Can you help me so that the next batch I make are nicley browned...
Plzzz
Love,
Manju
Thanks Manju.Did you bake this in a Microwave Convection or OTG?If using MW,bake the rolls for the prescribed time,take it out and brush some melted butter on top.Bake again on the highest temperature for 2-3 minutes.You will get golden colour on top.If using OTG,use the broil mode for 2 minutes.
DeleteI baked this one in my OTG and it browned evenly after the prescribed time.
Thanks for taking the time out to reply :).
DeleteI tried it in my LG Microwave's convention mode.
Second time i left it for too long in the hopes of browning it, but they turned out hard like rusks :(.
SO you mean i need to first bake it at 180 degrees for 20-25 minutes and then increase the temperature to highest (i think its arnd 250 in my oven), brush with melted butter and bake for an additional 2-3 minutes?
Hi Divya, thanks for taking the time to reply :).
DeleteI used my LG Microwave's conventional mode for baking this (and for all other bake's).
Even tried a second batch, but i waited too long in the hope's of browning it that I ended with very hard one's that were similar to a rusk in their texture :( .
Ok, so now you mean I should first bake them at 180 Deg. for 20 minutes, brish with melted butter, increase to the max temp (i think its arnd 250 Deg) and bake for an additional 2-3 minutes right?
Yes,that's right Manjusha.Over baking can cause the baked good turn hard.So as I mentioned,just 2-3 minutes in high temperature should do the trick!
DeleteWas this baked in ur microwave oven? ?
ReplyDeleteI have baked this in the Microwave as well as OTG.The ones pictured above were baked in my Morphy Richards OTG.
DeleteDivya as u mentioned tat u use Mauripan Yeast sachets..where do u buy it..as i was unable to get in my market..is it online..i tried searching online it said Rs.60 for 60gm..can i keep it longer if i bought more...or once open i have to use it within a month..please help as iam dyin to bake bread as ive juz bought an bajaj OTG..but unable to get hold of yeast anywhere..And please tell from where hav u bought all ur lovely pans..if online let me knw the site plzz...i stay in pune.
ReplyDeleteI get all my baking related stuff from my hometown-
Deletehttp://www.divyascookbook.com/2012/05/baking-supplies-in-ernakulamkerala.html .I've seen it online here - http://www.gourmetco.in/Products/Baking-NEW-Miscellaneous-Ingredients/Mauripan/Mauripan-Instant-Dry-Yeast-(60g)/pid-2041707.aspx
I use whatever amount required and seal the pack using a rubber band and keep in an airtight container.You don't have to use it within an month,it has a longer shelf life.
Any idea how is Gloripan yeast..as i need to buy my pans..its available in zansaar thought of buying everything from it rather than paying extra for yeast only hav a look n plz let me knw http://www.zansaar.com/gloripan-instant-dry-yeast-500-gm-p-DEVTOALF1#item-description
ReplyDeleteHey lovely recipe and great way of explaining.. made them today and wow.... but it got baked in my oven in 16 mins...
ReplyDeleteand got a bit blackish crust.. but taste is yum.. thanks for the recipe
How manys can this rolls be stored and where to store
ReplyDeletehey Divya
ReplyDeleteawesome recipe bt can I use regular cooking oil instead of olive oil