I don't know what's with me and chocolate.I keep thinking I shouldn't bake/post anything chocolaty here for a while but the chocoholic in me somehow peeps up and here I am again with not something 'just' chocolate but a double chocolate brownie with coffee.Now we're talking.So after these Eggless Molten Lava Cake and Chocolate Loaf cake it is only fitting to post these Double Chocolate Mocha Brownies,isn't it?
 I rarely try any other recipe than this whenever I bake brownies because,well why mess with perfection,right?But it is fun to try something new,the excitement while trying a new recipe and the anticipation while cutting into the crust is simply mind blowing.
Some time back,I had tried a similar recipe from Purple Foodie.Though I took pictures through the starting stage to the final,somehow the brownie hasn't made it to the blog.Yes,it was made for my niece and was a total last minute bake when we had less than 2 hours to catch our train.Taking pictures while the taxi is waiting outside didn't make sense to Ajay,well I would have tried if he wasn't around;)).
 Brownies made with dark chocolate and cocoa make my heart beat faster.The decadent rich chocolate flavor is elevated to a completely different level with a slight hint of coffee.Though I do love brownies with walnuts,this one does not have any and is a complete chocolate lovers treat on its own.
Double Chocolate Mocha Brownies
Recipe source - Martha Stewart
Ingredients
Butter - 8tbsp / 100 gms,cut into pieces plus more for the pan
Chocolate - 8 oz /225gms - I used a mix of milk and dark chocolate
Instant Coffee powder - 2 tsp - I used Nescafe
Sugar - 1 1/4 cups - I powdered the sugar until it was fine,(not superfine)so that it mixes evenly into the batter without excessive mixing
Eggs - 3,whisked slightly
Flour - 1 cup
Cocoa powder - 1/4 cup
Baking powder - 1/2 tsp
Salt - 1/2 tsp
Method
Preheat oven to 170C.Grease and line a 9' square baking pan with butter.Line bottom and two sides with aluminium foil,leaving a 2' overhang on the two sides.
 In a small bowl whisk together flour,cocoa powder,baking powder and salt,set aside.
 Place butter and chocolate in a micro proof bowl and microwave on full power for 1 minute.Whisk together till smooth.If chocolate chunks remain microwave again for 15 seconds and whisk again.
Add instant coffee and sugar and mix to combine.
 Mix in the whisked eggs and stir.Add the flour mix and mix just until moistened(do not overmix).
 Transfer batter into prepared pan,smooth top.
Bake for 50-60 minutes or until a toothpick inserted into the center comes out with moist crumbs.(it took 50 minutes in my oven).
Cool in the pan for 30 minutes.
Using paper overhang,lift the brownies out of the pan and transfer to a rack to cool completely.
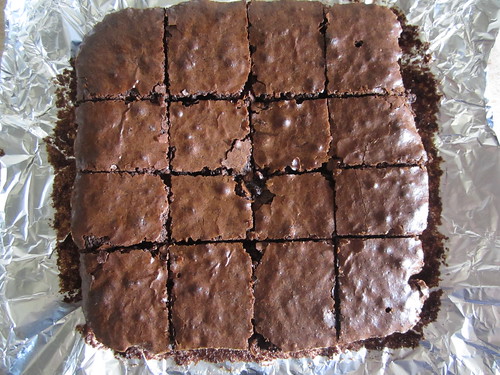
On a cutting board,using a damp serrated knife cut the brownie into 16 squares.
Serve warm with ice-cream.
 Notes

Some time back,I had tried a similar recipe from Purple Foodie.Though I took pictures through the starting stage to the final,somehow the brownie hasn't made it to the blog.Yes,it was made for my niece and was a total last minute bake when we had less than 2 hours to catch our train.Taking pictures while the taxi is waiting outside didn't make sense to Ajay,well I would have tried if he wasn't around;)).

Double Chocolate Mocha Brownies
Recipe source - Martha Stewart
Ingredients
Butter - 8tbsp / 100 gms,cut into pieces plus more for the pan
Chocolate - 8 oz /225gms - I used a mix of milk and dark chocolate
Instant Coffee powder - 2 tsp - I used Nescafe
Sugar - 1 1/4 cups - I powdered the sugar until it was fine,(not superfine)so that it mixes evenly into the batter without excessive mixing
Eggs - 3,whisked slightly
Flour - 1 cup
Cocoa powder - 1/4 cup
Baking powder - 1/2 tsp
Salt - 1/2 tsp
Method
Preheat oven to 170C.Grease and line a 9' square baking pan with butter.Line bottom and two sides with aluminium foil,leaving a 2' overhang on the two sides.


Add instant coffee and sugar and mix to combine.


Bake for 50-60 minutes or until a toothpick inserted into the center comes out with moist crumbs.(it took 50 minutes in my oven).
Cool in the pan for 30 minutes.
Using paper overhang,lift the brownies out of the pan and transfer to a rack to cool completely.
On a cutting board,using a damp serrated knife cut the brownie into 16 squares.
Serve warm with ice-cream.

- The baking time varies from one oven to another so check the brownies after 40-45 minutes.It is better to under bake the brownies(with gooey center)than to over bake which would make the brownie dry and hard.
- Cool the brownie completely before cutting to get pretty,neat squares.I am impatient and couldn't wait:).
- You could also refrigerate the brownie for 30-45 minutes and then cut it to get neat squares.Warm the brownie in the MW for 10-15 seconds before serving.