


Whenever someone reminisces about the food served in their school/college canteens,I sit dumb founded.I did my education in a convent institution beginning with the kindergarten through my graduation.I might have stepped into the campus canteen maybe once or twice in all those years.Primary reason being,the canteen stunk and stunk big time.
 Maybe because during that period I wasn't as familiar with non-veg food as I am now or maybe it was the lack of cleanliness;it was a never-go-even-if-you're-dying place for me.Of course,when I had fresh and delicious food packed in a dabba from home,there was no need to as well.
Things changed when I came to Chennai and did a regular course in one of the colleges here.Getting up in an ungodly hour to make breakfast and pack lunch and hurry to the bus stop made me very receptive towards the canteen for those days when I woke up late or couldn't find time to eat breakfast at home.
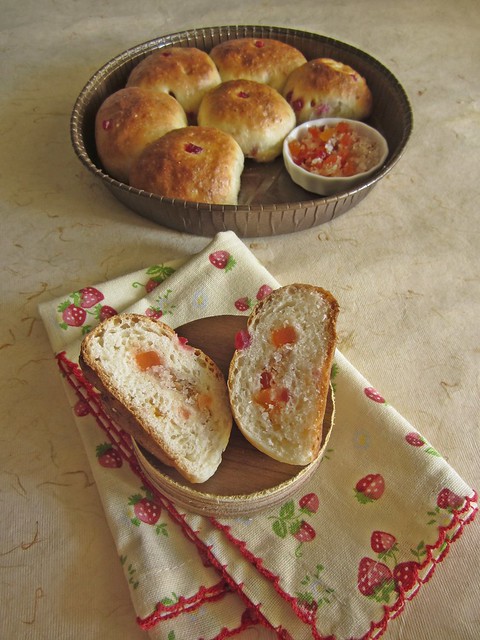
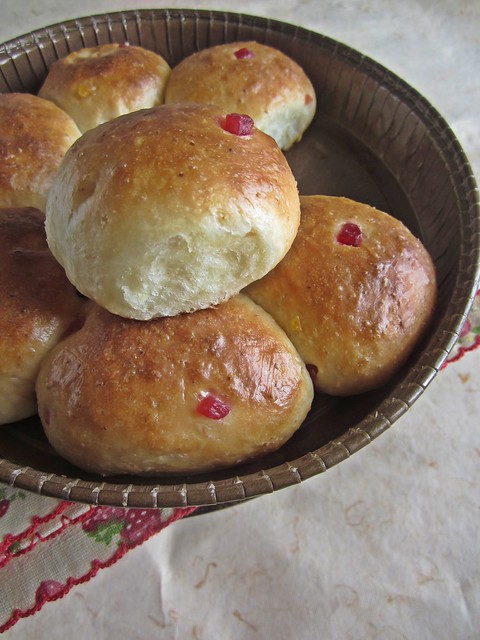 Snack time between classes always meant a visit to the makeshift canteen.Depending on the time of the day we had an option of having Poori-bhaji,idli-sambhar and bread-sandwich.If nothing else there was this delicious and filling Dilkush Buns.Filled with sweetened coconut and tutti frutti,it was a hearty dessert-meal.I don't remember having this elsewhere and even now sometimes crave for it.
When we made Hokkaido Bread for WKtB,I decided to try out this bread after all.The bread rolls were soft and pillowy and I felt it would make for a perfect Dilkush and undoubtedly they were!Don't go by the lengthy process,it really is a wonderful bread to bake.
 Dilkush Bread using Hokkaido Milk Bread With Tangzhong Recipe

Whisk together lightly the flour, water and milk in a saucepan until smooth and there are no lumps. Place the saucepan on the stove, and over medium heat, let the roux cook till it starts thickening. Keep stirring/ whisking constantly so no lumps form and the roux is smooth.
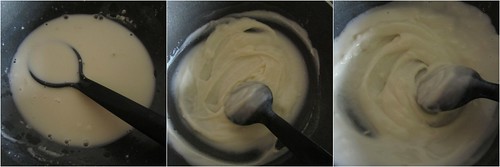
If you have a thermometer, cook the roux/ tangzhong till it reaches 65C (150F) and take it off the heat. If like me, you don’t have a thermometer, then watch the roux/ tangzhong until you start seeing “lines” forming in the roux/ tangzhong as you whisk/ stir it. Take the pan off the heat at this point.

Put the flour, salt, sugar,
powdered milk and instant yeast in the processor bowl and pulse a couple of times to mix.
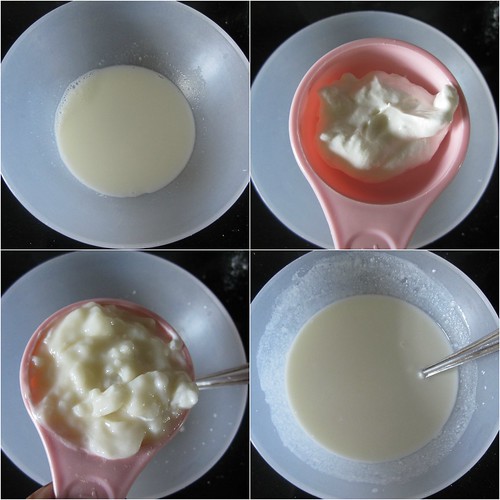
In another small bowl mix the milk, cream and Tangzhong till smooth and add to the processor bowl.

Run on slow speed until the dough comes together. Now add the butter and process till you have a smooth and elastic dough which is just short of sticky.
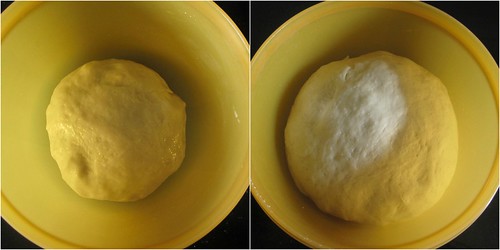
Form the dough into a ball and place it in a well-oiled bowl turning it so it is well coated. Cover with a towel, and let the dough rise for about 45 minutes or till almost double in volume.
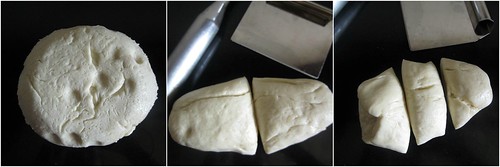
Place the dough on your working surface. You don’t need flour to work or shape this dough. This recipe makes enough dough to make one loaf (9” by 5” tin), 2 small loaves (6” by 4” tins) or 1 small loaf (6” by 4”) and 6 small rolls (muffin tins). Depending on what you are making, divide your dough. If you are making 1 loaf, divide your dough in 3 equal pieces. If you are making two smaller loaves, divide your dough into 6 equal pieces.
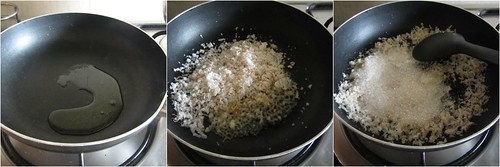
In a pan add ghee and saute grated coconut and sugar till light brown.
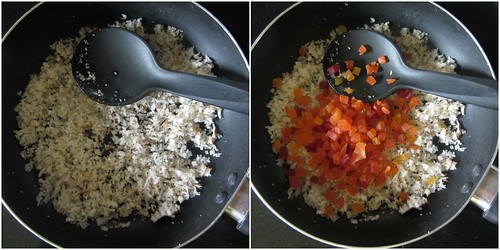
Mix in the tutti frutti and keep aside.
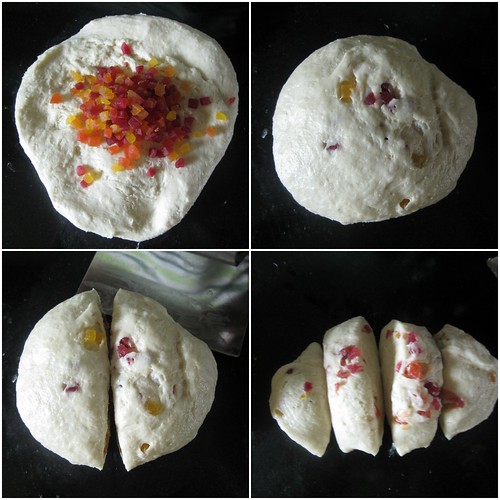
I added half the filling into the whole dough and then started shaping it into smaller rolls.
Roll out each portion of the dough with a rolling pin into an oval shape, about 1/8” thick. Take one end of the dough from the shorter side of the oval and fold it to the middle of the oval. Take the other end and fold so it slightly overlaps the other fold.
Carefully brush the tops of the rolls and the loaf with milk (or cream) and bake them at 170C (325F) for about 20 to 30 minutes till they are done (if you tap them they’ll sound hollow) and beautifully browned on top. Let them cool in the tins for about 5 minutes and then unmould and transfer to a rack till slightly warm or cool.
 Serve or else store in a bread bin. This bread stays soft and delicious even the next day. This recipe makes enough dough to make one loaf (9” by 5” tin), 2 small loaves (6” by 4” tins) or 1 small loaf (6” by 4”) and 6 small rolls (muffin tins).
I'd highly recommend this bread to everyone who think bread baking is not as easy as it seems to be.Many a times,I've been disheartened too-sometimes the yeast was faulty,sometimes the recipe was faulty or sometimes,I might have done something wrong.This recipe is the answer-soft,pillowy and spongy,bread which you thought you only got in bakeries can now be made at home and with an almost fool-proof recipe.
Things changed when I came to Chennai and did a regular course in one of the colleges here.Getting up in an ungodly hour to make breakfast and pack lunch and hurry to the bus stop made me very receptive towards the canteen for those days when I woke up late or couldn't find time to eat breakfast at home.
When we made Hokkaido Bread for WKtB,I decided to try out this bread after all.The bread rolls were soft and pillowy and I felt it would make for a perfect Dilkush and undoubtedly they were!Don't go by the lengthy process,it really is a wonderful bread to bake.
(Original Recipe from 65 Degrees Tangzhong “65C Bread Doctor” by Yvonne Chen, and adapted from Kirbie’sCravings)
Ingredients:
For The Tangzhong (Flour-Water Roux)
1/3 cup all-purpose flour
1/2 cup water
1/2 cup milk
For The Dough:
2 1/2 cups all-purpose flour
3 tbsp sugar
1tsp salt
2 tbsp powdered milk
2 tsp instant dried yeast
1/2 cup milk (and a little more if needed)
1/8 cup cream (25% fat)
1/3 cup tangzhong (use HALF of the tangzhong from above)
25gm unsalted butter (cut into small pieces, softened at room temperature)
1/2 to 3/4 cup mini chocolate chips if making the chocolate chip rolls
Method:
The Tangzhong (Flour-Water Roux):
Whisk together lightly the flour, water and milk in a saucepan until smooth and there are no lumps. Place the saucepan on the stove, and over medium heat, let the roux cook till it starts thickening. Keep stirring/ whisking constantly so no lumps form and the roux is smooth.
If you have a thermometer, cook the roux/ tangzhong till it reaches 65C (150F) and take it off the heat. If like me, you don’t have a thermometer, then watch the roux/ tangzhong until you start seeing “lines” forming in the roux/ tangzhong as you whisk/ stir it. Take the pan off the heat at this point.
Let the roux/ tangzhong cool completely and rest for about 2 to 3 hours at least. It will have the consistency of a soft and creamy crème patisserie. If not using immediately, transfer the roux to a bowl and cover using plastic wrap. It can be stored in the fridge for about a day. Discard the tangzhong after that.
The Bread Dough:
I made this dough in the food processor. This dough can be made by hand but the dough is a bit sticky and can take some time and effort to knead by hand. If you have some sort of machine which will do the kneading for you, use it. Don’t punish yourself. And do not add more flour to make it less sticky either!
Put the flour, salt, sugar,
powdered milk and instant yeast in the processor bowl and pulse a couple of times to mix.
In another small bowl mix the milk, cream and Tangzhong till smooth and add to the processor bowl.
Run on slow speed until the dough comes together. Now add the butter and process till you have a smooth and elastic dough which is just short of sticky.
The dough will start out sticky but kneading will make it smooth. If the dough feels firm and not soft to touch, add a couple of tsps of milk till it becomes soft and elastic. When the dough is done, you should be able to stretch the dough without it breaking right away. When it does break, the break should be form a circle.
Form the dough into a ball and place it in a well-oiled bowl turning it so it is well coated. Cover with a towel, and let the dough rise for about 45 minutes or till almost double in volume.
Place the dough on your working surface. You don’t need flour to work or shape this dough. This recipe makes enough dough to make one loaf (9” by 5” tin), 2 small loaves (6” by 4” tins) or 1 small loaf (6” by 4”) and 6 small rolls (muffin tins). Depending on what you are making, divide your dough. If you are making 1 loaf, divide your dough in 3 equal pieces. If you are making two smaller loaves, divide your dough into 6 equal pieces.
For the Coconut Tutti-Frutti filling
Ingredients
Ghee - 1 tbsp
Grated coconut - 1/2 cup
Sugar - 1/4 cup
Tutti-frutti - 1/2 cup
Method
In a pan add ghee and saute grated coconut and sugar till light brown.
Mix in the tutti frutti and keep aside.
Filling and shaping the buns
I added half the filling into the whole dough and then started shaping it into smaller rolls.
The shaping of the portions, whether for the loaf or the rolls, is the same.
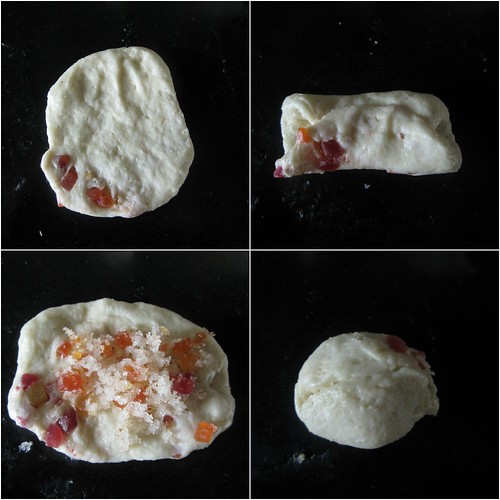
Roll out each portion of the dough with a rolling pin into an oval shape, about 1/8” thick. Take one end of the dough from the shorter side of the oval and fold it to the middle of the oval. Take the other end and fold so it slightly overlaps the other fold.
Roll this folded dough with the rolling pin so the unfolded edges are stretched out to form a rectangle.
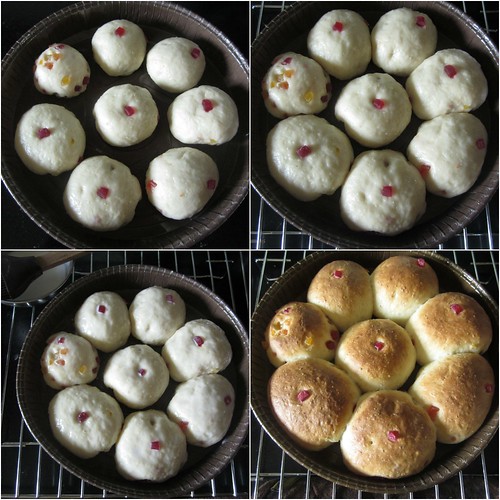
Place 1 tbsp of filling and then roll the rectangle from one short edge to the other, pinching the edges to seal well. Do this with each of the pieces and place them, sealed edges down, in a well-oiled loaf tin. Cover with a towel and leave the dough to rise for about 45 minutes.
Carefully brush the tops of the rolls and the loaf with milk (or cream) and bake them at 170C (325F) for about 20 to 30 minutes till they are done (if you tap them they’ll sound hollow) and beautifully browned on top. Let them cool in the tins for about 5 minutes and then unmould and transfer to a rack till slightly warm or cool.
I'd highly recommend this bread to everyone who think bread baking is not as easy as it seems to be.Many a times,I've been disheartened too-sometimes the yeast was faulty,sometimes the recipe was faulty or sometimes,I might have done something wrong.This recipe is the answer-soft,pillowy and spongy,bread which you thought you only got in bakeries can now be made at home and with an almost fool-proof recipe.


Wow, sachchi, dil khush hogayaa, gorgeous buns, have bookmarked.
ReplyDeletegr8 effort divya ! truly admired !
ReplyDeleteThx a lot Divya for this recipe.....Bread-baking does look much more easier to me now!!
ReplyDeletenicely done Dilkush ........... will make this for sure ........
ReplyDeleteone of my fav. bread roll dear... love it..
ReplyDeleteG'day! WOW love your recipe, TRUE!
ReplyDeleteEnjoy the step by step photos as they are always inspiring too!
Cheers! Joanne
What's On The List
http://www.whatsonthelist.net
gorgeous looking buns.
ReplyDeletehttp://mycookworld.blogspot.in/
Cheers
Mina Joseph
Stunning dilkush, beauties..
ReplyDeleteThis looks great. Iam definitely one of the people who thinks bread making is a scary and big process so let me see when I can gather guts to do this.
ReplyDeleteVery nice recipe. Buns came out very soft. My daughter loved them. Thanks
ReplyDeleteI have trued your recipe couple of times and they are perfect everytime... thank you so much fir sharing the recipe and detailed explanation with pics.
ReplyDelete