Monday, February 13, 2012

Gajar ka Halwa

A big hello to all of you who kept visiting this humble space of mine despite me abandoning it midway:).Thank you to Sharmilee,Suma and Sanjeeta who helped me out through the no-posts phase.I owe you gals big time!!I am yet in a confused state since my oven is yet to arrive and I am yet undecided about a high end camera.Well,to cut a long story short,I've decided to start blogging as I slowly iron these issues out.
IMG_0119

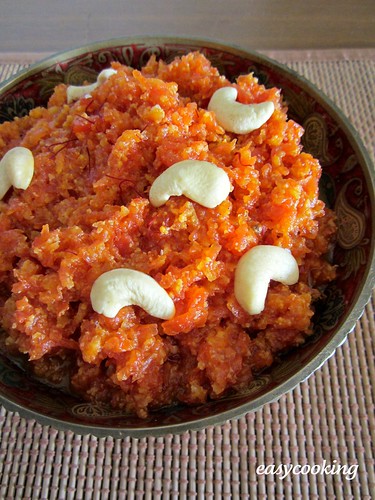
Blink and February is here.The(so-called) month of love where you see heart shaped balloons all over the place and heart shaped anything is up for sale,except the heart of course;).I would have loved to bake a cliched heart shaped cake,cookie etc,but since that is not possible right away,I thought of this ever-popular Indian sweet Gajar ka halwa aka Carrot halwa.
IMG_0128

Of all the halwas I've eaten,I would say my sis-in-law Soumya's halwa is the best[and no this is not to soap-marofy her,she doesn't read my blog;)].It is of the right consistency,not overtly sweet and just perfect on its own.Some time back when Ajay was home,she sent me a small dabba of gajar halwa neatly packed and it was gone before you could even spell gajar halwa,it was that good.
IMG_0042

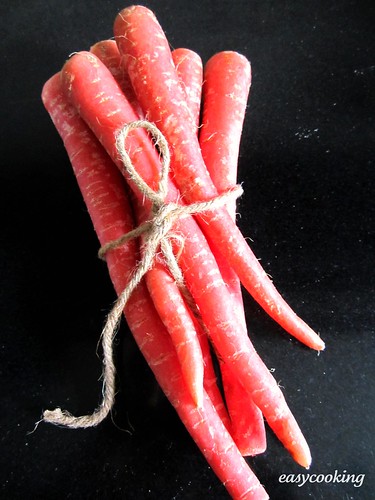
Armed with a kilo of carrots,I called her up and asked the recipe for the umpteenth time while preparing it.I should say it tasted great,but it didn't match hers in comparison.Since I am not giving up trailing the-perfect-gajar-halwa,I decided to try it again,this time using Delhi carrots.

Like she told me-grate the carrots,cook in enough milk,add sugar and finally add ghee when it dries up.Garnish with nuts if you like,that's it.Oh,I wish it was as easy to make!!Thanks to my food processor,grating the carrots was a 2 minute job.Or else it would have taken the joy out of making this one.

Gajar ka Halwa - Carrot Pudding

Ingredients

Delhi carrots(or regular ones) - 500 gms
Milk - 500 ml,boiled
Sugar - 1 heaped cup
Ghee - 3 tbsp or more according to your taste
Cashewnuts - 10-12,chopped
Cardamom - seeds of 2,crushed
Saffron - a few strands

Method

Wash and scrub the carrots well under running water.Snip the ends and peel.Grate using the medium grater attachment of your food processor.Or use a box grater.
In a thick bottomed kadai(I used non-stick),add a tbsp of ghee and saute the carrots for 3-5 minutes,or till the carrots become slightly pale.
Add milk and give a good stir.Simmer the gas and let the carrots cook in the milk on a low flame.Stir once in a while.It will take anywhere from 30-40 minutes to dry up,so it helps if you are using a non-stick pan.
Mix in the sugar and stir well.The mixture will again liquefy now and change in colour.Let the sugar dry up now-about 7-12 minutes.Now add ghee a tsp at a time till the carrots gets a nice glaze and dry up completely.A little liquid at the bottom of the pan is fine since it will continue to cook as it cools down.
In another pan,add a tsp of ghee and roast the chopped cashews till they turn golden brown in colour.Now mix in the roasted cashews and the crushed cardamom to the cooked carrots.
Crush a few saffron strands in your palm and mix in that too(not in the picture).Let it cool for a while.
IMG_0132

Notes
  • You could try making the same halwa using regular carrots too.I've tried with both and personally did not find a great difference in taste.Another variation is using grated beetroots in place of carrots,a red halwa-perfect for valentines!!
  • I would strongly recommend using a non-stick pan since the stirring procedure is minimal.You could go on with your regular chores and need to check this only once in 5-7 minutes or so-something not possible with a regular kadai.
  • Milkmaid/condensed milk could also be used to enhance the taste and texture.If you do,adjust the sugar accordingly.
  • If you like the flavor of cloves,add a couple into the milk while cooking the carrots and remove them once the halwa is ready.
  • Garnishing with nuts is optional as I feel the halwa tastes equally great without it too.
I hope you have noticed,divyascookbook is now a dot com.Yeah,pretty late but nevertheless.Thanks again to all of you who kept checking on me.This is for you guys.


Monday, February 6, 2012

Fruit Tarts - A guest post by Sanjeeta

Sanjeeta of Lite Bite needs no introduction.Her blog is a treasure house of healthy(and tasty!)recipes and I believe that is the secret behind her youthful appearance.I met Sanjeeta of Lite Bite's a while back and we hit it off instantly.She agreed to do a guest post for Easycooking readers at a very short notice and I am so thankful to her for that.Over to you Sanjeeta--
Thanks Divya for letting me share this recipe with all your lovely readers, hope they like this treat fro Lite Bite!
These crisp and scrumptious looking Oatmeal tarts with fresh fruits & yogurt
filling was our weekend dessert and must say that its filling and yummy till the last bite. Oatmeal added in the recipe to make the crust gives a lovely texture and makes the base healthier. I used hung yogurt to make the filling, you could use a filling of fresh cream and fruits for more exotic tarts.


Ingredients;


For crust;
• 1/2 cup quick cooking oats
• 1/2 cup whole wheat flour
• 1/2 cup all purpose flour
• 1/2 cup olive oil
• 2 tbsp. granulated sugar
• 2 tbsp. or more milk
• 1/2 tsp. cinnamon powder
• A pinch of salt


Filling;
• Thick yogurt/curd
• 1 cup diced Fresh fruits
• 1/2 cup castor sugar


Method; 


Lightly roast the oats for a few minutes and grind it into fine powder along
with sugar in a food processor.
Take a large vessel and combine ground oats, whole-wheat flour, all purpose flour, salt, cinnamon powder and mix well with a fork.
Add olive oil and mix all the ingredients together using a fork or your fingers.
Pour milk a teaspoon at a time and combine the mixture till all the ingredients come together and make hard dough.
Turn the dough on a floured surface and knead it lightly for a few minutes. 
Take a small ball of dough and roll it into a small circle if you are using mini tart shells, or make a large circle for a single pie dish.
Grease the mini tart shells with oil and line the small circles of dough in it, pressing it to fit perfectly all around the corners. Trim the edges if you wish, I like rugged looking tarts and did not trim mine.
Make small slits (cuts) in the crust using a fork. You can blind bake these tarts with dried beans for crispier base. I did not use any and baked the tarts for 15 minutes at 200°C.
Remove form oven and let the tarts cool completely.
Mix all the ingredients for filling, fill the oat tarts with it and chill them before
serving.


Notes;
1. Use very thick yogurt which is completely devoid of whey.
2. Srikhand made with curd is a yummy and healthy filling for this tart.
3. You can make the filling with cream by beating it lightly and mixing all the
fruits to fill the tarts.
4. Make sure to fill the tarts just before serving, else it will make the base soggy
and less crispy.
5. Sliced fruits will release water when mixed with yogurt thereby making the
filling quite runny. Add fruits to the thickened yogurt just before serving.


Wednesday, February 1, 2012

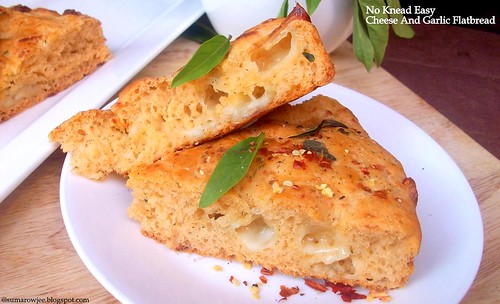
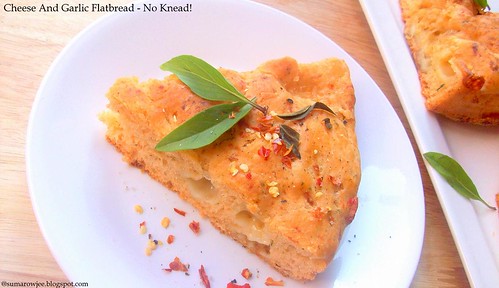
No Knead Cheese & Garlic Flatbread - A guest post by Suma

When I look into my archives every once in a while,I know one area which lacks posts is in the bread section.I've baked very little breads and I really don't know why I am apprehensive when it comes to baking it.I've got good quality yeast with me and foolproof recipes too,but something is lacking somewhere.So when I asked Suma of Cakes and More for a guest post,I was kinda hoping that she'd bake bread and Voila,she did!


Suma,a fellow blogger,a keen baker and a good friend,agreed instantly when I asked her to do a post for Easycooking readers,though it was at a very short notice.Check out her recipe for a simple no knead bread.Over to Suma.
9 nine Cheese And Garlic Flatbread 082 
I am extremely happy and honored to be guest-posting for Divya, one of my favorite bloggers and friends. I am also very excited as this this my first ever guest post! Thanks so much Divya, for giving me this opportunity to share a recipe, connect with the readers of Easycooking. Oh! I think I forgot to introduce myself first - This is Suma, I blog at Cakes And More,a blog which is basically about baking, some desserts and a bit of traditional cooking thrown in as well. Like most of us, I am obsessed with food, baking particularly. I started writing my blog when I was making all of  2 desserts and baking 4 3 2 cakes which summed up my baking world, hence had given my blog the name.  

Now after 2 years, along with a couple of other new things, yeast is my new, big time, growing obsession. I am discovering how magical, rewarding and satisfying, not to mention delicious, baking bread at home can be. But then, I can be really lazy at times. But again, good food, and good food in a hurry, is a bare necessity of life! No knead breads come as a savior as they can be put together with minimum fuss and effort. And your home will be smelling of freshly baked bread in no time at all. Its even more fun as you could play around with the recipe and create breads with different flavors. 6 six Cheese And Garlic Flatbread 061 

The flat bread or focaccia here is one which I have previously made a few times. A versatile recipe, this can be made with the flavors of coconut and lime,just some Italian herbs and garlic or with a couple of tablespoons of tomato puree, chopped fresh coriander and green chillies if that is your flavor. Or even sun dried tomatoes or jalapenos or olives if you love them. Made with just some herbs or with the additions, this will taste good. I must repeat, at the cost of boring you, breads are versatile and baking with yeast gives a very different high altogether. A high every home baker must absolutely experience...

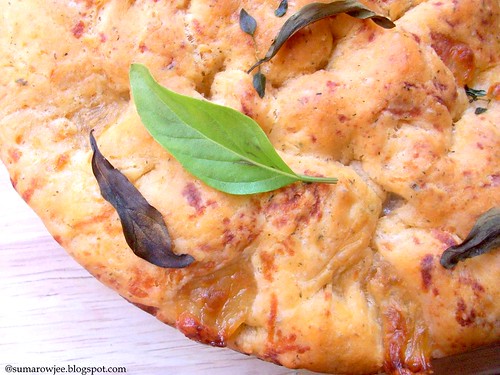
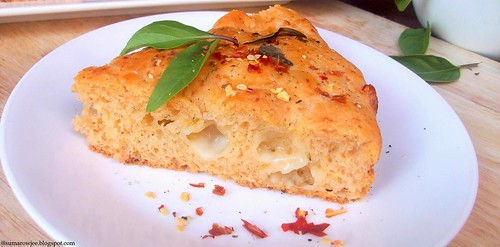
Here is another variation with roasted garlic and cheese, Cheese and Garlic focaccia from the King Arthur Flour site, a site I love for all their fabulous recipes, reviews and very useful tips. This is a variation of the No fuss Focaccia .The idea is a mildly garlicky, soft, slightly chewy, herbed  flat bread with bits of cheese in between bites. I have added a bit of pizza sauce to the batter to give it a hint of tomato and pizza flavor of course (doesn't taste the same as pizza though). You could omit the sauce and use the rest of the ingredients if you wish it to be tasting only of herbs, cheese and garlic. 

This is half the original recipe, which I have baked in a 9'' round tin. You normally do not need to line the tin to bake a focaccia as you want the bottom crust to be crispy. After reading the reviews about the melting cheese making someone's bread stick to the pan, I thought its better to line the tin and sacrifice the crispy crust ...for the joy of getting the bread out of the tin in its whole..sorry, full glory!

Here is what we need 4 four Cheese And Garlic Flatbread 030 


Ingredients:

For the batter 
All Purpose flour - 1 1/2 cup plus 2 tablespoons / 210 grams
Warm water - 1/2 cup
Pizza sauce - 2 tablespoons plus 2 tablespoons water (to make a total of 1/4 cup liquid, please read notes)
Dried thyme (or your favorite dried herb) - generous heaped 1/2 teaspoon 
Chilli flakes - 1 teaspoon or to taste
Salt - 3/4 tsp
Instant yeast or Active dried yeast - 1 1/2 teaspoons ( I use instant)
Sugar - 1/2 tsp
Oil - 1 1/2 TBSP plus more for greasing the pan 

To mix in 
Roasted garlic pods - 3, medium sized (not more, as yeast doesn't love too much garlic, says the KAF site), mashed or chopped fine
Mozzarella cheese, cut into 1/2'' cubes - 100 grams or more (I use Amul) (Recipe suggests cheddar, Monterey Jack or flavored cheddar)

For the topping
Oil - 1 1/2 teaspoons (I used olive oil)
More dried herbs for topping 
Basil leaves - a few 

Procedure: Grease and line the bottom and sides of a 9'' round tin. Grease again. Sift the flour, salt, chilli flakes and dried thyme to mix well. Keep aside. In a large bowl, take the sugar and the yeast. Add the warm water ( If using active dried yeast, you would need to proof it first using the warm water, yeast and sugar, let it stand for about 5-10 minutes till frothy and then proceed with the next step). Add the sauce mixed with water and the oil.  Mix. Tip in the flour mixture . Stir with a wooden spoon till all the flour is incorporated. Then beat 20 times with the spoon. The batter will be sticky. Mix in the chopped garlic and the cheese cubes. Transfer the batter to the greased tin. Push gently with greased hands to cover the entire pan. Spread some oil lightly over the surface. Dimple the dough with your fingers. Cover with a greased aluminum foil and let rise in a warm place for an hour. The dough will be puffy (not necessarily double the volume) at the end of one hour.

Towards the end of the rise period, pre-heat oven to 190 degrees C / 375 degrees F. Drizzle oil on top. Remove the foil, sprinkle the herbs and the basil leaves. I do not think it would be a good idea to top with cheese as it will get almost burnt by the time it bakes. Bake for 35 -40 minutes or till light golden brown on top. The bread will not brown a lot as there is very little sugar in the batter. The bottom should sound hollow when tapped. It should read between 200-210F on an instant read thermometer. Cool on the wire rack in the pan for 10 minutes, then remove from the pan, place on the rack and cool further.

Slice when it is still a bit warm (not when hot). You do want to eat the bread when the cheese is still a bit gooey right? It doesn't taste all that bad either when its completely cool too. Ever heard of cheese tasting terrible at room temperature? But melting cheese is something I have no complaints eating whatsoever. How about you? seven  7 Cheese And Garlic Flatbread 071 
Please note: If you not wish to use the sauce, omit it and use water instead. You will be using a total of 3/4 cup of water for the entire recipe. Do not add more sauce unless you want the bread very tangy. Use good quality dried herbs for maximum flavor. 


Ooops!  when I introduced myself, I forgot to mention, I do tend to go a bit overboard when I talk!  Thank you for reading my post, hope to see you again! Thanks again Divya, it was fun doing this post for you!

Related Posts Plugin for WordPress, Blogger...
 
Pin It button on image hover